
(终极第一人称射击文档)
© 强制保留所有权利。
|
(终极第一人称射击文档) © 强制保留所有权利。 |
|
目录
在你的项目中使用简单的玩家预制组件(player prefabs)
调整后坐力(recoil 反冲,后退,退缩,反跳,跳回,反冲力)
输入速度刻度(Input Velocity Scale 目前难以理解)
最大输入速度(Max Input Velocity 目前难以理解)
需要地面接触点(Require ground contact)
避免相机裁剪(Avoiding camera clipping)
选择模型武器穿透解决方案(Choosing a world intersection solution)
轴点 or 参照点 or 中心点的硬度(Pivot Stiffness)
轴点 or 参照点 or 中心点的阻尼(Pivot Damping)
显示轴点 or 参照点 or 中心点的(Show Pivot)
跌落时重心下降柔性参数(Kneeling Softness)
输入速度刻度(Input Velocity Scale 目前难以理解)
最大输入速度(Max Input Velocity 目前难以理解)
弹簧旋转 or 弹性旋转(Rotation Springs)
轴点 or 参照点 or 中心点的硬度(Pivot Stiffness)
轴点 or 参照点 or 中心点的阻尼(Pivot Damping)
显示轴点 or 参照点 or 中心点的(Show Pivot)
跌落时重心下降柔性参数(Kneeling Softness)
输入速度刻度(Input Velocity Scale 目前难以理解)
最大输入速度(Max Input Velocity 目前难以理解)
The quickest way to set up a new melee weapon
1. Decide how the weapon should move
4. Assign the states to the weapon component
Setting up a basic, ragdolled player body
Enabling animation, headlook and ragdoll handler
Removing head clipping and extra arms
Adding weapon props for 3rd person
Adjusting the position and rotation of weapon props
Defining spawnpoints for muzzleflashes and shell casings
Calibrating 3rd person weapon aim
1) The main Body object, childed to the root player gameobject
3) The "Lowest Spine Bone", assigned to slot in the bodyanimator (1)
4) The "Head Bone" assigned to slot in the bodyanimator (1)
5) Right hand gameobject (parent of 3rd person weapons)
Parameters of the UFPSExampleAnimator
In Local 3rd person / Remote players
Recommended components and scripts to study
Where to find the 3rd person code?
Why is the bullet always fired from middle of camera in 1st person?
What exactly does the ragdoll handler do?
Using the "Generate Remote Player" wizard for AI and multiplayer
The player model walks away from the charactercontroller
My ragdoll keeps falling over backwards, but I want it to fall over forwards
My remote player or 3rd person player starts swiveling around its hip like crazy
The camera shakes violently when I move
Headlook is weird somehow: head tilts to / rests on shoulder or looks in wrong direction
When I aim or shoot in 3rd person, the hand of my character points in a wrong / unnatural direction
When I calibrate weapon aim, the next time I start the game it's broken
Activating and deactivating states
Anatomy of a bullet hole decal prefab
Disabling quad raycasts per-projectile
Making bullets ignore triggers
Spawning certain impact effects such as blood on enemies
Preventing decals from attaching to enemies
Creating a MuzzleFlash prefab from scratch
Creating a Shell prefab from scratch
MinRespawnTime & MaxRespawnTime
Enabling a weapon for inventory use
Step 1/2: Declare an ItemType for your weapon
Step 2/2: Add an Item Identifier to the FPS weapon
Limit specific items by Amount
Limit items by Volume or Weight
Setting zero item restrictions
Setting unlimited ammo & items
Spawning an Explosion from script
Assigning the MovingPlatform layer
Scripts that sit on scene objects
Scripts that sit on effect prefabs
ImpactEvents and SurfaceEffects
Defining a fallback effect for when the ImpactType is unknown
Setting up a SurfaceEffect from scratch
Enabling blood effects on the player
Vertex Raycast Interval (sec) and Decals Per Batch
Interval mode with player body feet
Interval mode with "dummy" feet
Using a state to temporarily silence footsteps
Setting up a Foot FX Handler on your player
Tweaking AudioSources for footsteps
Recommended AudioSource settings for footstep sounds
Adding new footstep sounds to your game
Setting up footstep sounds for multiplayer
Using 'Muting local footsteps' for multiplayer testing
Making footsteps audible behind your back
Making a Rigidbody emit SurfaceEffects on collision
Item pickup ground drop effects
Advanced Surface System Topics
Limitations due to system architecture
Limitations due to Unity architecture
Choosing a footstep detection mode
Preventing bugs when pooling objects
地表系统故障修复(Surface System Troubleshooting)
My surface fallback does not work
I have put a vp_SurfaceIdentifier on an object but it does not seem to work
SurfaceEffects don't work on a static, multi-material / atlas map object
Bullets make the wrong (or no) sound when hitting the player
Trouble getting decals to show on a uniformly scaled object
Trouble getting decals to show on a non-uniformly scaled object
In a standalone build, decals show up as stretched on a non-uniform, static object
Decals have not been removed when an objects respawns
Footsteps won't trigger in 'Detect Camera Bob' mode when I'm walking slowly, backwards or crouching
No footsteps / effects on terrain
Project Settings (IMPORTANT)
Make these settings before play
Make these settings before play:
Make these settings before play
Scene root objects (not childed to each other)
Other unnecessary camera states
VR mode forced runtime changes
Limitations and unsupported features in VR
The unity editor just crashes when I press play in VR
VR mode doesn't work / behaves oddly
Oculus Headset is not tracking
"Error (vp_VRCameraManager) 'CenterEyeAnchor' is not assigned."
My VR character suddenly seems taller or shorter than normal / I can't reach down to the pickups.
I suddenly can't fire / interact / rotate
I can't fire in a standalone VR build
Snap rotating with the gamepad is unresponsive / slow
Snap rotating with the mouse is crazy sensitive
Rotating with the right gamepad stick is very sensitive / unsensitive
I can't move with the left gamepad stick but rotating with the right stick works
I can't rotate with the right gamepad stick but moving with the left stick works
I can't toss a grabbed rigidbody with the fire button using a gamepad
Interaction detection seems to be offset by a few decimeters in VR
The player slides a little when picking up items by pressing the Interact button in VR
My player does not trigger footstep effects in VR
Rigidbody objects move with a stutter
Setting up basic gamepad buttons and axes for a new project
Setting up Left- and Right Trigger axes as buttons for a new project
Updating the Input Manager for an existing project (pre UFPS 1.6)
If you don't have a lot of custom bindings
If you have lots of custom bindings
Position, Velocity, Angles and Directions
Teleport(Vector3 position, Vector2 rotation)
Teleport(float x, float y, float z, float pitch, float yaw)
Teleport(float x, float y, float z)
Teleport(vp_SpawnPoint spawnPoint)
Transform GetLookTransform(float maxRange, int layerMask)
Damage(float damage, Transform source, vp_DamageInfo.DamageType type)
Damage(vp_DamageInfo damageInfo)
Die(float painHUDIntensity = 0.0f)
SetWeaponByName(string gameObjectName)
vp_ImpactEvent FootstepFXImpactEvent
vp_ImpactEvent FallFXImpactEvent
vp_ImpactEvent JumpFXImpactEvent
CameraShake(float force = 0.5f, AudioClip audioClip = null, AudioSource audioSource = null)
GroundStomp(float force = 0.5f, AudioClip audioClip = null, AudioSource audioSource = null)
ShowMouseCursorAndAllowMouseLook()
Introduction to the event system
Understanding event driven code
Finding the lines that SEND an event
Finding the methods that LISTEN to an event
2. Making the PlayerEventHandler available to the scripts
3. Registering a target script with the event handler
Activity additional properties
What's the difference between an Activity and a State?
Scheduling actions using vp_Timer.In
Delegates with multiple arguments
Running a timer forever using vp_Timer.Start
When to implement ObscuredTypes?
Changing a variable in ANY SCRIPT into an ObscuredType
Changing a variable in a UFPS SCRIPT with a STATE MANAGER into an ObscuredType
Preventing obscured value reset in prefabs when updating UFPS
'Unsupported type' editor error message
ObscuredTypes do not work with the ternary operator
There is no Vector4 ObscuredType
Sending an ObscuredType variable across the network in Photon PUN
支持和附加信息(Support and additional information)
Congratulations on your purchase of UFPS! A whole new world of amazing FPS immersion is now at your fingertips. Many thousands of hours of work has gone into the design and programming of these systems and we hope you'll have tons of fun with them!
At the core of UFPS is an advanced procedural camera system, allowing you to manipulate the camera and weapon model for a vast range of complex, realtime-generated behaviors. Combining this with traditional animation can result in super-lifelike motion rivaling the best AAA games out there!
Imagine having an artillery shell detonate nearby, shaking your arms and the camera violently while you desperately attempt to reload a shotgun. Shell shocked, your vision, hands and movement pattern are disturbed for a while before returning to normal ...
In summary, the main emphasis of UFPS is immersive first person motion. That said, it is currently being expanded into a full FPS framework that will eventually cover every aspect of a first person game. It can already be used as a cornerstone for a new FPS. Great effort has also gone into keeping it modular, so you should be able to pick it apart and use bits and pieces of it in your existing systems.
Hope you'll have as fun working and playing with this system as we are having building it! Feel free to show off your game or participate in the official forum discussion at:
www.opsive.com/assets/UFPS/forum/
Also, stay up-to-date on current developments by following us on twitter:
Good luck with your game!
The walkthrough demo is fairly self-explanatory. Use the big arrows at the top of the screen to navigate back and forth between screens. Press the buttons to try out various settings.
|
WASD |
Move |
|
C |
Crouch |
|
Space |
Jump |
|
Shift |
Sprint |
|
R |
Reload |
|
Middle & Right Mouse Button |
Aim Down Sights / Zoom |
|
F |
Use |
|
G |
Toggle GUI |
|
ESC |
Quit app (if offline standalone player) |
|
Enter |
Toggle menu |
This scene, made with ProBuilder, is an example of how UFPS can feel and behave in a real game environment. It's a sci-fi museum populated by dangerous security turrets programmed to annihilate any intruder (you). Collect the small arsenal of HD weapons near the initial spawnpoint and see if you can make it around the museum!
This scene (located in the "Demo/Levels" folder) is a simple terrain with a basic first person camera and controller, intended for prototyping and experimentation.
This scene (located in the "Demo/Levels" folder) is designed as a test range using a Half Life "orange map" style. Its content and FPS player is tightly integrated into a walkthrough of the most important features.
This scene is as test range for physics testing. It has an extra "slidy" player and several ramps tilted at various degrees for different test cases. It also has examples of various types of moving platforms. To shut off the demo walkthrough, disable or delete the "Demo" gameobject in the scene Hierarchy. Upon pressing Play you can now run around freely.
This scene is an outdoor environment with a base and a bunch of explosive cubes, breakable crates and pickups of various kinds. It is a demonstration of how to put some of the example gameplay scripts to use. To shut off the demo walkthrough, disable or delete the "Demo" gameobject in the scene Hierarchy. Upon pressing Play you will be able to explore freely with an advanced FPS player.
|
|
|
IMPORTANT: If you have a fresh scene with an auto-created Main Camera object in it, delete this object (or atleast its Audio Listener) or you will get Unity warnings in the console. |
If you are like us and skip through manuals, here's what you really need to know: UFPS is all about FP components, States and Events.
An FP script is a Unity component designed to be part of a local, First Person player. These all have names beginning with "vp_FP" and include the Player, the Controller, the Camera, its Weapons and their Shooters.
A State is a list of settings for a specific component during a specific activity. For example: the camera "Crouch" state has values in it defining a lower Y-position for the camera. The controller's "Crouch" state makes it slow down. States are saved in small scripts called 预设(Presets).
Events are how FP components communicate. For example: when the character controller detects a ground impact from falling, it sends the force of impact to the Player Event Handler, which in turn broadcasts it to the camera and weapon components (making them shake).
|
|
|
TIP: If you are planning to do even just a little scripting with this system, it is a good idea to first have a glance at the 事件系统(Event system) chapter, and you will have more AHA! moments and fewer headaches. |
Sliders are used to modify most variables. Text edit fields are used for variables with no limited range. Note that you can click and drag the text in front of a text edit field (for example the X) to adjust the value with the mouse.
Pressing and holding Alt while doing this gives you finer control. This is very useful when adjusting particular values, for example weapon position offset
Any time you want to toggle back and forth between the Inspector and the Game view without firing shots:
The Unity Editor has a neat highlight feature which simplifies navigating for assets. To locate a text asset you see in a component State list, simply click on it and the text asset will be highlighted in the Project view. This gives you quick access to close by text presets compatible with the current component. You can also click directly on a text file in the Project view to inspect its values.
Another great way to quickly locate text assets is to write part of their names in the Project view search box).
UFPS will communicate any detected errors and warnings via the Unity console. It's always a good idea to be aware of any red (Error) or yellow (Warning) messages it might display.
Most Unity crashes will result in an error message being shown in the console bar at the bottom left of the screen.
Click on the icon to open the full list of errors.
|
|
|
IMPORTANT: The displayed error may not be the one that caused your application to become unstable. To find the real source of a crash, you must often look further up the error list. The first and topmost (red) error message is often the culprit. Finding the name of the script and the line number of the crash in this way will often lead to AHA! moments. |
To get started scripting with UFPS, check out the 基础脚本(Basic scripting) chapter. It will give you a very good overview of what the system can do in terms of manipulating the player object.
When you feel comfortable with the basics, it's a good idea to read up on the 事件系统(Event system) and 计时器 定时器(Timers) (both are central concepts to UFPS).
Browsing through the scripts is also a great way of learning how the systems work. UFPS has very rich code commenting, and scripts will often contain additional useful info not found in the manual.
All methods in the included scripts use XML <summary> tags. Depending on your IDE (e.g. MonoDevelop / Visual Studio), this means you should be able to mouse-over on a method name in the code (or on a member name in a pop-up list) to display a brief description.
The "vp_" prefix is a legacy from the original UFPS development team, VisionPunk. It will be removed in UFPS version 2.0, which is being developed by Opsive.
The demo scenes and prefabs will be sufficient for getting to know the system and playing around with its various parts. Once you're ready to dig a little deeper, these player creation tutorials will be good next steps for learning how things are set up.
|
|
|
TIP: Remember to clear the Project view search box when done. |
|
|
|
TIP: If you have more than one weapon, it's a good idea to prefix the name of your weapon object with a number. This will not only define weapon order in the hierarchy. It will also control the order of the weapons when toggled.
|
|
|
|
A weapon prefab means a prefab containing a mesh filter, a mesh renderer and materials.
For more info about prefabs and how to set them up, see these articles:
|
Using a weapon camera will prevent the weapon from intersecting other objects in the scene, and will give you greater control over weapon appearance. Though this is optional, in most cases you will want one.
|
|
|
IMPORTANT: You should only create one weapon camera (not one per weapon).
|
That's about it! There are obviously many more powerful features and things to learn about the various components. Play around and browse this manual for information and ideas.
One of the really unique and cool things about UFPS is how it makes heavy use of procedural motion for animating the camera and weapons. This means it is not dependent on "regular" animations. Instead, most motion is generated in realtime depending on player input, movement, and external physics forces, which makes everything a lot more organic and natural. You are one with the camera and weapons.
Another huge benefit of procedural motion is that you don't have to animate every weapon individually. You don't even have to know a single thing about animating models! As long as there is a static 3d model, UFPS will animate it for you in realtime. Once you have motions for one weapon type - for example a pistol - the motions work instantly on all pistols with minor tweaks.
Here's the thing: using procedural motion in conjunction with traditional animation can result in incredibly realistic and lifelike motion, strongly promoting suspension of disbelief and giving your game a special edge.
The main workhorse of UFPS is a spring system that operates on transform position, rotation or scale. The spring has a Rest State (also known as the "static equilibrium") where it "wants to be". If you move it away from the target value using external force, it will immediately and continuously strive back to its target position or angle. The spring Stiffness - or mechanical strength - determines how loosely or rigidly the spring behaves. Finally, the Damping makes spring velocity wear off as it approaches its rest state. Springs can be used to simulate everything from jello (a loose spring operating on object scale), an arrow hitting a wall (a very stiff spring rotating the arrow with the pivot at the head) or an underwater camera (a loose spring making the camera bounce softly as your feet hit the ocean floor).
Bob is the sinusoidal motion of an object or the camera. View bob has been around in first person shooters for ages as a means of moving the camera up and down when walking. Modern shooters don't always have a very pronounced view bob, but bob is still very useful for animating the weapon model (and camera if used in moderation). If applying bob along both the x and y vector you can get interesting results such as the feeling of being a dinosaur or a huge ogre.
Procedural noise has been used in computer graphics and special effects for years as a means of generating smoke, terrains and camera shakes (to name but a few areas). UFPS uses a standard perlin noise function for applying random turbulence to the weapon and camera. For example: a slight breathing camera motion as you zoom in with a sniper rifle, gentle idle movements for a hand holding a sub machine gun, or the heavily disturbed camera movements of a character that is drunk or poisoned.
Since UFPS' procedural motion systems only operate on a model's pivot and transform, they won't handle more complex animations. For example, if you want to do things "inside" the weapon model - such as bending an arm or fingers - you have to use a model with animations (this is also true for pistol / rifle reload animations).
That said, UFPS provides plenty of hooks for playing such weapon animations, e.g. when wielding, unwielding, firing and reloading weapons. The weapon class even has a cool ambient animation scheduler which will play a random idle animation from a list provided by you at random intervals. For more info about this, see the 动画(Animation) section of the Weapons chapter.
UFPS makes massive use of our own timer logic, vp_Timer. This is a very powerful and easy-to-use script extension for delaying (scheduling) methods (such as animations or physics force impacts) with a time delay. The system has many commands an options and is well worth checking out for all sorts of sequential animation and gameplay programming tasks.
|
|
|
The pistol reload animation in the demo was actually made using procedural animations only. It was an experiment to see how far we could push the motion systems using only springs and timers. For more info, study the comments in the vp_PistolReloader script.
|
vp_FPController is an extended character controller designed to work perfectly with the vp_FPCamera class. It features acceleration, sliding, air control, wall bouncing, external forces and the ability to push around rigidbodies.
The controller doesn't rotate by itself. To rotate it via mouselook, add an FPCamera to its hierarchy as described in the Creating an FPS Player from scratch chapter.
The Motor foldout contains all basic movement parameters of the FPController.
The amount of world velocity added to the controller every frame when
moving.
How quickly velocity should deteriorate when movement stops. Low values will get you a "slippery floor" or icy feeling. High values will slow down the controller.
|
|
|
TIP: If you're not a big fan of "slidy" controls, set both Acceleration and Damping to 1 and reduce damping until you're happy with the walking speed. This will get you a controller that stops abruptly. |
|
|
|
TIP: If you want to tweak the controller for a specific real world max speed, you may output the player's speed in meters per second using this line of code:
Debug.Log(Controller.Velocity.magnitude); |
A factor determining how fast the controller can move when it has no contract with the ground (jumping, falling or flying). A value of 0 means the player can not move sideways at all when flying (like a real world human). A value of 1 means the player can move as quickly in the air as on the ground. This is often used in games to increase the feeling of control, especially if platform jumping is a gameplay element.
This value increases or decreases controller velocity on upward slopes. At 1.0, velocity on upward slopes will be kept roughly the same as on flat ground. Values lower or higher than 1 will make the controller slow down / speed up on upward slopes, respectively.
|
|
|
TIP: The slope speed feature can be especially useful on outdoor terrain; try setting "Slope Speed Up" to 0.5 and "Slope Speed Down" to 1.5. This will slow down the controller moving uphill, and give it a speed boost running downhill. |
This value increases or decreases controller velocity on downward slopes. At 1.0, velocity on downward slopes will be kept roughly the same as on flat ground. Values lower or higher than 1 will make the controller slow down / speed up on downward slopes, respectively.
When active, this enables a throttle logic for moving a flying controller in an arbitrary direction based on player (camera) forward vector. This can be used for many things in an FPS, for example spectator cams, ingame editor modes, zero gravity, swimming underwater, jetpacks and superhero style flying. Free fly movement can be toggled at any time. This feature works best if the Physics > Gravity Modifier is zero or very low.
|
|
|
Jumping and crouching behaves differently in Free Fly mode. The Jump activity will make the camera go straight up. The Crouch activity will make it go straight down. The collider will only shrink upon crouching if the controller has ground contact. |
The Jump foldout contains parameters allowing you to design a highly customized jumping behaviour for your player.
The amount of up-force that is added to the character controller in a single frame when the player jumps. The height of the jump is slightly influenced by the gravity modifier.
This parameter determines how quickly the jump force wears off.
The amount of force to add per frame if the jump button is being held down continuously. This is a common feature for providing increased jump control in platform games. A large value here will have sort of a jetpack effect. To remove this feature, just set it to zero.
Determines how quickly the hold jump force wears off.
The Physics foldout contains parameters governing how various laws of nature should affect the controller.
This value scales how receptive the controller is to scripted external forces such as explosion knockback. A value of 1 means it is not affected at all, like an extremely heavy object. A value of 0 means the controller will be affected enormously, as would a very light object.
This value determines how "strong" the controller is when pushing around physical objects (rigidbodies). Rigidbodies with larger mass will be harder to move.
The gravity modifier regulates how much the controller will be affected by gravity. Higher values give a heavier feel. The "Physics.Gravity" value of the Unity Physics Manager affects the object aswell.
The ground steepness in angles above which controller will start to slide.
Slidiness of the surface that we're standing on. Will be additive if steeper than the (regular Unity) CharacterController's "slopeLimit" parameter.
|
|
|
TIP: You can alter PhysicsSlopeSlidiness and SlopeSlideLimit in realtime using the state manager depending on the current ground surface, for example by enabling a special sliding state on the vp_FPController via a trigger. |
This feature makes the character controller bounce when moved by external forces such as explosions , giving a slightly more organic feel on wall collision (note that it does not apply to regular player movement).
This feature determines how much the character controller should slide against surfaces when moved by external forces such as explosions (note that it does not apply to regular player movement).
The collision trigger is a scripting feature used for interacting with rigidbody objects such as 运动平台(Moving Platforms). When this is active (default) a child gameobject is generated on startup, with an encompassing capsule collider trigger. This is to allow physics responses to incoming rigidbodies.
|
|
|
IMPORTANT: Without a trigger, the controller will still be able to ride on moving platforms, but the platforms will not auto-start when stood upon and will not be able to push the player around or use its intersection solver.
|
|
|
|
The collision trigger may sometimes affect raycast or trigger logic. If you are experiencing issues with raycasts not hitting the player, make sure the raycast hits the actual charactercontroller, or send a message from the trigger to the controller using "SendMessageUpwards". See how this works in the vp_HitscanBullet script.
|
The vp_FPCamera class governs all behaviour of the first person camera
which is a child to the main player gameobject.
It features mouse smoothing, view bob, camera shakes, smooth zooming, kneeling and reacting to
external forces among many other things.
Sets mouse sensitivity in the X (yaw) and Y (pitch) axes.
Mouse smoothing interpolates mouse input over several frames to reduce jerky player input. "Smooth Steps" determines how many of the most recent frames of mouse input to average. A typical value is 10.
"Smooth Weight" determines the influence of recent mouse input as it ages. Reducing the weight modifier to 0 will provide the user with raw, unfiltered feedback. Increasing it to 1.0 will cause the result to be a simple average of all the recently sampled smooth steps (and will feel very laggy). A typical value is 0.5.
Mouse acceleration increases the mouse sensitivity above certain speeds. Along with low mouse sensitivity this allows high precision without loss of turn speed. It gives you optimal precision at slow mouse movements (for example when sniping), but will also allow you to turn 180 degrees quickly to aim at someone behind you.
Describes the speed above which mouse acceleration will be activated. If you move your hand above this set speed, mouse acceleration will kick in.
Sets the target FOV of the first person camera.
Determines how fast the camera will interpolate to the target value when FOV is changed from script. Higher values result in slower zoom.
This setting will temporarily disable the setting 'Virtual Reality Supported' (found under Project Settings) when the vp_FPCamera wakes up, and re-enable it when needed. This may seem counter-intuitive for a VR game, but is an important workflow feature. For more info, see this section in the VR chapter.
The camera position is hooked to two springs, allowing for a host of interesting effects. The
first, "regular" spring is used for reacting to player movements that need a soft spring setting. The second
spring is intended for external forces that require stronger spring settings, such as the camera shaking
violently from an artillery impact.
Camera position offset relative to the player. For example: to create a crouch animation, you can smoothly lower the camera with the Y-offset. To peek around corners without moving the character, you can move the camera sideways using x-offset.
This position is where the camera "wants to be". If you move it away from the target value using external force, it will immediately try to go back to the target position.
A vertical limit intended to prevent the camera from intersecting the ground. The value is in negative world units relative to the camera position. It determines how far below the normal head position the camera is allowed to go when kneeling or reacting to external forces or camera bob.
Camera spring stiffness - or mechanical strength - determines how loosely or rigidly the camera spring behaves. A low value will result in a soft, swaying motion, and higher values will result in stronger spring movements.
Camera spring damping makes spring velocity wear off as it approaches its rest state. Low values will result in a very loose, swaying motion, while higher values can result in either motion that quickly grinds to a halt, or a stiff shaking motion (much depending on the spring stiffness setting).
Stiffness for the secondary camera spring. This spring is intended for external forces. It does not automatically do anything. Instead, activate it using the "AddForce2" script function of vp_FPCamera. See the DemoScript for example usage.
Damping for the secondary camera spring. This spring is intended for external forces. It does not automatically do anything. Instead, activate it using the "AddForce2" script function of vp_FPCamera. See the DemoScript for example usage.
Determines how much the camera will be pushed down when the player falls onto a surface.
The number of frames over which to even out each fall impact for kneeling. A higher number will slow down the kneeling. A lower number will be more 'snappy'.
Exaggerates or reduces the down force imposed on this camera by earthquakes.
The camera is mainly rotated by mouse input and camera shakes. It also has a rotation spring, mostly used for rotating around the Z vector (rolling) by means of external forces.
Limits vertical mouse rotation of the camera.
Limits horizontal mouse rotation of the camera. Useful mainly for creating things like gun turrets. It could also be useful for players mounted on vehicles, let's say a player shooting out of a car side window.
Determines how much the camera will be rotated when the player falls onto a surface. There is a 50% chance the camera will rotate left versus right upon impact.
The number of frames over which to even out each fall impact for kneeling. A higher number will slow down the kneeling. A lower number will be more 'snappy'.
This variable rotates the camera depending on sideways local velocity of the character controller, resulting in the camera leaning into or away from its sideways movement direction. It's useful when moving and crouching. Larger positive values (2.0 and above) will result in a motorcycle or airplane type behaviour.
Exaggerates or reduces the rotation force imposed on this camera by earthquakes.
UFPS uses a standard perlin noise function for applying random turbulence to the weapon and camera. For example: a slight breathing camera motion as you zoom in with a sniper rifle, gentle idle movements for a hand holding a sub machine gun, or the heavily disturbed camera movements of a character that is drunk or poisoned.
Determines the shaking speed of the camera.
The strength of the angular camera shake around the X, Y and Z vectors. X and Y shakes are applied to the actual controls of the character model while Z is only applied to the camera. If you increase the shakes, you will essentially get a drunken / sick / drugged movement experience. This can also be used for i.e. sniper breathing since it will affect aiming.
View bob is the sinusoidal relative motion of the camera, hooked to character controller velocity. If applying bob along both the x and y vector you can get interesting results such as the feeling of being a dinosaur or a huge ogre.
Speed of the camera bob. X, Y and Z is positional motion. W is roll around the forward vector (tilting the head from left to right). A typical value for Y is 0.9.
The strength of the camera bob. Determines how far the camera swings in each respective direction. For camera bob, X, Y and Z is positional motion. W is roll around the forward vector (tilting the head from left to right). A typical value for Y is 0.1.
A feature for syncing bob motion with a script callback. The bob step callback is triggered when the vertical camera bob reaches its bottom value (provided that the speed is higher than the bob step threshold). This can be used for footstep sounds and various other behaviours.
This feature is not automatically used by the camera (although external components such as the vp_PlayerFootFXHandler will hook into it). If you want to use it for additional purposes, you need to provide a callback through script. Here is an example of how to set up a bob step callback:
Camera.BobStepCallback += delegate()
{
Camera.AddForce2(new Vector3(0.0f, -1.0f, 0.0f));
};
This snippet will apply a sharp stomping motion on the camera for every footstep. It will be called once whenever the camera reaches its lowest bob point and changes direction
This tweaking feature is useful if the bob motion goes out of hand after changing player velocity. Just use this slider to scale back the bob without having to adjust lots of values.
A cap on the velocity value being fed into the bob function, preventing the camera from flipping out when the character travels at excessive speeds (such as when affected by a jump pad or a speed boost).
|
|
|
TIP: The current speed used by the camera bob can be displayed in script using:
Debug.Log(FPController.Velocity.sqrMagnitude); |
This determines whether bob should stay in effect when jumping, falling or flying. Disabling this is useful for doing flying dinosaurs, underwater movement et cetera.
In UFPS, 1st person weapons are implemented by adding empty child gameobjects to the FPCamera transform and dragging vp_FPWeapon components onto each gameobject.
When the game starts, any such gameobjects are put in a list and may be toggled on or off from script. The weapons are arranged in alphabetical order, so you have great control over the order of your weapons, e.g. by putting numbers at the beginning of their names in the Hierarchy.
The runtime responsibility of the vp_FPWeapon component is to animate a weapon using its procedural motion properties. This means the component will manipulate the weapon transform's position and rotation using springs, bob and perlin noise. For more info about this, see the Animation Concepts chapter.
|
|
|
Note that the vp_FPWeapon class is not responsible for shooting logic, only for motion resulting from player movement or external forces. This is because an FPWeapon is not necessarily a firearm. It could just as easily be a knife, an axe, a crowbar or a couple of fists. All firearm specific features exist in a separate class called vp_FPWeaponShooter. |
|
|
|
In UFPS, weapon availability is not controlled by adding or removing weapon gameobjects to the FPCamera hierarchy dynamically. Instead, the camera hierarchy is meant to parent all the weapons the player will ever be able to carry. The game code simply allows or prevent the player from activating these depending on the inventory state. By default, this is handled by the vp_WeaponHandler and the vp_PlayerInventory scripts.
|
The weapon should be rotated straight forward with no rotation around the X or Y axis (otherwise the iron sights won't match up by default when zooming). You can set the ingame position and rotation (aswell as the pivot) in the Inspector and in the preset scripts, so that doesn't really matter, but in general we recommend to keep the weapon 100% centered in the X axis, roughly centered in the Y axis and to keep the elbow of the arm at about the center of the Z axis. This way you'll make sure the weapon will be visible by default when added to the FPSPlayer, simplifying further editing. If you will be making many weapons, this rough placement is a good standard to conform to. Final tweaking of position and rotation should be done in the Position Springs and 弹簧旋转 or 弹性旋转(Rotation Springs) foldouts of the vp_FPWeapon component.
One important thing to remember when you create (or choose) a model is that any arm geometry should be positioned so an imaginary tube (about 3 inches in diameter) would be able to pass from the top of the wrist to the camera plane without touching any arm geometry. If it does, you will have trouble with the camera clipping arms ingame at some point (we call this the Pringles Tube Rule).
The "Pringles Tube Rule"
A common problem in FPS construction is preventing weapons from sticking through walls and other geometry. UFPS allows you to choose between two very different solutions to this issue.
This is the classic approach, where weapons are rendered by a second camera, after the scene has been rendered. This gives you greater control over weapon appearance, since you may change the Field of View (FOV) of the weapon camera independently of the vp_FPCamera. However, it comes with a couple of drawbacks:
For more info about the Weapon Camera and gameobject and component setup, see the Adding a weapon camera tutorial.
This feature approaches the intersection problem in a more "realistic" manner. It allows you to run the system without a weapon camera. Instead, every frame a raycast is made from the weapon into the environment. Whenever the raycast hits something, the weapon is pulled back accordingly. Using this approach your weapon will feel more like a part of the world geometrically. Shadows from world objects will be cast on the weapon model, which looks very nice. However, drawbacks include:
|
|
|
TIP: Although the Retraction feature is intended for running the system without a weapon camera, nothing prevents you from using the systems together. In fact, Retraction can be a small extra nice touch to "weapon camera weapons". |
The vp_FPWeapon's Rendering foldout
manages what to render for the weapon and how to render it.
This slot should contain the model to be rendered for this weapon. A weapon prefab means a prefab containing a mesh filter, a mesh renderer and
materials. For more info about prefabs and how to set them up, see these articles:
http://docs.unity3d.com/Documentation/Manual/Prefabs.html
http://docs.unity3d.com/Documentation/Components/comp-MeshGroup.html
http://docs.unity3d.com/Documentation/Manual/Materials.html
This slider sets the Field of View for the weapon camera (if using one). It gives you great control over the appearance of the weapon. Tweak this along with weapon position and rotation offset to get the exact placement and perspective that you want.
Determines how fast the weapon will interpolate to the target value when FOV is changed from script. Higher values result in slower zoom.
Determines the near and far clipping planes of the weapon camera. Very useful in situations where you want to use a specific FOV and positional / rotational offset for the weapon, but parts of the weapon mesh intersect the view too close to the camera. In these cases, simply increase the near clipping plane. This is best done at runtime by clicking and dragging on "Clipping plane: X" in the Inspector while holding the "Alt" key.
Z Scale is intended for tweaking the appearance of the weapon when running the system without a weapon camera. See the 回缩(Retraction) section for a use case.
The weapon is hooked to its own position and rotation springs. Just like the camera it supports bob, shakes and external forces. It applies player local velocity to its position when walking and falling. The weapon has special position and rotation springs for additional forces such as recoil. The pivot point of the weapon is also hooked to a spring, and manipulating this at runtime can be quite useful.
Weapon position offset relative to the weapon object position. This position is where the weapon "wants to be". If you move it away from the target value using external force, it will immediately try to go back to the target position.
This position is used by the parent FPCamera for switching weapons. It will move the current weapon model to its Exit Offset, switch weapons and move the new weapon into view, starting at its Exit Offset.
This setting manipulates the pivot point of the weapon model. A value of "0, 0, 0" will leave the object's pivot at the point defined in the 3d object file.
|
|
|
The relation between pivot and weapon model position is affected by rotations. This may lead to unexpected behaviour when moving the pivot in the editor. Before editing weapon pivot it is best to turn off weapon shake and set weapon rotation offset to (0, 0, 0). |
Pivot spring stiffness - or mechanical strength - determines how loosely or rigidly the pivot spring behaves. A low value will result in a soft, swaying motion, and higher values will result in stronger spring movements.
In some scripting situations you may need to move the weapon offset and pivot offset at the same time. In these cases you may want to make sure that the two springs share the same Stiffness and Damping settings, and are moved approximately the same distance, or one spring will finish before the other. On the other hand, this results in a more complex animation and may sometimes be desireable. If you run into problems related to pivot switching in script, try calling the "SnapPivot" method of vp_FPWeapon.cs.
Pivot spring damping makes spring velocity wear off as it approaches its rest state. Low values will result in a very loose, swaying motion, while higher values can result in either motion that quickly grinds to a halt, or a stiff shaking motion (much depending on the pivot stiffness setting).
Toggles pivot point visualization on or off for editing purposes. The pivot point looks like a blue transparent ball. It can only be visualized when the game is playing.
|
|
|
TIP: Set Pivot Z to about -0.5 to bring it into view. |
Weapon spring stiffness - or mechanical strength - determines how loosely or rigidly the weapon spring behaves. A low value will result in a soft, swaying motion, and higher values will result in stronger spring movements.
Weapon spring damping makes spring velocity wear off as it approaches its rest state. Low values will result in a very loose, swaying motion, while higher values can result in either motion that quickly grinds to a halt, or a stiff shaking motion (much depending on the weapon stiffness setting).
Positional stiffness for the second weapon spring. This spring is intended for additional forces such as recoil. It is not used internally by vp_FPWeapon, but the vp_FPWeaponShooter component uses it for recoil. It can also be activated using the "AddForce2" script function of vp_FPWeapon.
Positional damping for the second weapon spring. This spring is intended for additional forces such as recoil. It is not used internally by vp_FPWeapon, but the vp_FPWeaponShooter component triggers it for recoil. It can also be activated using the "AddForce2" script function of vp_FPWeapon.
Determines how much the weapon will be pushed down when the player falls onto a surface.
The number of frames over which to even out each fall impact.
Makes the weapon pull backward while falling.
Walk sliding moves the weapon in different directions depending on character controller movement direction.
This tweak feature is useful if the spring motion goes out of hand after changing player velocity. Just use this slider to scale back the spring motion without having to adjust lots of values.
A cap on the velocity value being fed into the weapon swaying method, preventing the weapon from flipping out when the character travels at excessive speeds (such as when affected by a jump pad or a speed boost). This also affects fall sway.
|
|
|
TIP: The current speed used by weapon swaying can be displayed in script using:
Debug.Log(Controller.Velocity.magnitude); |
Weapon rotation is affected via springs by mouse movements and character controller motion. It can also be affected by external forces such as falling impact, and additional forces such as recoil.
Weapon rotation offset. This angle is where the weapon "wants to be". If you turn it away from the target value using external force, it will immediately try to swing back to the target angle.
This angle is used by the parent FPCamera for switching weapons. It will move the current weapon model to its Exit Offset, switch weapons and move the new weapon into view, starting at its Exit Offset.
This setting manipulates the angle of the weapon model's pivot point at runtime. A value of "0, 0, 0" will use the value defined in the 3d object file.
|
|
|
TIP: The relation between pivot and weapon model position is affected by rotations. This may lead to unexpected behaviour when moving the pivot in the editor. Before editing weapon pivot it is best to turn off weapon shake and set weapon rotation offset to (0, 0, 0). |
Pivot spring stiffness - or mechanical strength - determines how loosely or rigidly the pivot spring behaves. A low value will result in a soft, swaying motion, and higher values will result in stronger spring movements.
In some scripting situations you may need to move the rotation spring and pivot spring at the same time. In these cases you may want to make sure that the two springs share the same Stiffness and Damping settings, and are moved approximately the same distance, or one spring will finish before the other. On the other hand, this results in a more complex animation and may sometimes be desireable. If you run into problems related to pivot switching in script, try calling the "SnapPivot" method of vp_FPWeapon.cs.
Pivot spring damping makes spring velocity wear off as it approaches its rest state. Low values will result in a very loose, swaying motion, while higher values can result in either motion that quickly grinds to a halt, or a stiff shaking motion (much depending on the pivot stiffness setting).
Toggles pivot point visualization on or off for editing purposes. The pivot point looks like a blue transparent ball. It can only be visualized when the game is playing.
|
|
|
TIP: Set Pivot Z position to about -0.5 to bring it into view. |
Weapon rotation spring stiffness determines how loosely or rigidly the weapon rotation spring behaves. A low value will result in a soft, swaying motion, and higher values will result in stronger spring movements.
Weapon rotation spring damping makes spring velocity wear off as it approaches its rest state. Low values will result in a very loose, swaying motion, while higher values can result in either motion that quickly grinds to a halt, or a stiff shaking motion (much depending on the weapon stiffness setting).
Angular stiffness for the second weapon spring. This spring is intended for additional forces such as recoil. It is not used internally by vp_FPWeapon, but the vp_FPWeaponShooter component uses it for recoil. It can also be activated using the "AddForce2" script function of vp_FPWeapon.
Angular damping for the second weapon spring. This spring is intended for additional forces such as recoil. It is not used internally by vp_FPWeapon, but the vp_FPWeaponShooter component uses it for recoil. It can also be activated using the "AddForce2" script function of vp_FPWeapon.
Kneeling determines the amount of downward pitch force the weapon will receive upon fall impact.
The number of frames over which to even out angular force resulting from a fall impact.
This setting determines how much the weapon sways (rotates) in reaction to mouse movements. Horizontal and vertical mouse movements will sway the weapon spring around the Y and X vectors, respectively. Rotation around the Z vector is hooked to horizontal mouse movement, which is very useful for swaying long melee weapons such as swords or clubs.
Rotation strafe sway rotates the weapon in different directions depending on character controller movement direction.
This setting rotates the weapon in response to vertical motion (e.g. falling or walking in stairs). Rotations will have opposing direction when falling versus rising. However, the weapon will only rotate around the Z axis while moving downwards / falling.
This parameter reduces the effect of weapon Fall Sway when moving on the ground. At a value of 1.0, the weapon behaves as if the player was falling. A value of 0.0 will disable Fall Sway altogether when the controller is grounded.
A tweak feature that can be used to temporarily alter the impact of mouse input motion on the weapon rotation spring, for example in a special player state.
A cap on the mouse input motion being fed into the weapon swaying method, preventing the weapon from flipping out when extreme mouse sensitivities are being used.
The 回缩(Retraction) feature is intended for running the system without a weapon camera. Basically, this feature will pull back weapons when too close to walls. It makes for more realistic weapon rendering, but can also be a little trickier to use.
The first thing you will notice when removing the weapon camera is that all the default presets are currently adapted to weapon camera use (for starters the weapon will probably sit way too far away), so you will want to retweak some weapon settings. Here is a quick rundown:
If you manage to tweak all these things nicely, it will sometimes look even better without the weapon camera! For more info on pros and cons of the two options, see the Choosing a world intersection solution chapter.
The length of the raycast used for performing retraction. The weapon will be pulled back a distance corresponding to the length of the overlap. A typical value is 0.5.
This parameter will offset the retraction raycast horizontally and / or vertically in relation to the weapon. While the 回缩(Retraction) foldout is open, a debug ray will be drawn in the Scene view. The ray will be yellow if it doesn't intersect anything, and red if it does. For the best result, tweak the 偏移量(Offset) parameter until it runs inside the weapon's barrel (if any).
This slider can be used to adjust how quickly the weapon will ease back into its regular Z position after an intersection has ended.
This is procedural weapon rotation shaking, intended as a purely aesthetic motion to breathe life into the weapon. Super-useful for idle motions, but can also be used to rattle the weapon from wind turbulence when skydiving!
Determines the shaking speed of the weapon.
The strength of the angular weapon shake around the X, Y and Z vectors.
Weapon bob is the sinusoidal motion of the weapon, hooked to character controller velocity.
Speed of the weapon bob. X & Z rate should be (Y/2) for a classic weapon bob. To invert the curve, make X and Y negative. For weapon bob, X, Y and Z is angular bob. W is the position along the forward vector (pushing back and forth). A typical value for Y is 0.9.
The strength of the weapon bob. Determines how far the weapon swings in each respective direction. For weapon bob, X, Y and Z is positional motion. W is roll around the forward vector (tilting the head from left to right). A typical value for Y is 0.1.
This tweak feature is useful if the bob motion goes out of hand after changing player velocity. Just use this slider to scale back the effect without having to adjust lots of values.
A cap on the velocity value being fed into the bob function, preventing the weapon from flipping out when the character travels at excessive speeds (such as when affected by a jump pad or a speed boost).
|
|
|
TIP: The current player velocity can be displayed in script using:
Debug.Log(Controller.Velocity.magnitude); |
This determines whether bob should stay in effect when jumping, falling or flying. Disabling this is useful for doing flying dinosaurs, underwater movement et cetera.
The Step feature applies force to the weapon springs in order to simulate a fine footstep impact in sync with the weapon bob. A footstep force is triggered every time the vertical weapon bob reaches its bottom value.
|
|
|
TIP: Try exagerrating weapon Y bob while also using steps. |
This feature was developed to achieve procedural weapon motions rivaling the very best FPS games out there. If used in concert with regular weapon bob (and with decent understanding of position, rotation and pivot springs) it is indeed possible to achieve very realistic looking footstep motions.
This parameter sets the minimum squared controller velocity at which footstep impacts will occur on the weapon. The system will be disabled if is zero (default).
|
|
|
TIP: To measure the
controller's squared velocity you can do this in script: Debug.Log(m_Controller.Velocity.sqrMagnitude); |
The number of frames over which to even out each footstep impact. A higher number will make the footstep softer (more like regular bob). A lower number will be more 'snappy'.
A vector relative to the weapon, determining the amount of force it will receive upon each footstep. Note that this parameter is very sensitive. A typical value is lower than 0.01.
Determines the amount of angular force the weapon will receive upon each footstep. Note that this parameter is very sensitive. A typical value is lower than 0.01.
This value scales the impact force. It can be used for tweaking the overall force when you are satisfied with the axes' internal relations.
This parameter simulates shifting weight to the left or right foot, by alternating the positional footstep force every other step. Use this to reduce or enhance the effect of "limping".
This parameter simulates shifting weight to the left or right foot, by alternating the angular footstep force every other step. Use this to reduce or enhance the effect of "limping".
This sound will be played when the weapon is being readied.
This sound will be played when the weapon is being put away.
This foldout provides hooks for playing regular animations on a weapon model. Unity basically provides two ways of triggering animations on a simple model:
UFPS supports method 1. That means; for any model that has properly built-in animation clips, you can unfold it in the project view and select a clip , then drag it to an animation slot in the Inspector.
|
|
|
CHECKLIST:
|
For a brief explanation on the different use cases of regular animation versus procedural motion, see the 动画(Animation)s section of the Animation Concepts chapter.
An animation to be played on the weapon when it is readied.
An animation to be played on the weapon when it is being put away.
A random animation from this list will be played on the weapon automatically with random intervals. This is especially useful for alternating very subtle hand and finger movements, or temporarily removing the left hand when holding a rifle (as if to wipe it off) and can be a real realism and immersion factor!
Average random interval in seconds between ambient animations.
The vp_FPWeaponShooter class adds firearm properties to a weapon. The component should be added to a weapon GameObject that already has a vp_FPWeapon component added to it. The script will manipulate the weapon component for recoil and manages firing rate, accuracy, sounds, muzzle flashes and spawning of projectiles and shell casings. It also has basic ammo and reloading features.
|
|
|
The weapon shooter class inherits from vp_Shooter, a generic firing class that can easily be used for other shooters in your world - AI soldiers, traps, helicopters, robotic turrets - you name it! Add a vp_Shooter component to give all these things the ability to fire projectiles with muzzle flashes and shell ejection.
|
The Projectile foldout handles the birth aspects of any projectile objects spawned by the weapon.
The normal firing rate of the weapon. If the player continuously presses down the
fire button, shots will be fired using this as the minimum time interval in seconds.
The fastest possible firing rate of the weapon. If the player "spam clicks" the fire button (that is; presses and lets go of it many times in rapid succession) this will be the shortest allowed interval between bullets fired.
This should be a gameobject with a projectile logic script added to it, such as vp_HitscanBullet. But remember that a projectile does not have to use a vp_HitscanBullet script. You could put any gameobject here and a copy of it will be spawned when the weapon is fired. Feel free to write your own crazy projectile components! For more information about creating a bullet prefab, see the 抛射体 子弹(Projectiles) chapter.
|
|
|
Gameobjects can not be saved using the preset system, so they need to be hooked manually each time you create a new vp_FPWeaponShooter component. |
This parameter will scale each projectile object by the set amount. If using a vp_HitscanBullet projectile, this will be the scale of the resulting bullet hole object.
The amount of projectiles to be fired simultaneously. Each projectile will get its own unique spread. However only one shell will be ejected and the muzzleflash will display as if one projectile was fired.
The conical deviation of the projectile. This parameter randomly alters the direction of the projectile by "Spread" degrees. A value of 1 means the projectile will deviate 1 degree within a cone from the player to the aim point. A value of 360 means the projectile will be emit from the player in a completely random direction (essentially within a sphere). This is good for scripting shotgun type weaponry or manipulating accuracy at runtime.
|
|
|
TIP: To emulate the famous Classic DOOM shotgun, set "Firing Rate" to 1, "Count" to 7, "Spread" to 6 and "Shell > Eject Delay" to 0.5. Oh yeah.. |
This is the delay between the fire button being pressed and a projectile is launched. Useful for weapons such as hand grenades, where you may want to play a short animation (i.e. pulling out the sprint) before the actual projectile is launched (or in this case thrown).
The Motion foldout contains parameters that manipulate the position and rotation of the weapon when discharged.
A force added to the secondary position spring upon firing the weapon. Setting Z to a
negative number will make the weapon increasingly "kick like a mule". Keep in mind that achieving a good
positional recoil depends in large part on tweaking "Position > Spring2" of your vp_FPWeapon component.
Check out the demo weapon presets for some example Spring2 Stiffness and Damping settings.
A force added to the secondary rotation spring upon firing the weapon. Setting X to a negative number will make the weapon twist upward like a pistol. Rotation Recoil applied to the Z axis will make the weapon twist to the left or right for each shot fired (direction will be chosen randomly).
|
|
|
Keep in mind that achieving a good angular recoil depends in large part on tweaking the Rotation > Spring2 of your vp_FPWeapon component. Check out the demo weapon presets for some example Spring2 Stiffness and Damping settings.
|
When using Rotation Recoil around the Z axis, this parameter can be used to tweak the aggressiveness of the recoil. The function works by limiting the minimum possible Z rotation applied. A high Dead Zone gives sharper / crazier Z twist.
Upon firing, the primary position spring will snap back to its rest state by this
factor.
Upon firing, the primary position spring will snap back to its rest state by this
factor. This can be used to make a weapon always fire in the forward direction regardless of current weapon
angles.
Upon firing, any forces acting on the primary position spring will freeze and fade
back in over this interval in seconds.
Upon firing, any forces acting on the primary rotation spring will freeze and fade back in over this interval in seconds. This is typically useful if the weapon has a pronounced Fall Sway and the player fires it in mid-air. Without a Rotation Pause, the weapon may fire upwards or sideways while falling.
This parameter multiplies the recoil value when the weapon is out of ammo. This can be used to simulate pulling the trigger with no discharge.
|
|
|
TIP: Make 'MotionDryFireRecoil' about -0.1 for a subtle out-of-ammo effect. |
This is the delay between the fire button being pressed and the recoil kicking in. Useful for weapons such as energy guns that may have a warmup animation prior to each shot being fired.
The Muzzle Flash foldout handles logic for displaying the weapon's 枪炮口的闪光(Muzzle Flash) (if any) and animating its rotation and opacity.
This should be a mesh with a "Particles/Additive" shader and a vp_MuzzleFlash script added to it. For more information about creating a muzzle flash prefab, see the Muzzle Flashes chapter.
|
|
|
Gameobjects can not be saved using the preset system, so they need to be hooked manually each time you create a new vp_FPWeaponShooter component. |
Muzzle flash position offset relative to the FPCamera.
|
|
|
TIP: Set Position Z to a value larger than 0.5 to bring it into view. |
This parameter will scale the muzzle flash object by the set amount.
This amount of alpha will be deducted from the muzzle flash shader 60 times per second. When the weapon is discharged, the muzzle flash will be set to full alpha. It will then immediately start fading out at "Fade Speed". Note that the default (full) alpha for the "Particles/Additive" shader is 0.5.
This is the delay between the fire button being pressed and Muzzle Flash being shown. Useful for weapons such as energy guns that may have a warmup animation prior to each shot being fired.
Toggles muzzle flash visualization on or off for editing purposes. The muzzle flash can only be visualized when the game is playing.
|
|
|
Set Position Z to a value larger than 0.5 to bring it into view. |
The parameters under this foldout govern how shell casings are spawned and set in motion by the weapon.
A gameobject that will be ejected from the weapon upon firing. This should be a mesh with a vp_Shell script added to it. For more information about creating a shell prefab, see the 弹壳(Shells) chapter.
|
|
|
Gameobjects can not be saved using the preset system, so they need to be hooked manually each time you create a new vp_FPWeaponShooter component.
|
This parameter will scale each ejected shell object by the set amount.
Shell eject position offset relative to the FPCamera.
|
|
|
Set Position Z to atleast 0.5 to bring it into view. |
The vector in relation to the FPCamera, along which 弹壳(Shells) will be ejected from the Eject Position.
To send a shell flying forward, upward and to the right, set Eject Direction to 1, 1, 1.
The amount of force (positional speed) added to the shell's rigidbody object when instantiated.
This is what sends the shell flying.
When a shell is instantiated it receives a completely random torque (rotation speed,
or spin). This parameter scales the spin. A value of 0 means the shell won't spin at all. A value of 1 means
it will spin like crazy.
Time to wait before ejecting the shell after firing. This is very useful for i.e. shotguns and grenade launchers. For example, you could use a traditional animation for a pump action shotgun, and sync "Eject Delay" to the animation.
The Sound foldout defines how the shooter sounds when fired.
The standard firing sound of the weapon.
|
|
|
Gameobjects can not be saved using the preset system, so they need to be hooked manually each time you create a new vp_FPWeaponShooter component.
|
This sound is played if the player attempts to fire when the weapon is out of
ammo.
This parameter optionally pitches the sound of each shot fired slightly different to get a more organic firing sound. Variations in pitch should be kept minimal. A typical Min-Max range would be 0.95-1.05. This parameter allows you to use the same audio file with different pitch for different weapons.
This is the delay between the fire button being pressed and the fire sound being played.
The 动画(Animation) foldout contains any animations to be played on the weapon by the shooter component.
|
|
|
TIP: For many weapons (especially firearms with no prominent moving parts) you can often get a long way by just using recoil forces. |
For a checklist of the steps needed to play animations on a weapon model, see Weapons > Animation.
For more info about the different use cases of procedural motion versus regular animation, see the chapters Animation Concepts > Animations.
An animation to be played on the weapon when it is discharged. Fire animations are useful for things like pump action shotguns or a bow and arrow, where you really want more stuff going on than just force recoil.
The vp_FPWeaponMeleeAttack component can be used to generate super-fluid melee animations that blend dynamically between each other and react to the environment and forces affecting the player. The system was originally devised to see whether melee combat would be feasible using only spring physics and entirely without traditional animation. It worked out quite well.
For example: If you swing about a melee weapon while running, jumping or falling, the weapon will animate very organically, affected by character velocity as if carried by real, elastic muscles. If you stand close to an explosion, your arm will twist almost as if you're about to loose hold of the weapon. If you hit a solid object, the weapon will stop and bounce back.
Arguably, it would be hard to get these things going at the same level of quality using only traditional animation. However, this system is still in an experimental stage and certainly not the easiest to use! It has been included in the package by popular demand. But rest assured: Here Be Dragons ;)
The quickest way is simply duplicating the existing demo mace, which has a range of melee swings that should work for most prototype purposes.
The melee attack system uses a quite complex state setup. Before you move on, you will want to have a thorough understanding of UFPS 状态(States) and presets. It's also a very good idea to have a look at how the mace and its components are set up in DemoScene1 to get a feeling for how everything is put together. You may also want to study the comments in the melee attack script.
To quickly get a grasp of what's going on, the following walkthrough might help.
As you can see the mace weapon component has a bunch of states for various poses that might come in handy during melee combat. Toggling them will move the mace by having its springs act like muscles blending between the positions.
However, the motion does not happen automatically (you need to toggle it manually) and the movement is quite sluggish and not very violent. Also, nothing will happen if you hit something. We need to add timing, collision detection, impact effects and violent forces! This is the purpose of the vp_FPWeaponMeleeAttack component.
What happens here is that a random melee attack state gets selected every time you press fire. Also, a corresponding "Pull" and a "Swing" state gets enabled. Importantly, they do not get enabled on this (melee attack) component, but on the above weapon component. Also, the states get enabled with a slight delay inbetween them. On top of this, soft angular and positional forces are added to make the motion more dramatic.
When a melee attack is initiated, this is what happens under the hood:
The system uses 3 types of states. The melee attack component can have an unlimited amount of Attack states, each referencing two states on the weapon component: the Pull state (for raising the weapon) and the Swing state (for slashing). Attacks and their sub-states are alternated randomly when the player holds the attack button. In other words:
A regular weapon state for pulling back the weapon and gathering force in preparation of the attack. Sits on the weapon component.
The final orientation of the weapon at the end of the attack (striking / thrusting / slashing). Sits on the weapon component.
This state generates animation sequences by handling timing, physics and the enabling & disabling of the above states on the weapon component. It sits on the melee attack component.
The regular, bottom-most state of any vp_Component. On the vp_FPWeaponMeleeAttack object, this state is only intended to be used at the design stage. Unless a weapon only has one single attack, each attacks should use a custom state.
There are basically three stages to designing a melee attack:
Workflow
For this example, we'll create an "up-right to down-left" sword swing. This could be visualized as raising a sword to above your right shoulder then slicing your opponent diagonally from his left shoulder to his right hip.
Go into you weapon component, open the Position and Rotation foldouts and modify the position and orientation of the weapon until it is raised to the right of - and above - the camera, pointing over your shoulder. Save this tweak by clicking the Preset -> Save Tweaks button (will create a new preset text file containing only the parameters that you have changed). Name this Pull state something fitting, For example "PullUpRight".
TIPS:
Same process. Go into you weapon component and modify its Position, Rotation and Rendering settings until the weapon is pointed forward and sits below and to the left of the camera. Save the preset as, e.g. "SwingDownLeft".
Add two new states and name them, e.g. "PullUpRight" and "SwingDownLeft". Drag your new presets to the corresponding slots.
Go to the FPWeaponMeleeAttack component and disable "Pick a random state for each attack". This allows you to design an attack using the "Default" state, that is; without other states getting enabled randomly, which may be interrupting and confusing.
|
|
|
IMPORTANT: Make sure the Weapon States foldout has the correct names for the Pull and Swing states you just created on the weapon. |
|
|
|
TIP: You can also start off by duplicating an existing attack. In the project view, right click on a melee attack state and select Duplicate. Rename the new script and open it in a text editor. Don't forget to update the names of the WeaponStatePull and WeaponStateSwing with the names of your new pull and swing states. |
Save the state as a new preset. When done, open the "States" foldout, click "Add State" and assign the preset you just saved. It doesn't really matter what you name the states on the melee attack component, unless you mean to enable these states from code later rather than use the random logic. The important thing is that the "Pull" and "Swing" fields in each preset correspond to actual states on the weapon component.
As you get more and more weapon poses and melee attack states that use them, the "random attack" mode will become more and more organic and entertaining.
... in the attack script to adjust the speed / violence of the swing. The "SwingPositionSoftForce" and "SwingRotationSoftForce" parameters will add force to the weapon over several frames, the amount of which is determined by "SwingSoftForceFrames". The fewer frames, the more instant the attack will appear. It is recommended to keep it at the default value for smooth motion, and instead regulating the force of the attack using the force parameters.
The recoil force is an impulse that takes effect whenever the weapon hits a solid object such as an enemy or a concrete wall. Typically, the recoil force should be roughly the inverse of the swing force. For example: if the weapon travels left across the screen and hits something, it should repel back to the right.
This force is applied to any rigid bodies that we hit. The direction of the force is currently always straight away from the player. The "DamageForce" parameter simply determines the strength of the force impulse.
|
|
|
With the random state checkbox unchecked, you can control which attack gets played by setting the state of the melee attack component from script. For example, you may want to bind a specific slash to a certain button.
|
When you perform melee attacks with the vp_FPWeaponMeleeAttack's "Swing Motion" foldout open in the Inspector, red and yellow spheres will appear. The big (yellow) spheres show where the spherecast used for collision detection spawns. In reality, it is not made up of spheres, but is a wide, continuous tube. The small (red) sphere shows where the spherecast detects a collision with the environment.
This concludes the docs for the experimental UFPS melee system! As you may have noticed the workflow can be a bit challenging :) but the end result can sometimes be really cool. Hope you'll have fun with it!
UFPS comes loaded with player body features, designed for characters with a need to move around and fire guns a lot! Its weapon spring physics make for a novel mix between traditional animation (body) and procedural animation (1st person arms and weapon). The feature set can be divided into five categories, all explained in the following chapters.
|
The UFPS player event system connected to a Mecanim animator controller, along with specialized body orientation and headlook features. |
|
|
Systems to provide the experience of being a human within a body (and not just a floating camera). |
|
|
An experimental "survival horror-style" over-the-shoulder camera view, with logic to make guns fire at the camera's look point. |
|
|
The rotating of a hand to make it aim a weapon correctly, and the propagation of recoil force from the weapon onto the hand. |
|
|
The physics-based animation of a human body when a player gets killed and falls to the ground / gets tossed away. |
UFPS has its own animator scripts with a headlook logic specialized for gunplay. The headlook animates bone falloffs within the spine according to player states in very lifelike ways.
For example: if you look around without firing or aiming, you head will turn flexibly and freely of your torso. This gives the appearance of a character that is "alertly" scanning the environment around it. The second you aim or fire, the torso and arm will "stiffen up" and turn to where your head is pointed, aiming the gun there. This quite effectively communicates a sudden interest in a world look point. Lower body (legs and feet) rotate independently of the upper body (spine, arms and head). For example: the character can stand still and look around quite freely without moving its feet.
These animator scripts are tightly integrated with the UFPS player event system and designed for use with the provided "UFPSExampleAnimator" Mecanim controller. When an UFPS vp_Activity event starts or stops, a corresponding parameter gets activated in Mecanim, blending the animations into that state. The body animator also maintains floating point values (moving, turning, pitching and jumping), triggers (climbing, reloading, sliding out of control) and info on the weapon type (firearm, melee) and grip (one handed, two handed) for Mecanim to play suitable animations.
UFPS allows you to look down at your body as you walk, fight, crouch, run and jump around in first person. Since there is such a strong emphasis on wild, spring based camera motions, extra care is taken to keep the camera in sync with your 3d head, making sure the camera view doesn't clip the body model, all while allowing the camera to move around as freely as possible.
In 1st person the material of the 3rd person head and arms is set to an invisible, shadow casting material in order not to clip the camera or interfere with 1st person arms and weapons. If you unwield the current weapon, the Mecanim arms will come back into visibility for walking and sprinting.
Furthermore, the weapon class has logic to procedurally and smoothly move weapons into realistic positions when looking down. When you switch back to 3rd person, the head and arms reassume their original materials and the bodyanimator exchanges some aspects of it logic for movement that looks better in 3rd person.
All in all complicated stuff, and very effectful when it comes together!
|
|
|
Note: When playing in 1st person in the editor, you will spot this guy bouncing around in the Scene view, arms flying everywhere and legs sticking through the ground. Not to worry! This is not how the character will appear in 3rd person or multiplayer - it's just the full body awareness systems at work and this will never be rendered into the actual game.
|
Nevermind the "headless dude" ...
This experimental feature provides a "survival horror-style" camera that collides with the environment, reacts to explosions and allows for some pretty action packed precision gunplay (this feature was originally a by-product of testing the body systems, but turned into a decent feature of its own).
While this works really well with camera-to-level collision and certainly opens the door to your own Tomb Raiders, Resident Evils and MMOs, it is far from glitch-free at time of writing, and for the time being provided as-is, for animation testing purposes and as a starting point for those who may be interested in developing it further.
Except for arms, the 1st and 3rd person player models are actually one and the same. When you switch to 3rd person, the head and arms again become visible and the bodyanimator exchanges some aspects of its logic for motion that looks better in 3rd person.
|
|
|
TIP: For an example of player appearance in 3rd person, open up the "DemoScene3" or "SkyCity" level and press the "Toggle3rdPerson" key (default: "V"). |
"Cosmetic" precision aiming is taken care of by a simple script that sits on the player's right hand, rotating it to keep the weapon aimed at the player's look point. This has no real gameplay effect (bullet precision is regulated in the shooter script) but it makes things look fairly alive and "realistic". This aiming script also applies the current weapon's recoil when shooting which is quite cool.
Note that this subset of the body system is still in an early prototype state. The feature is currently "rough around the edges" and quite challenging to calibrate but it gets the job done when setup right.
"Ragdolling" is always lots of fun and very entertaining in action, especially with a suitable application of high explosives! When ragdolling is enabled in UFPS, the body of any killed player will crash to the ground or get tossed away in a "physically realistic" manner adapted to the current situation. Keep in mind that the ragdoll handler doesn't set up a ragdoll for you (the ragdoll components must be added to you character model by means of the Unity ragdoll wizard or some other method).
What it does do is initialize things on startup, enable the ragdoll on death and disable it on respawn. There is also the "VelocityMultiplier", which has the momentum of the charactercontroller carry over into velocity on the ragdoll upon death. This can have quite cool and sometimes hilarious results :).
To create a brand new player completely from scratch it is easiest to start with an existing (body-less) player prefab. If you want to set up a basic, functioning player for learning purposes, you may want to study this chapter before tackling full player bodies.
The full animated player body system - between UFPS and Mecanim - is really a quite complex beast in total. Good news is: for the most part it's a one-time process per character!
The main difference between a basic UFPS player setup and one with a body, is that in addition to the "FPSCamera" child object, the latter also has a "Body" child gameobject. (Edit: in the first release of 1.4.8 this is actually named "Hero".) This object basically contains an animated player model at the local position and rotation (0, 0, 0).
In UFPS there are two objects for each weapon, a "real" one for 1st person and a "prop" for 3rd person. The 1st person weapon object manages all the game logic and fx. The 3rd person weapon is only a cosmetical one for 3rd person views, AI and multiplayer remote players. That said, spring-based recoil from the vp_FPWeapon can be made to affect the hand and weapon of your 3rd person body model by means of the vp_3rdPersonWeaponAim component.
|
|
|
When you toggle to 3rd person, the 1st person weapon becomes invisible and begins firing any bullets from the world position of the (now visible) 3rd person weapon props. Behind the scenes, though, it is always the same vp_FPWeapons and vp_FPShooters that take care of all the logical dirty work, including accuracy, projectile / shell spawning, muzzleflashes and so on. |
Study the Hero player hierarchy in the DemoScene3 and SkyCity maps, aswell as this section on player body anatomy.
Study the comments in the vp_BodyAnimator and vp_FPBodyAnimator scripts along with the player setup in the scenes, aswell as this section with body scripting notes.
|
|
|
|
Start the game and hit the "Toggle3rdPerson" key (default: "V"). The player should now have a basic - albeit stiff - body attached to charactercontroller as it moves around in the scene. To make it animate and ragdoll in response to game events, please see the next tutorial.
Done! Toggle back to 1st person, and you will likely find that the player has too many arms in the 1st person view. Perhaps you can even see the inside of the player model's head (teeth, tongue, eyballs and whatnot). To fix this see the following section.
If your player appears to have too many arms or you can see inside of the player model's head, you need to make the body model's head and arms invisible in the 1st person view. This can be done in two ways. Here is the easiest one:
|
|
|
This quick-fix will not currently work in 3rd person, will break ragdolls and will cause your head and arms to cast no shadows. To solve all of this the proper (but more labor intensive) way please see this tutorial. |
|
|
|
TIP: The typical 1st person
weapon model is unsuitable for 3rd person because it has animated arms on it. Also, 1st
person weapons may be way too highly detailed to be appropriate for AI or multiplayer remote
players. Re-using pickup gameobjects can often be a time saver for creating 3rd person weapons. The model
and shader can usually stay the same (as long as there are no arms). |
If you start the game now you will notice the player having one or more weapons in its hand. However, the weapons are active always, many at a time, and have no logical connection to their 1st person counterparts. They may also be pointing in all sorts of directions. We need to adjust position and rotation of the weapons.
For each weapon prop in turn:
|
|
|
TIP: After you have positioned the first weapon prop, you can often just copy position and rotation onto the remaining ones (assuming the models have similar pivot points). To do so, click the little cog wheel of the first weapon's Transform component -> "Copy Component". Then in the Transform component of the next weapon, cog wheel -> "Paste Component Values". This will give you decent positioning for all weapons in a second with only minor tweaks remaining! |
Start the game and temporarily disable the player's inventory component for access to all weapons. As you toggle weapons, the player should now hold each weapon properly in its hand. Muzzleflashes and shells ejection may be slightly off, though. Read on to fix this ...
If you see muzzleflashes and shells spawning at the wrong positions, you need to create, position and orient "Muzzle" and "Shell" child gameobjects for your weapon props.
After you have created a "Weapon" group for one character, you can duplicate and re-use that weapon group on characters that should carry the same arsenal. You may need to reposition the weapons in their hands and you will need to reconnect the weapon props with their new host vp_FPWeapons, but atleast you can save a few minutes of little work this way.
Ok, so far we've covered mosts steps needed to create working 3rd person weapons! However, at this point you will have probably noticed the weapons pointing in slightly different directions from where bullets hit when firing. To fix this see the following tutorial ...
By default, weapon aiming of the player model is a result of the Mecanim animation used. Along with headlook this will make the arms and weapon point in roughly the right direction (just not right enough to look good in 3rd person).
The vp_3rdPersonWeaponAim component can be used to make a character's main hand + weapon aim more accurately at the screen crosshair. This component also imposes recoil from the active vp_FPWeapon onto the hand of the player model, which looks really cool.
|
|
|
DISCLAIMER: This subset of the body system is still in a prototype state. Logic and workflow is far from ideal and full of lore. Here be dragons! |
|
|
|
Please note that melee weapons do not need a vp_3rdPersonWeaponAim component, since they have no need for projectile recoil or aiming. |
|
|
|
This could be a different slider for different models and depends on various factors during rigging and export from various 3d art programs. |
Restore the other sliders to "180" then roll the
hand until the gun's "top" faces upward properly in the Game view.
|
|
|
TIP: Any time you want to toggle back and forth between the Inspector and the Game view without firing shots, press ESC to free the mouse cursor from the game, and the right mouse button on top of the Game view to reenable mouselook without firing. |
|
|
|
IMPORTANT: When you're happy with the aim, do not stop the game before copying the component values, or your tweaks will be lost! Read on ... |
|
|
|
First make sure that your weapon prop has a vp_3rdPersonWeaponAim component (see this tutorial for information on how to set one up). |
When you first add a plain human body model to an FPS player, usually you can see too many arms in 1st person plus the inside of the player model's head (teeth, tongue, eyeballs).
To fix this, the head must be made invisible at all times in 1st person, and the arms must be made invisible when wielding any 1st person weapons that come with their own arms.
This result can be temporarily achieved using the "cheat" described here, however that's a quick fix resulting in several unintended glitches, making it useful only for prototyping and quick tests.
UFPS can solve the issue "properly" by applying a little black magic to make the arm and head meshes invisible although still casting shadows in the 3d world. For this to work your player model needs to have one material assignment for the head, one for the arms and one for the rest of the body.
|
|
|
TIP: The following tutorial can be done by hand, but there is also a great add-on asset for UFPS by CodeBison, called FPS Mesh Tool. This excellent piece of software will take care of all the below steps for you and a whole lot more (no need for a standalone art program). |
For any new player model you want to use for 1st person:
Now, in 1st person mode, the inside of your head should be invisible (like in the real world ;) and there should be no more cases of "too many arms". Toggling to 3rd person view should make the head and arms come instantly back into visibilty, everything in a seamless manner.
|
|
|
The character can of course have many more materials too if you like. What's important is that the arms share a material with the letters "arm" in the name inside Unity, and that the head has a material of its own with the word "head" in its name. |
The following image provides an overview of the functional aspects of a body hierarchy (script components in white):
|
|
|
On a local, 1st or 3rd (!) person player the animator is always of type vp_FPBodyAnimator, but on a computer controlled AI / bot or multiplayer remote player, it would instead be a vp_BodyAnimator (without the "FP"). This is because any script prefixed "vp_FP" will assume a camera (rendering to a monitor) and input (e.g. mouse and keyboard) |
This is a regular Unity SkinnedMeshRenderer component with three materials for preventing clipping and multiple arms in 1st person. These are manipulated by the bodyanimator script. Basically, when you are in 1st person the "Head" and "Arm" materials are replaced by an invisible, shadow casting shader. If you go unarmed in 1st person, the "Mecanim arms" are again shown (optional). When you toggle to 3rd person these get replaced by a normal material. See this tutorial for info on how to set up body materials.
Used in headlook logic. This could be a uniquely named and located gameobject in every model, but the bone directly above the hips / pelvis is usually what works best.
Used in headlook logic. This could be a uniquely named and located gameobject in every model, but the bone located as close as possible to the center of the body model's head is usually what works best.
|
|
|
All bones in the hierarchy in direct ascension between this gameobject and the "Head Bone" gameobject will be considered the character's spine (hence the bent, red line in the illustration) and will be automatically included in the headlook mechanism. In the above illustration the bones included will be "Spine", "Spine1", "Spine2", "Spine3", "Neck" and "Head". |
|
|
|
The bones "LeftShoulder" and "RightShoulder" in this illustration are not directly rotated by headlook since they are not a parent of "Head". However, as children of "Spine3" they'll still be affected by headlook logic. The arms will turn roughly in the direction the player is aiming, and the animation and weapon aiming scripts will kick in to achieve the last part of a spot-on aim. |
This is usually an empty gameobject (no components), but you will navigate to it many times because it is the parent of all the 3rd person weapons (6).
This could be a uniquely named and located gameobject in every model, but it's a very good idea for this object to have the letters "hand" (case insensitive) in its name because of an auto-initialization feature of the weapon aiming script.
The 3rd person weapon group is an empty gameobject (no components) that contains visual (as opposed to "functional") representations of the 1st person weapons that are childed to the main FPS camera. These are associated with a vp_FPWeapon under its "Rendering" -> "3rd Person Weapon Model" slot.
These are separate "prop" models depicting 1st person weapons for 3rd person views, AI and multiplayer remote players. Note that the 1st person weapon object still manages all the game logic and fx. In 3rd person, the 1st person weapon is invisible and fires any bullets from the world position of its corresponding 3rd person weapon prop. See this tutorial for info on how to set up 3rd person weapon props.
The vp_BodyAnimator and vp_FPBodyAnimator scripts are tightly integrated with the UFPS player event system and designed for use with the provided "UFPSExampleAnimator" Mecanim controller. In the UFPS demo scenes, whenever a UFPS vp_Activity event starts or stops, a corresponding parameter gets activated in Mecanim, blending the animations into that state.
|
|
|
PLEASE NOTE: Working with these statemachines will require a decent understanding of Unity's animation system, Mecanim, which is outside the scope of this manual. To learn about Mecanim please see these links: |
The system assumes an upright player, logically divided into upper and lower body. The UFPSExampleAnimator has three layers: "Base", "Lower Body" and "Upper Body". The lower and upper body layers each have elaborate state machine setups designed for movement and gunplay, respectively. The base layer is currently kept empty and could be used for expanding the system.
Most of the example animation states submit to this upper / lower body split. For example: legs will frequently be running while the upper body is reloading and one doesn't really get affected by what the other is up to.
|
|
|
To open up the Animator window for your player, select its "Body" gameobject (the one with the Animator and the vp_FPBodyAnimator components on it. Then go to the Unity top / main menu and click "Window" -> "Animator" (not to be confused with "动画(Animation)"). |
There are examples of full body animations in the demos, e.g. the "OutOfControl" and "Climb" states. These cases are solved simply by playing the same animation in the upper and lower body layers at the same time. Theoretically, you could also play a full body animation either by having it in the base layer and disabling the two other layers or by disabling the UFPS body animator script altogether and assigning another one, maybe even assigning a different animator controller. Everything is possible. One thing is for sure, though: animation is tricky territory and you will want to know Mecanim and Mecanim scripting well.
|
|
|
There is a special case in this state machine when it comes to running vs. crouching, where control is allowed to pass from Crouch to Run even if 'IsRunning' is false. This is necessary or control will always pass via walk due to the activation order of the events. |
|
|
|
Note that melee combat has very limited support in the first version of the body system and the melee state machine and animation are placeholders. |
|
Parameter |
UFPS source |
Mecanim destination |
|
Forward |
Player.Velocity |
Lower Body -> forward / backward leg animation |
|
Pitch |
Player.Rotation |
Upper Body -> FireArm -> up / down aim animation |
|
Strafe |
Player.InputMoveVector & Crouch, vp_BodyAnimator yaw logic |
Lower Body -> sideways (strafing) leg animation |
|
Turn |
vp_BodyAnimator yaw logic |
Lower Body -> idle turn animation |
|
VerticalMove |
Player.MotorThrottle.y (jump input) |
Lower Body -> jump animation |
|
Parameter |
UFPS source |
Mecanim destination |
|
IsAttacking |
Player.Attack.active |
Upper Body -> Firearm & Melee -> attack / zoom animation |
|
IsClimbing |
Player.Climb.active |
All statemachines -> climb trigger |
|
IsCrouching |
Player.Crouch.active |
Lower Body -> crouch animation, Upper Body -> CrouchAttackZoom |
|
IsGrounded |
vp_FPController.Grounded (vp_FPBodyAnimator) |
Lower Body -> most states, Upper Body -> Unarmed -> most states UpdateGrounded (vp_BodyAnimator) |
|
IsMoving |
Player.MotorThrottle (vp_FPBodyAnimator) |
Lower Body -> most states, Upper Body -> Unarmed -> most states, Upper Body -> Melee -> most states Player.Velocity (vp_BodyAnimator) |
|
IsOutOfControl |
Player.OutOfControl.active |
All statemachines -> out of control trigger |
|
IsReloading |
Player.Reload.active |
Upper Body -> Firearm -> reload trigger |
|
IsRunning |
Player.Run + Player.MotorThrottle (vp_FPBodyAnimator) Player.Run + Player.Velocity (vp_BodyAnimator) |
Lower Body -> most states, Upper Body -> Unarmed -> most states, Upper Body -> Melee -> most states |
|
IsSettingWeapon |
Player.SetWeapon.active |
Upper Body (main) -> setweapon state |
|
IsZooming |
Player.Zoom.active |
Upper Body -> Firearm -> attack / zoom animation |
|
Parameter |
UFPS source |
Mecanim destination |
|
StartClimb |
Player.Climb (OnStart_) |
All statemachines -> climb state |
|
StartOutOfControl |
Player.OutOfControl (OnStart_) |
All statemachines -> outofcontrol state |
|
StartReload |
Player.Reload (OnStart_) |
Upper Body -> Firearm -> reload state |
|
Parameter |
UFPS source |
Mecanim destination |
|
WeaponGripIndex |
Player.CurrentWeaponGrip (vp_Weapon) |
Upper Body (main) setweapon state |
|
WeaponTypeIndex |
Player.CurrentWeaponType (vp_Weapon) |
Upper Body (main) setweapon state |
|
|
|
DISCLAIMER: Regarding the included animation library: UFPS contains a folder with animations which are provided for prototyping, demonstration and testing purposes only.
Most animations come from various free examples by UnityTechnologies. Others have been slapped together in 5 minutes for quick tests. Some of the animations may drop lots of warnings, some may not work as expected, and some may not suite every character rig.
In truth we can not provide support for these animation clips in any meaningful way. They are to be seen as demo content only. For your actual game we strongly recommend obtaining a more comprehensive and higher quality animation library. |
The default UFPS player setup is certainly moddable, but the better you know Mecanim, C# scripting and UFPS specific scripting concepts (in that order), the better your chances will be of implementing your own game design. This chapter collects some lore and good-to-know bits for scripters about the UFPS player body systems.
The single in-world player object that is controlled by the human operating this physical machine. A local player can exist in two render modes: 1st and 3rd person.
Any in-world player object that is not controlled by the human who operates the local computer. Can be controlled by a human or AI, but never performs rendering (has no camera) and never has a physical input device connected to the local machine.
This property is used all over the place and reports the 1st/3rd person status of the player. The property will return:
... and may be accessed using the player event handler 'IsFirstPerson' value event, e.g:
if(Player.IsFirstPerson.Get())
Please investigate the editor inspector and code comments of the following scripts for more insight:
This code is part of the first person camera class due to the intimate relations of different aspects of camera logic in the two modes. The mode is disabled by default and should incur zero overhead in a first-person-only setup. To enable the mode, set 'Position3rdPersonOffset' in the camera's 'Position Springs' foldout to a non-Vector3.zero value and fire the new 'CameraToggle3rdPerson' message with the player event handler (or just press "V" in DemoScene3).
Because of the weapon camera. Sometimes the barrel will appear to be in front of a wall when in fact it's sticking through it. Bullets must be fired from the camera in order to end up where the barrel points on the wall.
The ragdoll handler scans the player hierarchy on startup to store any (pre-existing) ragdoll joints, rigidbodies and colliders for later quick-toggling on / off. The initial state of all the objects are also stored for respawning purposes. The ragdoll handler then starts listening for the player's death event and, upon death, disables the body animator and activates any ragdoll components. Finally the character controller's world velocity is carried over into the ragdoll rigidbodies. When the player respawns, its ragdoll joints and colliders are returned to their default states and disabled. Control is then given back to the player's body animator.
If headlook "gets weird" somehow, if the head tilts to the shoulder or looks in the wrong direction, this can be a somewhat complicated scripting issue. From a spine-initialization perspective, there is a big difference between starting the game with a character that already exists in the scene, versus one that is instantiated by script at runtime. If you start experiencing this:
|
|
|
NOTE: vp_BodyAnimator's "HeadPoint" rotation can not be set every frame - it should be manipulated as rarely as possible even if it must always point in the correct direction. |
It is important to note that the main local player prefab has many scripts with the prefix "vp_FP" and these scripts should never be used on remote or AI players because they assume access to camera and keyboard / mouse input. Luckily, the most important player scripts also exist in a base version simply prefixed "vp_" and these scripts can normally be used on non-local player objects.
The 'Generate Remote Player' wizard strips a 1st person player of all scripts that assume camera & input, and in many cases converts the "vp_FP" scripts to their "vp_" equivalents. The resulting gameobject could then be spawned in multiplayer to represent a player of the same type as the local player, or you could design AI enemies using the 1st person player workflow (beginning by making sure they handle and animate well) and convert them into AI foes using the wizard as the second stage in the process.
The wizard is run by selecting the root object of a local player prefab (for example, the "Hero" in DemoScene3) and going to the top main menu: "UFPS -> Wizards -> Generate Remote Player". This will create a stripped down, "remoteplayer-legal" version of the player. This object won't do anything in and of itself. It is just intended as a starting point for adding AI or multiplayer features (in our own upcoming multiplayer adaptation we actually use this raw wizard output exactly as-is and apply any additional components needed for multiplayer at runtime). Of course, you may not want to use all the components retained on the player by the wizard. In this case you can mod the wizard or remove them manually.
For AI, the UFPS event system can be manipulated quite easily. Just add a vp_PlayerEventHandler (without the "FP") script to the player and add custom scripts to interact with it. Note that the wizard doesn't produce a controller or collider - nor movement support - which means you will have to add those and rotate and move the object using your own logic. Other than that it has all the weapons and shooters needed already, and you just need to toggle the 3rd person weapon objects on and off in their hands, make them look at something and send the events that fire the weapons.
It should be noted that all of the local player scripts do incur quite an overhead and are not suitable for spawning legions of furious AI. In the case of a village full of NPCs that just need to stand still and turn towards the player and activate dialogs etc. it would probably be better to make new scripts (or new versions of the included ones) that don't require a player event handler.
Verify that the bodyanimator component of the character does not have headlook nodes set to nodes in another model.
The camera collision feature casts a ray to intersect with walls. There may be an active collider on the body (ragdoll or player damage collider) that does not have the correct layer.
See this note in the body scripting chapter.
Make sure that you have also assigned the model to the '3rdPersonWeaponModel' slot of the corresponding vp_FPWeapon component (the weapon childed directly under the camera)
You must calibrate the aim of the weapon. To do so, please see the weapon aim tutorial.
Always make sure that all 3rd person weapons are activated on the character before starting the game or calibrating weapon aim (basically the character should have a big bundle of guns in its right hand). Otherwise, the "virgin" relative rotations of the weapons inside the hand will not be initialized correctly on startup and weapon aim will break. This is not ideal workflow and something we are planning to fix down the line.
You must delete the old 3rd person weapons childed to the right hand bone of the player body too.
Make sure that your player's main object (with the collider) is set to layer: localplayer, otherwise shells may collide with the player when it is moving.
The Preset system allows you to take a snapshot of all the settings in a component
and save it to a text file. Presets can be loaded via script at runtime and used to quickly manipulate all
the parameters of a component as needed by the gameplay. You'll find the "Preset" foldout at the bottom of
most components in the inspector.
These buttons will open a file dialog allowing you to load or save presets to disk. Saving a preset will result in all the current parameter values of the component being dumped to disk. Loading a preset will alter the current component values with data from the preset. Preset text files are meant to be assigned to player states under the State foldout (see the 状态(States) chapter).
|
|
|
IMPORTANT: Assets (such as 3d objects and sounds) can not be loaded or saved via text presets. This is because the Unity Editor AssetDatabase is no longer accessible once the game has been built. Inspector slots for sound, 3d meshes and textures always have to be set manually in the Inspector or via scripting methods. |
This feature will save partial presets, that is: create or update a preset with only the values modified since the last time you pressed Play or changed the states at runtime. The purpose of this will usually be to create presets for use with the State Manager.
For example: the player may pick up a powerup that should only affect running speed. To create a preset for this, you could select the FPController component in the Inspector, start the game, alter the "MotorAcceleration" parameter and press "Save Tweaks". This would result in a FPController preset with only the acceleration parameter in it. See the 状态(States) chapter to learn how to assign such a partial preset to a player state and bind it to a button.
Any fast-paced FPS will have the player switching between different modifier keys quickly and repeatedly (e.g. crouching, zooming, running). This calls for swapping lots of presets at runtime, usually requiring lots of scripting, for all the special cases and key combos. The UFPS State Manager simplifies this by moving much of the work into the Editor and solving runtime preset blending automagically. It will combine multiple presets smoothly, depending on a current combination of 状态(States).
|
|
|
States are completely optional to use. If you don't need them, don't add any states and your component will simply use the currect Inspector settings as its Default and only state.
|
States can be used not only for input, but for messing with the player in many
different ways. For instance, you could use timers to activate a "ShellShock" state shaking the camera for a
limited amount of time, or you could use triggers to prevent the player from enabling a certain state in a
certain area.
Here's an example of toggling a state on and off via script.
if (Input.GetKeyDown(KeyCode.H))
SetState("MyState", true);
if (Input.GetKeyUp(KeyCode.H))
SetState("MyState", false);
|
|
|
There are many other ways of using states. Study the vp_FPWeaponHandler script to get more acquainted with some different methods of working with states and timers. |
The state system works basically like the layers of a paint program. The state (layer) at the bottom represents the current inspector values of a component. The state above it represents a preset that will override all - or just some - of the underlying one's values, and so on up the list. If a state is disabled, the remaining presets in the list will be smoothly recombined (let's say you release the Crouch key while still holding the Zoom key).
To bump up a state, press the little arrow button at the right and the state will jump up one step. Any currently
active states in the top will override any currently active states below them.
The bottommost state is called the 'Default' state. It represents the standard mode of the component and cannot be removed or renamed. It should usually be left empty: "None (TextAsset)", in which case it uses the current Inspector settings for the component. If you do choose to assign a text preset to the Default state, it will lock down the component, preventing editing. If so the component can be modified at runtime only, and changes will revert when the app stops (presets can still be saved though). To re-enable editing, the 'Default' state must be unlocked by pressing the small 'Unlock' button .
Sometimes you want states to override each other entirely. For example, you may not want the player to be able to aim down sights while sprinting, and so you want the Run state to override the Zoom state on the camera and weapon. Theoretically, you can block out all underlying states by applying a preset that contains every possible value for the component in question. However, this approach soon becomes labor intensive.
Instead, use state blocking. This function lets a state "mute" one or more other states on the component while active. Press the little button to unfold a list of available states to block. Every state that is ticked will be blocked out while this state is active. States that block other states always have a blue button. Also, while the blocking foldout is open, any affected states are highlighted in blue in the regular state list.
|
|
|
States can not block themselves, states that block them, or the Default state. |
To delete a state, simply press the small button at the far right. Beware though; deleting a state can not
be undone!
To remove a preset from a state, press the small circle icon to open a "Select TextAsset" window. At the top of the list,
select "None".
The Default state can optionally be "persisted", meaning the variables you change during play will not be reset when the application stops. Whenever this checkbox is unchecked and the app is stopped, Unity will reset the Default state to what it was before you pressed play (the default Unity behaviour). If it's checked, Unity will stay away from your variables. Please note that only the currently selected component will be persisted even if the checkbox is checked on several components.
UFPS uses classic hitscan bullets. This means that the game uses instant raycasting rather than Newtonian physics to move the bullet. This is the way in which bullets traditionally work in first person shooter games.
|
|
|
Please note that the way bullets are constructed has significantly changed in UFPS 1.6 versus previous versions. Previously, a bullet would contain a decal mesh, audio source and renderer with a generic bullet hole texture. The new bullets have no rendering capabilities. Instead they leave decal spawning to the SurfaceEffect system, which allows spawning different decals depending on the surface hit. The bullets still play an impact sound however |
.
This prefab goes into the player's vp_FPWeaponShooter script, on e.g. the "Machinegun".
This prefab goes into the 'Decal' section of a SurfaceEffect, e.g. "BulletOnWood".
|
|
|
IMPORTANT: Be very careful not to write a lower number than the currently existing one, or the the last elements in the list will be destroyed. |
|
|
|
TIP: Just to make sure your new projectile type works, you can temporarily assign the 'BulletOnFlesh' effect, which will make your projectile spawn blood on whatever it hits. |
To disable quad raycast for a projectile, set 'Allow Edge Overlap' to the maximum of 0.5. The DecalManager uses quadruple raycasts to check for good or bad decal placement. But on really small projectiles, such as a shotgun pellets, it's really performance overkill to use this feature.
to prevent a trigger from interfering with bullets, put it in the 'Trigger' layer (default: 27). This will make bullets fly right through triggers.
on a scripting.
|
|
|
You probably don't want to disregard a hit based on !collider.isTrigger, because that would make bullets _disappear_ if they hit a trigger. |
|
|
|
To prevent decals from attaching to enemies when fallbacks get activated, it is usually a good idea to configure the SurfaceManager to have Default Fallbacks -> Allow Decals -> OFF. |
vp_MuzzleFlash handles logic for showing an additive, randomly rotated muzzle flash in front of the weapon. The script should be attached to a gameobject with a mesh to be used as the muzzle flash, using the "Particles/Additive shader".
This gameobject will always be enabled but most often invisible. When a shot is fired, it snaps to a new random rotation and its alpha is set to full. It then immediately fades out.
|
|
|
TIP: Sometimes the muzzle flash may display briefly (for one frame) right when the game is started. In order to prevent this, set the initial alpha of its material to 0.
|
vp_Shell is a script for managing the behavior of shell casings ejected from weapons. It uses managed rigidbody physics to behave in a manner typical of bouncing shell casings. It also plays random bounce sounds. The script should be added to a gameobject with a mesh to be used as the shell casing. The vp_Shooter component which spawned the shell is responsible for setting its initial velocity and random spin.
Time to live in seconds for this type of shell. When the time has passed, the shell
is quickly and discretely shrunk and destroyed.
This is the chance of a shell not being removed after
settling on the ground. An optional optimization feature for weapons that emit large amounts of shells. A
value of 0 means that all
shells will be removed after bouncing once or twice. A value
of 0.5 means that roughly half of the shells will be removed early. A value of 1 means that all shells will stick around for the remainder of their lifetime.
This is the shell's list of bounce sounds. When a shell hits the ground sufficiently hard, one of these will be randomly selected and played. There is no limit to the amount of sounds. In order to add sounds to an empty list, change the "Size " parameter to the amount of sounds you intend to add, and new slots will appear.
|
|
|
Please note: This manual chapter reflects UFPS v1.4.6 and is out of date. In UFPS 1.4.7+, damage handlers are not responsible for respawning. Until we've had time to update this chapter, please see the UFPS 1.4.7 releasenotes ("System wide overhauls" section) for up-to-date info on damage handlers and respawners. |
vp_PlayerDamageHandler is a helper class to give your scene objects the capability of taking damage, dying and respawning. To use it, just drag it to a gameobject inside your level and tweak its parameters. You should then be able to shoot and kill it.
When the PlayerDamageHandler's "Health" goes below zero, it will call its "Die" method to remove the object, restore health to the original value and respawn after some time in the original location.
Any other script can send damage to the PlayerDamageHandler using the following code:
hitObject.SendMessage("Damage", 1.0f, SendMessageOptions.DontRequireReceiver);
Where "hitObject" is the PlayerDamageHandler's gameobject and "1.0f" is the amount of damage to do.
Initial health of the object instance, to be reset on respawn.
Gameobject to spawn when the object dies. The included examples all use an explosion,
but this could also be a gameobject hierarchy with rigidbody rubble, such as the shards of a vase or wood
debris from a crate.
Random timespan in seconds to delay death. Good for designing cool serial
explosions!
Whether to respawn the object or just delete it upon death.
Random timespan in seconds to delay respawn. This can be used to make respawning less
predictable.
Radius around the object that must be cleared of other objects before respawn can
take place. If the spawn area is occupied the PlayerDamageHandler will reschedule respawn using a new
RespawnTime.
Sound to play upon respawn.
UFPS has a robust inventory system with simple drag & drop editor workflow, item pickups, item and ammo caps, seamless interaction with the WeaponHandler and capacity limitation by amount, space or weight.
The system separates item type information from player gameobjects, keeping it in a central location which is generally good for game logic. Please note that there is no in-game GUI implementation of the inventory at this point, only gameplay.
If you're in a hurry or looking to solve a specific problem, skip ahead to the case-specific mini tutorials below. If you wish to gain some fundamental knowledge of how things work before you dive in, it is recommended to read the "Basics" chapter first. This should promote some "Aha" moments in no time :)
|
|
|
The files for the old (vp_SimpleInventory) system are still included with UFPS for the time being (although not guaranteed to work 100%). The old docs are available here. |
The first important thing to keep in mind is that the main FPS camera should have every weapon childed to it that the player will ever be able to use. Weapons are never taken away from - or added to - this gameobject hierarchy. They are always there; sometimes hidden, sometimes visible.
The job of the inventory is basically to restrict usage of these predefined weapons. The weapon system asks the inventory for permission before wielding, reloading or firing any weapon.
It is important to understand that the inventory is just a list, or a record-keeper tracking the player's belongings. Game-world objects are not really understood by the inventory and never interact with the inventory directly.
|
|
|
Example: When a player collides with a pistol pickup object, the pistol gameobject does not actually move into the player's backpack. Rather, it transmits a message to the player's backback, saying "I am a dispenser of pistol licenses and you are now certified to enable 1 pistol". It then goes into hiding.
Now, when the player presses the button that wields the pistol, the weapon handler will ask the backpack "are we registered for pistol use?", to which the backpack will proudly reply "YES", and the pistol wield sequence will get a go-ahead. |
Finally, there's a lot of talk of weapons and ammo. The inventory system is written for general use and doesn't really care whether a UnitBank is a flame thrower or a Pez dispenser. In other words: there is plenty of room for creativity!
The inventory system currenty has 3 main components to solve common tasks. For detailed info on their usage, see the tutorial chapters further down.
This component is responsible for keeping track of the item types that the player currently has access to, and to reply to other scripts that poll for this information.
The item identifier can be slapped onto any gameobject to basically say: "This is an item of type X". It is what allows the weapon handler to associate a particular first person weapon object with info from the inventory.
This component can be added to a game object to give the player access to a certain item on collision. It will temporarily hide its gameobject when it triggers (the gameobject can be re-enabled again using a vp_Respawner component).
Inventory scripts communicate by referring to 3 types of ScriptableObject, or ItemTypes. Think of these as the id cards for items, explaining what they are and in some cases defining basic inventory related stats. ItemType objects can be created from the top menu: UFPS -> Wizards -> Create Item Type.
This is the base ItemType that declares simple aspects such as the name, icon and description of an object. It is used for items that have no advanced inventory related logic in themselves.
This extended item type describes any object that can be "loaded" with a certain amount of compatible "Units". It is used to describe devices that are powered by a finite resource, for example: pistol, flamethrower, shotgun, crossbow, fire extinguishier, tazer, wand, cell phone, disposable camera, spray can, power drill, chain saw, oxygen mask, syringe.
Units are what power UnitBanks. In other words, each UnitType represents a limited, portable resource of which the player can potentially carry a large amount (which is why they are implemented as integer counters rather than object instances). Some examples of units would be: bullet, fire extinguishing foam, mana, shell, battery, film, oxygen, gasoline, red spray paint, blue spray paint, sedative, bolt, arrow.
Base UFPS has 6 demo item types, one for every physical object that can be picked up
(although a typical finished game could have scores or hundreds). The demo item types are:
|
|
|
Regarding Ammo Clips: There is no "Clips" concept in UFPS. The inventory simply has a bank of Units (bullets) of a certain type and when you reload, units get pulled up to the point where your weapon gets filled (in effect, if you have 17 bullets loaded in a 19 bullet pistol and hit reload, only 2 bullets will be pulled from the inventory instead of a whole clip of 19). This means that the "clip" concept only exists in the form of vp_ItemPickup prefabs that award a number of Units and have names and meshes that happen to resemble ammo clips. |
(Note that the AdvancedPlayer example prefab comes with a vp_PIayerInventory component already on it. The below steps only apply if you are using the SimplePlayer or Camera&Controller prefabs - or if you have created a custom player setup.)
From now on, every time the WeaponHandler wants to ready a weapon or fire a bullet, the inventory component will interfere - giving or denying permission. That is: as long as the items involved are identified using ItemType objects.
An ItemType object as shown in the Project View and
Inspector
An instance of the same ItemType in the form of an inventory Item Record
|
|
|
TIP: Think of this object as the ID CARD of your item. It will be used by all the scripts that handle items (vp_PIayerInventory, vp_ItemIdentifier, vp_ItemPickup) every time they need to communicate about this type of item. |
|
|
|
If you wish to create a new ammo type for your weapon, also create an ItemType for the ammo in the same way described above, but choose Unit instead of UnitBank. |
|
|
|
TIP: The UFPS demo weapons have over-simplified type names for clarity, but in any "real" game (with many types of similar weapons) your ItemType should pinpoint the actual model name of the weapon. Names like "Pistol", "Knife", "MachineGun" or "AssaultRifle" are not very practical. Examples of better names would be "Glock19", "Colt45", "AK47", "KABAR" and "M4", names that allow the inventory system to distinguish between items of similar category. |
|
|
|
|
Now we have declared that a certain type of item exists, but there is nothing binding that item type to any particular first person weapon yet. Your 3D weapon needs an Item Identifier.
... OR click on the small circle on the item slot and choose from all the available item types.
Done! Now whenever your player has an active vp_PIayerInventory component, you will be able to wield this weapon as long as the inventory contains a matching record of the same ItemType object. If not, it means your player does not yet own that weapon.
... OR click on the small circle on the item slot and choose from all the available item types.
Done. Now whenever a player collides with this gameobject, the vp_ItemPickup component will send a message to the player's vp_PIayerInventory component that the player has access to the ItemType.
|
|
|
"Weapon Index" here refers to the order of your weapon as childed under the FPSCamera gameobject, and has nothing to do with ordering inside the inventory. |
The Item Caps and Space Limit foldouts of the vp_PIayerInventory component has settings to limit item access by type & amount, and volume or weight. By combining different types of rules you can go very creative with inventory capacity.
|
|
|
Please note: While the inventory supports multiple weapons of the same type, currently the WeaponHandler does not. Future versions of UFPS will address this (things like dual wield, a.k.a. akimbo, involves some heavy re-writing of the weapon handler). For now it is recommended to always use an Item Cap of 1 for all weapons.
|
If you would like the player to be restricted to carrying only the items in the list - check the "Allow only listed types" checkbox.
|
|
|
TIP: If you would like certain items to not be affected by Space rules, just leave their Space at zero (0). |
|
|
|
Note that while this will allow you to pick up unlimited items and ammo, it will not affect the capacity of your weapons (loaded ammo will still be limited). |
To play the game with unlimited ammo and items, simply disable (or remove) the vp_PIayerInventory component.
Item ID is a scripting feature that provides a way to associate a certain gameobject with a specific item record. This is useful in games with quests or puzzles.
The inventory system does no hard-coded assignment of item values: if you add five pistols via the inspector they will all have an ID of zero, although the pickup system can optionally assign an inspector-defined ID upon pickup.
The UFPS demo items all have the default ID of 0, but your own game code can be written to rely heavily on IDs. Perhaps your game has hundreds of item instances and you need your ID:s to be GUID:s (globally unique identifiers), or you may be building an MMO where item IDs get pulled from a remote database. It's up to you as a programmer.
|
|
|
TIP: The vp_ItemInstance class has a method, SetUniqueID, which will assign a positive integer value that is practically guaranteed to be unique. |
There is some lore to how the inventory will pinpoint which item record to interact with given an incoming ID-based item request. That is: when a weapon is fired or reloaded and you want this to affect a specific item record in the inventory by setting the weapon's vp_ItemIdentifier ID to a positive value.
The only way to target a specific inventory item is to make sure the item pickup / item record has a unique, positive ID, and the item identifier has the exact same ID. If the inventory has multiple items with the same ID, the first item will get picked.
When using a zero ID, you are basically saying "I don't care about the ID. Let the inventory decide". In this case the inventory will always choose the first item record of matching type, even if the first item record has a positive ID, and there are item records further down the list with zero IDs.
if item identifier ID is zero
inventory always selects first item record of matching type (regardless of ID)
aborts if there is no item record of matching type
if item identifier ID is positive
inventory selects the first item record of matching type and ID (if any)
aborts if there is no item record of matching type and ID
if item identifier ID is positive and inventory item record IDs are all zero
always aborts
vp_Explosion is a simple death effect for exploding objects. It will apply damage and a physical force to all rigidbodies and player event handlers within range. It will also play a sound and spawn a list of FX gameobjects. These would typically be particles, but could also contain things like image effects. The explosion gameobject destroys itself as soon as the sound has stopped playing.
The included explosion prefab is intended as an example death effect for the vp_PlayerDamageHandler, but you can also spawn an explosion from script very easily with the following lines of code:
Object.Instantiate(ExplosionPrefab, position, Quaternion.identity);
Where "position" is the desired vector3 location of your blast, and "ExplosionPrefab" is a GameObject declared as public variable at the top of your script and assigned in the Editor:
public GameObject ExplosionPrefab = null;
Any objects within this radius in meters will be affected by the
explosion.
Amount of motion force to apply to affected objects. Force will wear off with
distance.
How much to push affected objects up into the air. This will only take effect on objects that are currently grounded.
Amount of damage to apply to objects via their "Damage" method. Damage will wear off
with distance.
How much of a shockwave impulse to apply to the camera. The impulse will wear off
with distance.
User defined name of the damage method on the affected object.
|
|
|
TIP: By using different damage method names for different prefabs (and creating corresponding methods in your target object scripts) multiple damage types can be supported. For instance: !MagicDamage", "FreezingDamage", "PlasmaDamage" etc. |
Random pitch range for the explosion sound. This will add variation and a little
realism. Variations in pitch should be kept minimal. A typical Min-Max range would be 0.95-1.05.
This is a list of special effects objects to spawn when the explosion goes off. This would typically be particle effects but may also contain rigidbody rubble or wreckages. There is no limit to the amount of objects. In order to add objects to an empty list, change the "Size " parameter to the amount of objects you intend to add, and the corresponding number of fields will appear.
Animated level geometry can occur in many shapes. Elevators, revolving doors, train carts, traps, collapsing ceilings and so on. These are commonly referred to as moving platforms; objects that the player can ride on top of - or get pushed around by.
The vp_FPController will be moved correctly if standing on top of moving objects (including rigidbodies) that have the MovingPlatform layer and a collider. As long as these two requirements are in place, the player will correctly inherit the rotation and velocity of the object, also when falling or jumping away from it. Sliding will automatically work on tilted or rotated moving objects.
|
|
|
IMPORTANT: In the default UFPS project, "MovingPlatform" is layer number 28. In case you have created a new blank project this may not be the case. Make sure your "MovingPlatform" layer is #28 in the list and it should work. Alternatively you may change the layer number in the file "vp_Layer.cs". |
|
|
|
When it comes to moving stuff around in Unity, you really have tons of options! You could easily create your own script to move an object. You could use rigidbodies or use third party tweening libraries. But note that UFPS works best with its own platform script called vp_MovingPlatform. Especially if you experience camera jittering, then it is recommended to try and use this script instead. |
|
|
|
You don't have to perform this step if using the vp_MovingPlatform script, in which case the layer will be set at runtime. |
This tutorial explains how to work with the vp_MovingPlatform component. This is a very versatile moving platform class, supporting various motion interpolation modes, path behaviors, collision detection, player physics responses and sound fx. For an in-depth reference of the component, see the next section.
|
|
|
IMPORTANT: The vp_MovingPlatform script needs to run after the default execution order. Should you experience any issues with it please go to "Edit > Project Settings > Script Execution Order" in the editor, press the litte "+" button, choose "vp_MovingPlatform.cs" and drag it to after the "Default Time". |
|
|
|
IMPORTANT: Make sure your waypoints have no active components (especially not colliders) on them - or click the "Generate Gizmos" button (optional). This will attempt to strip all objects in the waypoints group of any and all components and convert them to gizmos that are visible in the editor only.
|
A platform and two waypoints after clicking
"Generate Gizmos"
The Path foldout manages how this platform will negotiate its route.
In PingPong mode, the platform will go to the last waypoint via all waypoints - then back the same way.
In Loop mode, the platform will continuously move through all the waypoints without changing direction.
In Target Mode, the platform will initially stand still, but go to a target waypoint when the player stands on it. This mode enables a number of additional parameters (see below).
This slot should contain a gameobject with waypoint children. See the Moving platform tutorial for more info on how this works.
(Target mode only) Determines which waypoint to move to upon player contact.
|
|
|
When Auto Start Target is OFF (0), the platform must be operated via the script's public GoTo method. In case you have no desire to script elevator buttons yourself, see the 交互(Interaction) chapter and the Platform Switch Interactable for more info. |
(Target mode only) Determines how long the platform will wait at the destination waypoint before going back to the start.
(Target mode only) This is a value in seconds determining how long the platform will remain shut off after reaching its destination. During this time the player can't activate the platform.
Decides which direction the platform should initially negotiate its list of waypoints - backwards or forwards.
The Movement foldout handles the realtime motion pattern of the platform.
In this mode the platform will accelerate slowly from standing still, reach its top speed, then start decelerating as it approaches its final waypoint, finally gently coming to rest.
In this mode the platform will accelerate slowly from standing still, reach its top speed and stop abrubtly when reaching its final waypoint.
In this mode the platform will almost instantly reach its top speed, then start decelerating as it approaches its final waypoint, coming gently to rest.
This is a more exaggerated EaseOut. The platform will start very abruptly but take a long time to decelerate and come to rest.
This mode will have the platform negotiate waypoints in a rounded pattern. Though sometimes unpredictable, it's fun to play with since it gives the path a slightly organic feel (more so with several waypoints).
This is the most basic mode. It will have the platform moving between waypoints with no change in speed, that is: no acceleration or deceleration. This is great for slow moving platforms where you want exact control of the speed, however a platform with many waypoints will have a somewhat robotic feel at higher speeds.
A factor determining the overall velocity of the platform.
The Rotation foldout handles the realtime rotation pattern of the platform.
In this mode the platform's angle will interpolate in perfect sync with its position.
In this mode the platform will start rotating abruptly (immediately reaching its top rotation speed), then start decelerating as it approaches the final waypoint, gently coming to rest.
This is a more spring-like version of EaseOut, where you can use the Ease Speed slider to tweak the damping behavior. Values below 0.5 work best.
This mode lets you specify a constant rotation around an arbitrary vector. This is useful for making platformer puzzles, such as having giant rotating cog wheels in a factory.
This parameter determines how hard to smack the player when it gets run over by the platform. This is useful for moving or rotating doors.
|
|
|
This component works best when the player's vp_FPController component has its collision trigger active. Without a trigger, the controller will still be able to ride on moving platforms, but the platforms will not auto-start when stood upon and will not be able to push the player around or use its intersection solver. See the Controller chapter for more info. |
In the event that the physics engine fails to detect a player collision for some reason, the player may end up inside a moving object. This doesn't look very good. If snap is enabled, the player will in this case be forced to the top of the platform in a single frame, hopefully saving the day.
(Target mode only) This sound effect will be played once when a targeting platform starts moving.
This sound will be looped while the platform is moving and will stop when it is not.
This sound will be played whenever the platform hits a waypoint. Great for clunky machinery and the Lerp movement mode.
(Target mode only) This sound effect will be played once when a targeting platform stops moving.
The Interact Manager component allows interaction with any object that has a vp_Interact component added to it either by using a key for interaction (“F” by default) or by triggering the interactable by touching it with the player, such as a floor switch. There are 4 vp_Interact components: vp_Climb, vp_Grab, vp_Switch and vp_PlatformSwitch.
If you’d like to use the FPInteractManager with other scripts, you can access it via the vp_Activity Interact. So to try and start interaction from the vp_FPInput script, Player.Interact.TryStart() is used. The current interactable is stored in a vp_Value Interactable.
|
|
|
To learn more about vp_Activity, vp_Value and other events, check out the 事件系统(Event system) chapter. |
This is the max distance from the player camera to any object with a vp_Interactable component on it. (Can be overridden by any vp_Interactable).
Every vp_Interactable can override the FPInteractManager’s Interact Distance. This options allows a maximum interact distance to be set. For instance, if a vp_Grab component has an interact distance of 30, but the FPInteractManager’s Max Interact Distance is set to 25 and the player is 26 meters from the grabbable object, the player cannot grab the object until the player is 25 meters or less.
A typical interactable will be setup with a C# script that inherits from the vp_Interactable script. Interactables allow the FPInteractManager to communicate with the Interactable. All interactables require a collider. UFPS ships with 4 interactables which can be found by searching the project for the "Interactables" folder. You can of course extend the vp_Interactable class to add more interaction functionality if you like.
There are 3 types Normal, Trigger and CollisionTrigger.
These require the Interact key to be used (“F” by default) and the crosshairs must be looking at the interactable.
These types of interactables require the player to come into contact with the object. This also turns on the IsTrigger option on the collider.
These types of interactables require the player to come into contact with the object and keeps collision with the collider intact.
By supplying a list of tags, only objects with these tags can interact with an interactable object. If left at 0, the player will be added by default. This is useful if you have a trigger interactable that you want other objects to be able to interact with, such as a floor switch that can be triggered by throwing objects on the switch.
This setting will override the setting that is on the FPInteractManager. This value also will get overriden by FPInteractManager’s Max Interact Distance. If set to 0, this setting is ignored.
Adding a texture to this setting will change the crosshair to the texture you’ve added when interaction can occur with the interactable (in range and looking at the interactable).
If a string is provided here, the text will be shown on the screen above the crosshair after the Delay Showing Text time.
If this interactable is looked at and in range for the amount of time (in seconds) set here, the Interact Text will be shown.
This interactable allows the player to climb objects. Since this interactable uses the object's world forward vector, a little setup is required for this interactable to be effective.
Climb Object Setup
|
|
|
IMPORTANT: If you scale the GameObject that has the vp_Climb component on it, you may encounter inconsistencies. Try to keep the scale for the GameObject to Vector3(1,1,1) and change the scale on the collider component instead. An easy way of scaling the collider is in the scene view, if you hold down shift, handles will appear on the collider which you can grab and rescale the collider with. |
For interacting with climbable objects without requiring an input key press and with collision still intact, be sure to set the Interact Type to CollisionTrigger.
The player can climb no slower than the speed set here.
The speed at which the player climbs this object.
The speed at which the player will grab on and start climbing this object.
During climbing, this will be the distance from the climbable object that the player will stay.
This determines what the minimum velocity the player needs to be moving in order to interact with this climbable.
The amount of time in seconds that must pass once climbing has stopped in order to interact with this climbable again.
Turning this option on will rotate the camera to be level with the horizon when the player mounts this object.
With this option on, climbing input is handled with “W” moving the player up and “S” moving the player down. If this option is disabled, movement is handled in a more complex manner and works with look direction (pitch only). Here are some examples:
The amount of force applied when the player dismounts this object (reaches top or bottom of the climbable or jumps off).
The audio source that will play the climbing sounds. If none is provided, defaults to the Audio Source on the player.
A list of sounds to be played at random when the player mounts this object.
A list of sounds to be played at random when the player dismounts this object.
The speed at which Sounds > Climbing sounds is played
This parameter optionally pitches the grab, drop and throw sounds. Variations in pitch should be kept minimal. "X" is "Min" and "Y" is "Max". A typical Min-Max range would be 0.95-1.05.
A list of sounds to be played at random when the player is climbing this object.
This interactable will allow the player to pick up, drop and throw objects. Similar to weapons, it has sophisticated logic to animate the object procedurally while carried. Also, it has functions to handle various physics and collision cases. To setup a Grab interactable, just drag the vp_Grab script onto any object.
This works just like the Interact Text, but will show the text when you pickup an object.
An optional image to replace the crosshairs while this object is carried. If no image is specified, the crosshairs will just be removed.
Determines how much the player's footsteps affect the objects motion.
Determines to what extent fall impact will affect the object's motion.
This parameter determines how sluggishly the object will react when moved. Low values will make the object sway more as you move around. High values will make the object feel rigid and heavy.
Determines the ambient shake speed of the object.
|
|
|
TIP: This is a great feature for adding a sense of "documentary" realism. It can really make it feel as if a "real" person is holding the object. |
The strength of the ambient shake. Object will rotate randomly around the X, Y and Z axes. Also, the Y value will be applied to the object's vertical position.
How much force will be applied to the object when thrown.
This will apply a rotation force when the object is thrown, adding an extra dimension of realism.
A value between 0-1 that will slow down the player while the object is being carried. A value of 1 will slow down the player to a crawl. A value of 0 will make the object have no effect on player speed.
The purpose of this feature is to prevent the player from pushing grabbables through walls (and generally to avoid funky physics with external, static objects).
The value determines for how many frames a grabbed object can stay in touch with an external non-kinematic rigidbody (such as a wall, pillar or door) before the player lets go of it. This feature also makes the experience of grabbing things that sit above you on a ledge or a shelf a bit more realistic.
|
|
|
This feature will not detect kinematic rigidbodies, only static level geometry. |
|
|
|
A very low Max Collison Count will make the player more prone to accidentally drop an object. A higher value will make it easier to push objects through walls. |
This applies an offset to the object in relation to the camera. The default is set for a standard unity cube.
This parameter limits the camera's lower pitch angle while carrying an object. It is recommended to keep the default value (0 = looking straight ahead). Lower pitch values will send the grabbed object into the ground which makes for funky physics. Also, the default value will make grabbing things that sit on a lower ground floor than the player a lot smoother.
This parameter optionally pitches the grab, drop and throw sounds. Variations in pitch should be kept minimal. "X" is "Min" and "Y" is "Max". A typical Min-Max range would be 0.95-1.05.
A list of sounds to be played at random when the object is grabbed.
A list of sounds to be played at random when the object is dropped.
A list of sounds to be played at random when the object is thrown.
The Platform Switch Interactable allows control of vp_MovingPlatforms that are set to Target mode for their Path Type. This is useful for opening and closing doors or moving a platform when the player pushes a switch.
The amount of time in seconds before the player can interact with this switch again.
A GameObject with a vp_MovingPlatform component should be supplied here. In order for this switch to control the vp_MovingPlatform, it is important that Path Type is set to Target on the vp_MovingPlatform.
An Audio Source that will be used to play the Switch Sounds. If none is supplied, an Audio Source will be added to this object automatically.
This parameter optionally pitches the grab, drop and throw sounds. Variations in pitch should be kept minimal. "X" is "Min" and "Y" is "Max". A typical Min-Max range would be 0.95-1.05.
A list of sounds to be played at random when the switch is triggered.
This is a generic switch that allows for the ability to send a single message to another game object. This could be useful for triggering events in your game.
The target GameObject that a message will be sent to.
A SendMessage is used here to send a message to the Target GameObject.
An Audio Source that will be used to play the Switch Sounds. If none is supplied, an Audio Source will be added to this object automatically.
This parameter optionally pitches the grab, drop and throw sounds. Variations in pitch should be kept minimal. "X" is "Min" and "Y" is "Max". A typical Min-Max range would be 0.95-1.05.
A list of sounds to be played at random when the switch is triggered.
The UFPS surface system is responsible for spawning effects caused by collisions and impacts. It is designed to be dynamic, powerful and useful in a broad range of possible physics situations.
|
Spawns random sounds (of varying pitch), prefabs (of custom probability) and decals (of random scale) upon impact / collision with objects and players. |
|
|
Removes bullet holes if they overlap wall corners, and ages (weathers) remaining ones. Decals may fade and rotate. |
|
|
Handles footstep and footprint effects with three footstep detection modes, along with jump- and fall impact effects. |
|
|
Rigidbodies can trigger sounds, decals and particle effects dynamically depending on contact with other rigidbodies / terrains or other geometry. Ragdolled bodies can spawn sound and particles when falling to the ground. |
|
|
These allow you to assign surface type per object, and allows you to disable or enable decals for that object. |
|
|
Allowing you to identify surfaces depending on terrain- and object textures, supports UV regions within textures. |
|
|
Will figure out the best effect to play in situations where the system doesn't have information about impact- and / or surface type. |
An ImpactEvent goes into a SurfaceType, which triggers a SurfaceEffect.
UFPS scenes should have a hierarchy called 'SceneManagers', each containing a 'SurfaceManager', a 'DecalManager' and a 'PoolManager' gameobject. A ready-to-use prefab for your new scenes can be found under 'Base/Content/Prefabs/SceneManagers'. Note that after dragging this prefab into your scene, you may want to add scene-specific textures to the SurfaceManager's 'Texture Fallbacks' (this is required if you want footstep and bullet effects on terrains). Also, note that the pool manager is deactivated by default in the prefab. This is because it requires some understanding that can be confusing to beginner scripters.
Has fallback SurfaceTypes derived from the textures of the target objects. Also has default fallbacks for (potentially missing) impact- and surface types. One per scene (optional).
Handles the fading out (weathering) of decals, and smart removal of any badly placed decals. One per scene (optional).
Handles recycling of prefabs that frequently die and reoccur. Saves lots of memory and is good for performance. One per scene (optional).
The main surface concept in UFPS, used for spawning effects on
projectile or footstep impact (and potentially many other things).
A recipe for a bunch of effects to be spawned in response to a certain type of collision.
Identifies different collision types for surface effect and damage logic purposes. Typical ImpactEvents are: BulletHit, FallImpact, Footstep, ItemDrop, etc. Typically assigned to vp_FXBullet, vp_PlayerFootFXHandler and vp_RigidBodyFX scripts. One per bullet fired / footstep placed.
Associates scene colliders with SurfaceTypes. Sits on any and all scene objects, whether static or moving around. One per collider (optional).
Sits on the player body. Handles any and all effects that emanate from the feet of the player, from footsteps, jumps and fall impacts.
Sits on scene props and the player ragdoll. Triggers any and all effects that emanate from physics objects colliding with other objects and terrain.
Can be used to make decals (and other objects) rotate, shrink, fade and die when finally invisible.
Handles proper pooling of particle effects, whether using the Legacy or Shuriken particle system.
The vp_SurfaceManager component can be used to trigger effects depending on object textures, reducing the need for assigning a vp_SurfaceIdentifiers to gameobjects in the scene. It also has default fallbacks for (potentially missing) impact- and surface types. Using a scene SurfaceManager is optional but recommended. Without it, default fallbacks and terrain effects (among other things) won't work.
The SurfaceManager will try to derive the surface type of a raycast hit from various sources, including single textures, textures among multi-materials, and terrain textures. It is also possible to define UV regions for textures inside its editor (i.e. for atlas maps).
|
|
|
|
To create a new SurfaceType fallback for a texture group, click 'Add Texture Group' and be sure to assign a vp_SurfaceType. Then, add all the textures you want associated with that particular surface type by clicking Add Texture Slot. You can clear and remove slots by clicking the little [x] button. You can remove an entire SurfaceType by clicking the [Remove] button at top right of the foldout.
Click the [UV] button to restrict a surface to within a rectanguar region inside a texture. If two texture fallbacks share the same texture and have overlapping UV, the one that is higher up in the list will always be selected, and any other underlying ones will never be selected. To solve this problem, make sure the UV regions of identical textures do not overlap. Note that if you want to have several surfaces inside a single texture, you need to add the texture to a slot once for every UV region.
These fallbacks will be used when the system can not determine the ImpactEvent and/or SurfaceType involved in an impact. This can happen due to a projectile not having its vp_ImpactEvent set, or a target object lacking both a vp_SurfaceIdentifier and a texture fallback. See this section for more info on the runtime logic.
This is the impact type that will be used when the impact type is unknown (for example: a footstep or bullet has no impact type). The fallback will apply to all cases when the impact type is unknown, unless a surface type has an effect assigned to the contact fallback.
This is the impact type that will be used when the surface type is completely unknown (for example: an object has no surface identifier, and none of the object- or terrain surface fallbacks triggered for it. Your fallback surface can be one of the existing surfaces, but it is important that it has all the impact types in your game hooked to an effect, including the fallback impact type
When 'Allow decals' is false (recommended) default fallbacks will not be able to spawn decals, even if the vp_SurfaceEffect has them. This will prevent fallback decals that don't fit well with the target surface.
|
|
|
TIP: Fallbacks are very powerful, as they will allow you to provide rough behavior for all the surfaces in your game with all FX combinations accounted for - with an absolute minimum amount of work. |
Due to Unity engine internals, childing a decal to an object with non-uniform scale (meaning x, y and z scale are not identical) will result in decals that are strangely stretched / warped on such objects.
Therefore, objects that are non-uniform will only receive decals if the DecalManager's "Allow Non Uniform Decals" is true.
If the object has only slight scale deviations on one or more axes, the warping of the decals may be very slight and acceptable, but if scale deviations are considerable, decals will start to look very bad when childed to the object.
There are three different workarounds for this:
|
|
|
|
The vp_ImpactEvent ScriptableObject is used to identify different collisions types for surface effect purposes. It declares (by filename) a particular type of collision that will be used to trigger effects when sent into a collider that has a SurfaceType.
Typical ImpactEvents are: BulletHit, FallImpact, Footstep, ItemDrop, etc. When a bullet hits a rock floor, the ImpactEvent is what makes the SurfaceManager spawn sparks, dust and a ricochet sound instead of a footstep sound. To achieve this, vp_ImpactEvent objects are bound to vp_SurfaceEffect objects inside an encompassing vp_SurfaceType object.
You can set a global fallback ImpactEvent in the SurfaceManager -> Default Fallbacks, for cases where the impact event is unknown (for example: someone forgot to set an ImpactEvent on a bullet component).
|
|
|
When you have created a new ImpactEvent, it must be assigned in at least two places to do something:
|
|
|
|
TIP: The vp_ImpactEvent script itself doesn't really 'do' anything, and it has no settings. It is just used as an 'ID card' for a certain type of impact, which can be easily dragged around in the editor and assigned to slots. Of course, at runtime it plays a very important role in the communication between footsteps / bullet / rigidbody fx scripts and the surface system. |
The vp_SurfaceType ScriptableObject is the main surface concept in UFPS. Surfaces will trigger effects in response to projectile, rigidbody and footstep impacts (and potentially many other things). Every surface has a list of ImpactFX' structs, each binding an ImpactEvent to a SurfaceEffect for every type of collision effect response you want to cover.
The recommended usage is for most of your scene prop prefabs to have vp_SurfaceIdentifier components with vp_SurfaceTypes assigned to them. This is the most performant way for UFPS to look up a surface. When a projectile, fall- or footstep impact hits an object, UFPS will have the SurfaceType instantly, and will look for the ImpactEvent in the 'ImpactFX' list. If found, the corresponding SurfaceEffect will be played. If not, the SurfaceManager (if any) will try to revert to a good fallback effect.
'ImpactFX' lists all the ImpactEvents that are supported by this surface type - that is: the ImpactEvents that can result in a certain SurfaceEffect being triggered when hitting this SurfaceType.
Add or remove elements to the list by increasing or decreasing the number.
|
|
|
IMPORTANT: Be very careful when decresing this number, since if you decrease it too much, the last elements in the list will be destroyed. |
Whenever a projectile, fall- or footstep impact occurs, the vp_SurfaceManager looks for the particular SurfaceType + ImpactEvent combo here. Click the little circle icon to the left of each field to see the Project's available object types. If found, the resulting SurfaceEffect is played. If not, the SurfaceManager (if any) will try to come up with a good fallback effect.
When walking on this surface, should vp_PlayerFootFXHandler send extra info (regarding foot and direction) to the SurfaceManager? This setting will only work if there are fx with decals in the ImpactFX list. Keep this setting off unless you need it. For performance reasons you should only enable footprints on soft ground surfaces like snow, mud or sand.
The vp_SurfaceEffect ScriptableObject is a recipe for a bunch of effects to be spawned in response to a certain type of collision. It might trigger when a bullet hits a wall, or when a player makes a footstep, or falls violently to the ground.
Each object contains the data references and logic for a simple one-shot effect. When triggered, it plays a random sound from a list, spawns a bunch of prefabs (according to random probabilities), along with optionally a randomly scaled decal (via vp_DecalManager).
|
|
|
It is important to understand that a SurfaceEffect object itself is never spawned, as a prefab. Instead, it gets triggered and responds by playing sounds and itself spawning prefabs. The SurfaceEffect object doesn't exist at the "Scene level", but at the "Project level". |
When the SurfaceEffect triggers, one AudioClip from 'Sounds' will be randomly chosen and played.
If these values are 1, the sound will be played as-is. With any other values, the pitch of the sound will be multiplied by a random value inside this range.
Enable 'Max Once Per Frame' to avoid excessive sound volume on impact with effects that triggers many times at once (such as shotgun pellets).
All prefabs in this list will attempt to spawn simultaneously, success depending on their respective 'Probability'. Perfect for particle fx and rubble prefabs!
A value of 1.0 means the prefab will always spawn when this SurfaceEffect is triggered. A value of zero means it will never spawn (useful for temporarily disabling the object).
|
|
|
TIP: When spawning rubble prefabs, consider adding a vp_RigidbodyImpulse script to the prefab to give it some initial velocity. |
When this SurfaceEffect is triggered, one prefab from the list will be randomly chosen, spawned, surface aligned and added to the decal manager cueue, for fading out over time.
|
|
|
IMPORTANT: All prefabs are assumed to have a MeshFilter and MeshRenderer on their main transform with a classic 2-triangle quad (normal aligned with the Z-vector). The overlap detection features of vp_DecalManager require this type of decal (!). |
When the decal spawns, its prefab XY (surface aligned) scale will be multiplied by a random value inside this range. Z (forward) scale is not affected.
With zero overlap (default) any decals in this effect that overlap the corner of a wall the slightest bit will be removed. When overlap is maxed out (0.5) the decals are allowed to overlap corners all the way to their center. Please note that this feature only works if the scene has a vp_DecalManager component with active 'Placement Tests'. For footprints, this setting is ignored unless your 'vp_PlayerFootFXHandler -> Verify ground contact' is enabled.
The vp_SurfaceIdentifier component is used to determine what effects should emanate from the surface of an object when hit by impact events, such as bullet hits, footsteps, fall impacts and rigidbody collisions.
It is recommended to rely on SurfaceIdentifiers first and foremost when making your game, and only resort to the more advanced SurfaceManager features for special cases (like terrains and multiple material objects). If you make it a habit to put SurfaceIdentifiers on all your prop prefabs, they should "just work" by default no matter what scene you use them in.
This field determines what the object's surface is made of, and what vp_SurfaceEffect it will trigger when it gets hit by something. Click the little circle icon to the right of the field to see a list of the project's available SurfaceTypes.
|
|
|
TIP: If the list is empty, make sure to select the "Assets" tab of the popup window, rather than the "Scene" tab. |
This toggle determines whether bullet holes and footprints can stick to the surface of this object. It will override any SurfaceManager settings for this particular object. Useful for objects that have colliders that do not perfectly follow the shape of the object and thus will get bad decal placement.
This parameter can be safely ignored. It is only provided for backwards compatibility with the old ufps 'vp_FootstepManager'. It is not used by vp_SurfaceManager and will be removed in a future release.
This will make the player emit blood fx and flesh sounds when hit by bullets. To replace the demo sounds and effects by custom ones, select the 'Flesh' SurfaceType and modify it.
If the player has a ragdoll hierarchy, you may also want to do the same on at least the torso colliders (usually one for the chest and one for the lower torso). This will make the ragdoll emit blood effects even when the controller has been disabled. Of course, nothing prevents you from going to town and assigning SurfaceIdentifiers to all of the ragdoll colliders.
vp_DecalManager is a per-scene system for capping the amount of decals in the level and removing badly placed ones in non-intrusive and elegant ways. The system can be tweaked for realism vs performance in a very flexible manner.
By default there can be 100 decals in the scene. As new decals appear, older ones are weathered and eventually removed. The weathering and "100 decal cap" work by default in a static fashion (no need to add a component). If the scene has a DecalManager, the limits can be tweaked.
Only this many decals will be allowed in the scene at any given time.
This sets how many of the oldest decals will participate in a gradual process of fading just a tiny bit each time a new decal gets spawned (the oldest of these will be almost invisible).
|
|
|
|
Typically, decals are considered "badly placed" if they don't sit firmly and entirely on the parent object. For example: a bullet hole has been fired into the corner of a wall and one or more of its quad corners are outside the wall, making the bullet hole appear as a thin, flat sticker partly hovering in the air. This can be tested against using additional raycasts at the quad's vertices. Since excessive raycasting can be a performance issue, the DecalManager has settings to keep the amount of raycasts at any given time to a minimum. Depending on your target platform you can disable placement tests or significantly reduce the amount of testing.
When enabled (recommended) the DecalManager will slowly and gradually check all decals in the scene for surface contact. Over time, all failed decals will be removed.
|
|
|
TIP: In this respect, the DecalManager is like a janitor who tries to prevent decals from getting placed in buggy ways. If it gets overhelmed with too many decals it will pause, but patiently remember and clean the world of all badly placed decals over time. Slowly but surely only well placed decals will remain. |
On each interval (in seconds) one batch of decals somewhere in the scene will each have one corner (vertex) tested for surface contact.
When enabled, any decals spawning within range of the camera will have all four corners raycast for surface contact immediately. On fail, the decals will be removed.
Decals within this range of the camera will have all four corners raycast for surface contact.
Only this many quad raycasts will be performed each second. Additional ones will be buffered. Every VertexRaycastInterval seconds, one remaining quad corner somewhere in the scene will be tested for surface contact.
With this setting enabled, objects with non-identical X, Y and Z scales will also receive decals (with a risk of stretched decals). See this section for info on how to deal with stretched objects.
These settings determine how any badly placed decals will be removed.
When a decal has been flagged for removal (but stays on screen) it will postpone fading out for this many seconds.
Lower values will make flagged decals fade out slowly. Maxing out the slider will make them disappear instantly.
If enabled, any decal that has been flagged for removal will disappear instantly if the player looks away from it, a "now it's there - now it's not" trick ...
Use this manipulator on decals (or any other objects) to spawn animated surface effects for footsteps on soft wet mud, cooling plasma gun impacts and more. The decal will always fade out and can optionally be made to shrink and rotate. When it reaches below 0.1 alpha it will be destroyed.
The decal will wait this many seconds before it starts to fade out.
Affects the speed of fadeout.
The decal will wait this many seconds before it starts to fade out.
Affects the speed of shrinking.
The decal will wait this many seconds before it starts to spin around its forward vector (Z).
Baseline Z spin speed.
If this is enabled, the rotation speed will gradually increase.
This component handles all effects that emanate from the feet of the player, including from footsteps, jumps and fall impacts. It supports three footstep detection modes: 'Detect Body Step' (from animation), 'Fixed Time Interval' and 'Detect Camera Bob' (same as classic UFPS). The system delegates all effect spawning to the UFPS surface system by sending it vp_ImpactEvents.
Except for triggering fx that may be detectable by a human player in multiplayer, this component does not affect gameplay. For example: Fall impact effects are handled by this script, but fall impact damage is handled in 'vp_PlayerDamageHandler'.
Below is a component reference exaplining all parameters in detail. If you're in a hurry, you may want to skip ahead to the following footstep tutorials instead:
Setting up a Foot FX Handler on your player
Adding new footstep sounds to your game
Setting up footstep sounds for multiplayer
When using this mode, the timing of the footsteps will be determined by the animation and you don't necessarily have to create separate states for e.g. Run and Crouch.
In this mode, footstep effects are placed on the ground under the correct foot whenever it returns down after having moved above the "Detect Height" plane. It is the most "intuitively realistic" mode. However please note that results are very dependent on the quality of your animation and tweaking a good "Detect Height" to suit it.
To enable this mode:
In this mode, footsteps will be placed according to a timer, and the horizontal foot position will be used to place footprint effects at ground level. Each foot will trigger effects whether touching the ground or not (but this is hardly noticeable since feet are usually fairly close to the ground and moving fairly fast).
Use this mode if you want a different / more controlled footstep rate than that resulting from the animation - or if you don't have an animated body model but you still want particles to appear where the feet would have been. This is great if your character animation somehow produces irregular footsteps (making the character sound like it's limping).
In this mode, you may want to create separate states with custom intervals for e.g. Run and Crouch.
A typical "Interval" is 0.35.
This mode is what you want if your game is not using a player body model.
This is the classic UFPS footstep detection mode. It is designed for a player with no body (a "floating camera") and works by detecting when the camera bob "dips", that is: reaches its lowest value and ascends again. Obviously it requires your camera to have bob motion enabled. The following settings on your vp_FPCamera component will determine footstep rate: Bob -> Amplitude -> Y Bob -> Step Threshold
This determines what ImpactEvent your player's feet will send to the underlying SurfaceType when walking. The SurfaceType, in turn, will determine what sounds and other effects are played.
This should usually be set to the default UFPS "Footstep" ImpactEvent, but you may want to create additional ImpactEvents for things like different player classes.
you may set an existing bone as the foot transform, but please note that if you are planning to use footprints later on (e.g. on snow, sand), then it's usually better to place a specific gameobject since the forward vector of the foot transform will be used for determining the direction of the footstep. also, adding a specific gameobject for this allows more control over the foot position for footstep detection.
A typical 'Trigger Height' is 0.15.
this parameter affects how likely footsteps are to trigger when accelerating from standstill.
it is recommended to begin with this setting at the default (0.5) and tweak only if necessary.
decrease the value if there are too many initial footsteps when starting walking
increase the value if initial footsteps fail to trigger when starting walking
if you are only having trouble with a certain animation such as run or crouch, then you can override this value in the affected state using a preset
Due to Unity Culling, the bodies of remote and AI players will stop animating when offscreen, which effectively silences the "Detect Body Step" mode, preventing you from hearing footsteps behind your back (!). This setting will force the Animator component of the player body to animate even if offscreen. It will incur a performance hit but the tradeoff may be worth it for sake of the footstep audio. You will not need to use this setting if your game is singleplayer and your enemies do not use vp_PlayerFootFXHandlers.
when this is true, the player will only be able to produce footsteps when moving around. when it is false, footsteps will also be triggered when standing still and rotating.
in 'Detect Body Step' mode, it is recommeded to disable this setting for more realism, as this will produce subtle footsteps when looking around, not to mention stepping up or down onto objects / surfaces.
With this setting enabled (not recommended) the decal system will perform four extra raycasts per footstep (!) to verify ground contact.
Warning: For performance reasons it is recommended to only enable this feature in very special circumstances. See Advanced Topics for more information on the rare cases in which this might be useful.
This determines what ImpactEvent your player's feet will send to the underlying SurfaceType when jumping. The SurfaceType, in turn, will determine what sounds and other effects are played.
This should usually be set to the default UFPS "Jump" ImpactEvent, but you may want to create additional ImpactEvents for things like different player classes.
This determines what ImpactEvent your player's feet will send to the underlying SurfaceType when falling hard onto a collider. The SurfaceType, in turn, will determine what sounds and other effects are played.
This should usually be set to the default UFPS "FallImpact" ImpactEvent, but you may want to create additional ImpactEvents for things like different player classes.
Determines the impact force required for a fall to trigger SurfaceEffects. Note that this is a different threshold from the "Fall Damage Threshold" one set on the player's damage handler.
This feature allows you to tweak the position of the footstep nodes. It will pause the game every time the player makes a footstep (!). This simplifies tweaking of foot node position and decal prefab scale.
On pause:
For tweaking multiplayer footstep sound range with two side-by side standalone executables. When enabled, footstep effects will only trigger if the window is NOT focused. Toggle between the windows a couple of times for this setting to take effect in both windows.
|
|
|
TIP: Footstep sound range is determined by the AudioSource's 'Max Distance' setting. |
This works just like adding states for the controller, camera and weapons.
Having 状态(States) and presets usually will only apply to the 'Fixed Time Interval' footstep mode, which is for when you have a player without a body model.
In some situations you may want to to disable footsteps, for example to Support a crouching or sneaking state where the player should move silent as a mouse. This can be done by creating a state with a preset that sets 'Mode' to 0 (bypass).
The PlayerFootFXHandler component will cache the AudioSource hierarchically closest to each foot as belonging to that foot. If the feet have no audio sources, the AudioSource of the main CharacterController will be automatically used for both feet. Sound range is determined by the AudioSource's 'Max Distance' setting. UFPS impact FX will mute the sound beyond this range (unlike the default Unity behavior).
The vp_PlayerFootFXHandler has a setting called "Mute local footsteps". Since local player footsteps are always played at max volume it can be hard to hear other player's footsteps when testing on your own with two clients runnig on the same machine. This setting makes it so that the footstep sounds on the focused game window will be muted, allowing you to hear footstep sounds from the other game window. If you run by a remote player you will hear your own footsteps, just from the window of the remote player. Run past the other player really close, and then run away until you can no longer hear the footsteps. That's your footstep audio range. Please note that this setting only works for local player footsteps, not for remote or AI players, and not for jump- or fall impact sounds. A recommended footsteprange is 50 meters. This is set using the local player audio source's max distance parameter.
Simply open the audio source of the remote player and set the 'Max Distance'. 'Linear Rolloff' versus 'Logarithmic Rolloff' will have quite different results, where linear is more audible over distance. Typically in Unity, sounds will still be audible beyond MaxDistance in 'Logarithmic Rolloff' mode, but UFPS will mute the footstep sound when the distance between the main camera and the transform of the audio source exceeds the max distance, no matter what mode you are using.
To mute footsteps in certain states / during certain player activities, set the controller's 'MotorFootstepInterval' to 0 (zero) for that state. For example, to have footstep sounds only play when the remote runs, you could set the 'MotorFootstepInterval' to 0.4 in the run state, and to 0 in the 'Default' and 'Crouch' states. Footstep sounds will never play in the 'Dead' state.
By default, remote player footstep sounds using the "Detect body step" mode will
not play behind the local player (that is: you can not hear footsteps occuring behind your back, no matter
how close). this is because Unity stops animating (culls) off-screen animated characters: there are no
footsteps to detect because the model is not animating. if your game requires the local player to be able to
hear footsteps behind his back (recommended) then this can be fixed in two ways:
This script can be placed on a Rigidbody object to make it spawn SurfaceEffects and object sounds upon collision with external surfaces. When a rigidbody hits a certain surface, it plays a bash sound specific to that surface, and lets the surface spawn any additional effects such as particles and decals. For example: An object hitting rock can make the terrain eject dust and pebble particles - along with a gravely sound - while an object hitting metal could make the metal clang, but with very subtle particle effects (if any). A wooden crate might make a hard, rattly sound when hitting rock, but a softer, muffled sound when bouncing on grass. And so on. If the ImpactType is left blank the SurfaceManager will try and come up with fallback effects.
|
|
|
|
This sets what ImpactEvent the Rigidbody will send to external objects upon collision.
The default ImpactEvent used on all rigidbodies in the UFPS demo scenes is 'RigidbodyCollision'. This ImpactEvent is represented in all SurfaceType objects with suitable effects assigned.
The SurfaceType of the hit objects will determine what sounds and other effects are played. If ImpactEvent is left blank, the SurfaceManager will try and come up with fallback effects that may or may not make sense.
This setting is what makes dust / blood / paint / rubble / debris come off of the other object.
Determines the impact force required for a collision to trigger SurfaceEffects.
This sets how close a Rigidbody must be to the local player in order for the effects to spawn. An optimization in order to prevent massive amounts of effects potentially spawning in hectic games / large worlds, especially when the game initializes and all the physics objects come to rest.
This is a list of sounds that should emanate from this object in response to collision with specific SurfaceTypes.
|
|
|
TIP: If you don't want to spend time and energy setting up a specific sound for every prefab and surfacetype in the game, just assign the 'Default' SurfaceType along with a sound into one slot. This is a good way of providing a generic effect that is still specific to the surface hit. |
If you want item pickups to have a sound when they pop out of a crate and fall to the ground:
Making the player body emit sounds and particles when killed and collapsing on the ground can be very dramatic.
This should be enough for the ragdoll to spawn ground surface particles and sounds when it dies and falls down. Theres no need to make any other settings, although it might be fun to add a collision sound to the head saying "ouch" ;).
|
|
|
TIPS: You may want to experiment with different colliders depending on your own particular ragdoll setup, whether your game is 1st or 3rd person, singleplayer or multiplayer etc.
|
|
|
|
TIP: If you have an object with multiple materials that should only have the same surface type, for performance reasons it is a good idea to just put a vp_SurfaceIdentifier component on it. |
UFPS will cache the audiosource hierarchically closest to each foot as belonging to that foot. If the feet have no audio sources, the audiosource of the main charactercontroller will be automatically used for both feet. Having footstep sounds emanate from _exactly_ the correct position in 3d space would theoretically be desireable in e.g. Virtual Reality - but please note that for a regular human character the difference between having one audiosource per foot and using a single one inbetween the feet incredibly slight. Also, it is likely to create falloff and doppler issues since the distance from the feet to the audio listener (on the camera) will fluctuate a lot as the character walks and runs. For humans, audio will usually be more 'stable' with a single audio source at the bottom center of the character controller.
When enabled, every footstep will be extra carefully checked for surface contact using quadruple raycasts, like bullets. This might be useful in case your character has just stepped in blood or mud AND there is a ledge or staircase nearby (to remove the risk of footprints partly hovering over floor edges).
For performance reasons it is obviously recommended only to enable this feature in very rare and special circumstances. Footprints usually always spawn within the decal manager's quad test range, meaning there will be a huge increase in raycasts made from the player. Also, these tests will spam the DecalManager's cleanup process, delaying tests for bullet decals which are vastly more likely to have bad placement.
In summary, it's almost always overkill to verify ground contact for footprints and they seldomly overlap edges anyway (stairs are rarely carved from footprint materials like sand or mud).
Then again, perhaps your game supports bloody, or muddy feet and lots of stairways? If so, whenever the player got his feet wet, set the 'VerifyGroundContact' bool to true on his 'vp_PlayerFootstepTrigger' component using script, then set it back as fast as you humanly can when the liquid has dried off.
|
|
|
TIP: You can visualize quad-raycasting for footsteps by enabling 'Show raycast points' in the decal manager's debug section. |
|
|
Detect Body Step |
Detect Camera Bob |
Fixed Time Interval |
|
Automatic body animation sync |
YES |
- |
- |
|
Camera & weapon bob sync |
- |
YES |
- |
|
Foot to ground touch timing |
YES |
- |
- |
|
Detects standing still and turning |
YES |
- |
YES |
|
No need for states and presets |
YES |
YES |
- |
|
No body model required |
- |
YES |
YES |
|
100% control over footstep rate |
- |
- |
YES |
|
Works in 3rd person |
YES |
- |
YES |
This is the standard hitscan bullet script for UFPS. It's the only bullet script with built in compatibility with the UFPS surface system. Always use it for new projects.
Use this as a base class for your own awesome hitscan-bullet class, or use it as-is if you just need an invisible raycast to damage or tractor-beam something.
This is the legacy bullet system for UFPS. Only use this if you are porting an old game to a newer UFPS version purely for bugfix updates, or relying on it for your own classes based on legacy UFPS versions (for example: your own surface system) or if you find its features sufficient and you're not planning on using the new UFPS surface fx system. Existing projects should have vp_HitscanBullet replaced by vp_FXBullet. See the releasenotes for UFPS 1.6 for an upgrade guide.
When a pool manager instance is not present in the scene, Unity's regular 'Object.Instantiate' and 'Object.Destroy' will be used to spawn and kill objects. This feeds the garbage collector and potentially causes performance issues. Pooling will do a world of difference in terms of runtime object allocations when shooting and blowing stuff up, especially with the surface system which spawns a lot of particle effects. Pooling (recycling) of objects will always occur if the vp_PoolManger script is placed on a game object in the scene and enabled, saving lots of memory. When a pool manager instance is found, 'vp_Utility.Instantiate' and 'vp_utility.Destroy' will forward execution to vp_Poolmanager.Spawn' and 'vp_Poolmanager.Despawn, respectively.
Please keep in mind that objects must always be re-initialized in 'OnEnable' instead of 'Awake / Start' when using pooling. Failing to meet this requirement will often result in strange and hard to find bugs (such as every other grenade not exploding). For this reason, when you run into strange bugs, always remember to test with the pool manager deactivated. If things work all of the sudden, there's a big chance you need to move your MonoBehaviour's initialization from 'Awake / Start' to 'OnEnable'.
Adding prefabs to the pool manager's ignore list is an option that will solve many issues while still allowing you to still use the pool manager. For example: when things start working only every other time (e.g. a prefab or system only working every other time it is spawned) - then this is indicative of a pool manager issue and you could try adding suspected culprit prefabs to the ignore list.
Particles and pooling is a bit tricky in Unity. Make it a habit to always put the vp_ParticleFXPooler script on every one-shot particle fx prefab (!) to enable it for use with the vp_PoolManager system. Without this script, most Shuriken particle systems will be left in the scene forever (unless you destroy or despawn them manually). Similarly, without this script, any Legacy particle systems that use 'AutoDestruct' will be destroyed and garbage collected (instead of pooled) and the ones that don't will be left in the scene forever (unless you destroy or despawn them manually). It's a very useful script if you fire guns a lot.
Add a vp_SurfaceIdentifier component on the object
Make sure that there is not a vp_SurfaceIdentifier component on the target object: it will override all fallback settings.
This is a very unfortunate limitation due to Unity architecture. When you make an object "rendering static", Unity merges the meshes together in a way that prevents UFPS from deriving material info / texture coordinates for fx spawning. At time of writing there is three known solutions to this problem:
This is a Unity bug in versions prior to Unity 5.4 What happens is actually that objects loose their static flag when loaded at runtime (!). If you see stretched bullet decals on a non-uniformly scaled, static object that exists in a level that is loaded at runtime (e.g. for multiplayer) then you can fix it in two ways
Also, see this section.
Make sure the bullet decal is in the "Debris" layer
Camera bob step detection is very sensitive and this is likely a tweaking issue
The algorithm works by detecting when the camera bob sinus curve reaches its lowest point and starts going back up. Depending on the speed of the character, the sinus curve will have different "shallowness" which may affect detection.
When moving and turning fast, footsteps may sometimes fail to trigger, since turning slows the character down which dampens camera bob. this is a limitiation of this mode, rather than a bug.
If your game supports different controller states with their own speeds (e.g. Run, Crouch) then tweaking the values for each state is especially important for this to work consistently.
UFPS has a simple VR integration intended as a starting point for your own VR research and experimentation.
|
|
|
|
A full-featured VR FPS framework with support for many input flavors, VR platforms or hardware. Moving beyond the starting point described above, every VR game will have its own design quirks and favored input models, a vast possibility spectrum not covered by this feature set (or by support). That said, UFPS 2 will have more native VR support and likely broader platform support.
|
|
|
For an overview of limitations and unsupported features, please see this section. |
The basic gameplay setup is similar to the early VR demo of 'Doom BFG Edition' and a number of VR ports of existing FPS games, that is: the weapons are fixed to the head view of the player and are rotated to point where you're looking, with sway.
When pressing forward, you move in the direction you look. Besides being a standard approach, this allows desktop FPS games to be ported to VR without the need to rewrite a ton of stuff.
The "Comfort mode" is an example of locomotion and input designed to prevent nausea due to simulator sickness. It uses a popular teleport locomotion model where you point something to the ground nearby (in this case your gaze) and press a button to instantly go there (note that the "pointer" used does not need to be your head, it can be anything).
|
|
|
|
... OR a Gear VR with a bluetooth gamepad
https://developer.oculus.com/downloads/game-engines/1.3.2/Oculus_Utilities_for_Unity_5/
https://developer.oculus.com/documentation/game-engines/latest/concepts/unity-integration-req/
vp_VRCameraManager
vp_VRWeaponManager
vp_VRCrosshair
vp_VRPainFlash
vp_VRTeleporter
vp_FPInteractManager <- NOTE: You must drag this from the top to the bottom for proper interaction in VR.
|
|
|
IMPORTANT:
|
(GAMEPAD ONLY)
|
|
|
TIP: The easiest way of finding the prefab is just to type "ovrc" in the Project View search box. When dragging, be sure not to accidentally child the object to another object. It should sit in the root. |
This mode is the safest one from a nausea-perspective and works great for casual games, slow paced games and puzzle games.
(GAMEPAD RECOMMENDED)
This mode is a more traditional FPS setup, with some modifications to prevent nausea.
(GAMEPAD OR KEYBOARD & MOUSE)
If you are going to be playing with gamepad
This mode is suitable for action-packed desktop FPS games that happen to come with a "bonus VR mode".
|
|
|
Keep in mind that the Input Manager "Control Type" setting is important and will result in confusion if it's not properly matching the input hardware, so remember to go back and change this setting if changing input hardware later. |
If you are only about to try out the demo scene then you don't need to bother with the following yet (instead, read the demo scenes setup chapter and head back here later). But if you are ready to port existing scenes / player prefabs, go ahead and read on.
It's important to note that no VR gameobjects or components are added to the UFPS player. Instead, the player co-exists with an OVRCameraRig and gets manipulated at runtime by a bunch of "vp_VR" scripts in a separate gameobject. This design requires a minimum of player prefab setup, and allows you to toggle the VR mode on and off seamlessly when testing in the editor.
|
The player object |
A regular UFPS player with a VR camera setting enabled |
|
OVRCameraRig |
The default prefab supplied by Oculus (NOTE: this is not the OVRPlayerController) |
|
VRMode prefab |
A gameobject with the vp_VRCameraManager (required) and a bunch of optional "vp_VR" scripts. The pre-configured ones are: 'VRModeComfortable', 'VRModeModerate' and 'VRModeIntense'. |
|
|
|
TIP: Toggling the VR mode is not intended as a game feature, but more as a development convenience. Perhaps you don't want to spend the whole a day with a headset on and there may be some gameplay features and visual aspects of the game that you're able to tweak and test in desktop mode. In this case, you can just disable the VRManager prefab and the game will be instantly playable in regular desktop mode. |
The vp_FPCamera needs a single setting to get working with VR (although you will also want to adjust the weapon positions later).
In your player prefab, go to the vp_FPCamera component's 'Rendering' foldout and verify that its 'Disable VR mode on startup' setting is ON (checked). When the vp_FPCamera wakes up, this will temporarily disable the setting 'Virtual Reality Supported' found under Project Settings, and re-enable it when needed. It leaves it up to the game scripts to re-enable the 'UnityEngine.VR.VRSettings' boolean when appropriate.
This may seem counter-intuitive, but it's an important feature that will allow toggling between regular Desktop mode and the OVR Camera Rig at runtime. It will allow you to test-run the game in "normal mode" without having a headset on. Without it, the desktop camera view won't render correctly when the VR mode is disabled and mouse and gamepad will not work in the editor.
|
|
|
TIP: 'Disable VR mode on startup' is only applied in the editor. You can change that by commenting out the the #if UNITY_EDITOR line at the bottom of vp_FPCamera.Awake. |
|
|
|
The VR integration currently does not support the body system. This is because the body system is based on desktop view rendering tricks, and because VR with motion tracked headsets demand some quite complex IK. In short, it requires a new body system, and this is planned for UFPS 2. |
If your game is VR only
If your game supports both Desktop and VR modes, and you need the player body for Desktop mode
Since the body object gets either deleted or disabled in the current setup, you need to create an additional vp_PlayerFootFXHandler specifically for the VR mode. This can not rely on an animated player body, and so needs to be added to the main player gameobject and use a footstep detection mode that does not rely on the animated player body.
|
|
|
|
Note that you don't need to worry about disabling potentially nauseating features on the camera component itself. This can be done on the vp_VRCameraManager. For more info see this section.
Since there's no ragdoll, the camera will revert to using its death state when the player is killed. You should tweak this for a slightly higher position that in default UFPS, or the headset camera will probably clip the ground in many situations. See the included preset 'VRCameraDead' as an example.
The Reload camera state is unnecessary in VR and may cause irritating, subtle sliding of the camera view, for example: when pressing the reload / interact button without having a weapon wielded. However, it must not be removed entirely from the camera, because this will mess with player auto reload logic. Instead, keep the Reload state on the camera but make sure the preset is empty ('None').
Revise your camera states to remove any states that are only suitable for desktop play. Have a look at the camera states in the 'VRHero' prefab for a good minimum setup.
You will want to modify at least the following weapon properties for best appearance in VR (the VRHero uses its ows presets for several weapon states and you can find them in the VR/Presets folder).
The VRCameraManager will automatically disable the weapon camera (!) and this means that the weapons will appear quite different in the headset view (one positive effect of this is that the weapons will now receive shadows, which they normally don't). You will need to tweak the positions in the various states.
|
|
|
The provided weapon VR Zoom states assume that the user will press zoom (aim down sights) and close their left eye (similar to how aiming works in the real world if you are right-eye dominant). You may want to provide two different sets of zoom states to offer a user-preference for this. There is no modification of camera FOV (which is generally discouraged in VR). |
Since there's no weapon camera, by default the weapons will clip through geometry. UFPS has a feature to alleviate this somewhat: Weapon Retraction.
|
|
|
TIP: If all your weapons have roughly the same length, or you are planning to use the exact same player prefab for VR and desktop mode and don't want retraction for desktop mode, you can force the same retraction distance on all weapons in the vp_VRWeaponManager. |
While these can be tweaked by stating relative positions on the components, it's best to add gameobjects for the muzzleflash and shell eject points as described here.
|
|
|
If you want to ship a game that has both a built-in VR and a desktop mode, you will likely have to provide two sets of local player prefabs: one with the weapons adjusted for VR, and one with the weapons adjusted for desktop rendering. |
These prefabs have some or all of the UFPS VR scripts, that co-exist with the OVRCameraRig and manipulate the UFPS player. Whenever it is active and enabled, the UFPS player will run in VR mode. Whenever it is disabled (even at runtime), the UFPS player will go back to normal. The prefabs can be found under "UFPS/VR/Prefabs/VRModes"
There are three prefabs to choose from:
The scene must always have an OVRCameraRig in the root (found under "OVR/Prefabs"). Note that this should NOT be the 'OVRPlayerController', which is not used by UFPS. This script is included in the Oculus Utilities you downloaded in the setup step.
Large rigidbodies that the player is able to view close up, should have their "Interpolate" property set to "Interpolate" for smooth movement.
|
|
|
TIP: For existing scenes, make a multi-selection by searching for these instances in the hierarchy view search box by name, and change this setting for all of them at once. |
The 'VR' folder under the UFPS root contains the UFPS VR integration. The first thing to note is that these scripts are not supposed to be attached to the player, but should sit on a gameobject of their own in the scene root. For more info, see the VR Overview section.
This component keeps an Oculus VR camera rig attached to the UFPS player controller and enforces headset rotation onto the player pitch and yaw at all times. It also forwards camera shakes (if allowed) and handles input for smooth or snap yaw rotation.
In addition, it has several settings to help you minimize nausea due to simulator sickness, which is an important subject matter to study for any VR game designer.
Potentially nauseating features like bob, shake, roll sway and controller sliding can all be disabled on an individual basis in the vp_VRCameraManager script (note that you don't need to disable them on the camera component itself). Bob and shakycam should probably be disabled in most VR games (certainly "Comfortable" ones), but if your game is "Moderate" or "Intense", then the occasional explosion shake could be considered (and is pretty awesome in VR).
This mode is designed to prevent nausea, commonly caused by the camera spinning, and is intended for gamepad use. The player can use the left stick to instantly rotate the camera by 45 (default) degrees, with a footstep effect played for immersion.
|
|
|
By default, this mode uses the horizontal move vector and not a button. This can be changed inside the script (see the snippet in 'vp_CameraManager.cs -> UpdateSnapRotation'). |
Should the player rotate by fixed degree steps?
Step angle in degrees for snap rotation.
Minimum time interval between step rotations.
Keeps a cursor prefab hovering in front of the FPCamera, but snapped to the surface of any object we're looking at. If we're not looking at an object, relaxes cursor position away to the a distance from the camera.
A quad with a crosshair texture and the normal facing along its Z vector.
A quad with an interact icon texture and the normal facing along its Z vector.
When aiming at nothing, the cursor will slide to a stop this far away from the camera.
When aiming at nothing, this is the speed at which the cursor will move to the max distance point.
When closer to the camera than this, the crosshair will fade out.
When closer to the camera than this, the interact icon will fade out.
When aiming at something, the cursor will stop this far in front of it to avoid clipping / fading into it.
Should the crosshair be hidden while zooming (aiming down sights)?
This optional script can be used to adapt UFPS vp_FPWeapons for VR camera use. It is intended only for games without hand tracking (so gamepad or keyboard-&-mouse only). The script keeps the weapon pointing in the camera direction, imposes weapon sway from input and headset rotation, and prevents the weapon from rendering at extreme pitch angles where it would otherwise rotate crazily.
The weapon will be made invisible when looking up or down by this many degrees, to prevent it from behaving erratically.
How much should the weapon sway behind when looking around using headlook? (generic for all weapons)
How much should the weapon sway behind (horizontally) when looking around using gamepad / mouse? This multiplies the FPWeapon's rotation look sway Y value. Does not work if the VRCameraManager is set to use 'SnapRotate'.
If zero, does nothing. If positive, forces the current weapon's 'RetractionDistance' to this number (same for all weapons). If you want to set this individually for each weapon, keep this at zero and do so on the weapon components (and state presets, if any), but keep in mind that this will affect the desktop game mode (if any) as well.
This is an implementation of a popular VR locomotion model by which you point to the ground and press a button to go to new positions. This can significantly reduce nausea due to simulator sickness and works great for casual games, slow paced games and puzzle games.
The object that points to the ground to pick a destination point. If not set, the transform of the vp_FPCamera will be set. However, this could be set to any object (such as an Oculus Touch controller).
This object will be spawned once, snapped to the destination point and (optionally) made to face the camera at all times.
If true, the cursor gameobject will be rotated to face the camera at all times. Set this to false if you want to put a vp_Spin script on the cursor.
The maximum distance the player will be able to teleport from the current position. The cursor will be visible within this radius unless objects are blocking the way.
The minimum delay between teleports.
If teleporting to a surface lower than the current position, fall impact will be applied beyond this vertical teleport distance, in relation to the distance.
If disabled (default), the player will be prevented from jumping at all times even if the jump button is bound. We've found that regular jumping doesn't quite make sense with the teleportation locomotion model.
This script piggybacks off the regular UFPS vp_PainHUD to detect when the intensity of incoming damage (and death) and updates a full screen fx plane in front of the camera with pain flashes and blood spatter. The vp_PainHUD is prevented from drawing GUI, and its realtime color values are copied and used by this script instead.
A quad with the normal facing along its Z vector. gets texture assigned automatically from the other public properties.
Should be a white texture that fades to zero alpha in the middle. if not set, will be acquired from the vp_PainHUD instance.
Should be a texture with blood splatter in it. if not set, will be acquired from the vp_PainHUD instance.
The distance of the plane from the camera (enforced at runtime).
It's good to keep in mind that UFPS was designed for desktop FPS games, and this collection of scripts is mostly intended to save you time by removing some of the research tasks and implementing the workarounds that everyone would have to go through porting an UFPS game to VR.
Moving beyond that starting point, every VR game will have its own design quirks and favored input models (a vast possibility spectrum that can hardly be covered by this framework). UFPS 2 will have more native VR support and likely broader platform support.
The following features / potential features do not work with - and are not covered by support for - the VR integration:
"[VRDevice] Initialization of device oculus failed."
This is a problem with Unity not detecting the Rift (unrelated to UFPS). It may be caused by a faulty Oculus plugin installation. Things you can try:
This error will occur if you try to import Oculus Utilities in a too old version of Unity. Make sure you are running at least the version required by Oculus.
This error will occur if you have a broken installation of the Oculus Utilities. Make sure you are running at least the version required by Oculus and reinstall Oculus Utilities.
Make sure that your project's Graphics API is set to Direct3D11. See this installation step for more info.
Try to delete the player gameobject and drag the prefab into the scene again. If you have changes on the prefab, don't forget to click "Apply" first.
Have you installed the Oculus utilities and dragged an OVRCameraRig into the scene? Before VR mode works, make sure you have done all those things and all the other setup steps described in the setup chapter.
Make sure that the editor game window has focus.
This seems to be some form of temporary input bug in either Unity 5.3.4 or the Oculus platform.
Here's a workaround to enable firing per game session:
We'd appreciate any findings regarding this issue.
Make sure the input manager is set to Control Type -> Joystick.
Make sure the input manager is set to Control Type -> Keyboard and Mouse.
Make sure the input manager is set to Control Type -> Joystick.
Make sure that the editor game window has focus.
This is currently bound to the top right shoulder button (RB) and not the fire trigger/axis (RT).
vp_FPInteractManager must execute last in VR. See this section.
You may need to assign a vp_PlayerFootFXHandler to the root controller transform. See this section.
Set the "Interpolation" of all rigidbodies (where this is noticeable) to "Interpolate" for smooth rigidbody movement.
Image Effects (Unity Pro only) are an awesome addition to any FPS and will give your game that
next-gen look. UFPS has been tested with all image effects available in the Pro Standard Assets package (see
Image FX compatibility notes). For more information about how to get started with image effects, check out the following
links:
http://docs.unity3d.com/Documentation/Manual/HOWTO-InstallStandardAssets.html
http://docs.unity3d.com/Documentation/Components/comp-ImageEffects.html
No image effect Fisheye on FPCamera Fisheye on WeaponCamera
The Rendering Path of the two cameras will influence the behavior of image effects.
When Forward Rendering is enabled, image effects will work on either the FPCamera (maincam) or the WeaponCamera, as described above.
When Deferred Lighting is enabled, image effects will only work if assigned to the WeaponCamera. The effects will render on both the scene and the weapon.
|
|
|
IMPORTANT: When Deferred Lighting is enabled, the FPCamera (maincam) and the WeaponCamera must use the same HDR setting (on / off), otherwise there will be serious rendering artifacts.
|
If a camera's rendering path is set to Use Player Settings, you may alter it by going to Unity's top menu and "Edit > Project Settings > Player > Per Platform Settings > Other Settings > Rendering Path".
When attached to the WeaponCam this effect will only work on the weapon, not the
scene.
These effects will work best if attached to the FPCamera, though they will only affect the scene and not the weapon. If you wish to blur the weapon and close surroundings but keep the target sharp (for example when sniping) consider instead using the "Vignette and Chromatic Aberration" effect.
Example of the Vignette and Chromatic
Aberration effect using Blur
This image effect does not currently work with UFPS.
This effect will not work with Deferred Lighting, and must be assigned to the
FPCamera. Hence it will only affect the scene and not the weapon.
This effect will not work with Deferred Lighting, and must be assigned to the
FPCamera. Hence it will only affect the scene and not the weapon.
If attached to the WeaponCamera, the shafts will only be cast off of the weapon geometry, not the scene geometry (looks cool though).
The Input Manager allows creating input schemes for keyboard+mouse, touch and gamepad controller. The Input Managerhas the default event types of UFPS preconfigured. It removes the need for most hard-coded keycode checks which means you don't necessarily have to edit scripts to change the controls. The Input Manager can be accessed from the top UFPS menu.
All UFPS input should run through the vp_Input class to keep all input in one centralized location. Some examples from vp_FPInput.cs:
// have the player jump continuously while "Jump" button is held
if (vp_Input.GetButton("Jump"))
Player.Jump.TryStart();
else
Player.Jump.Stop();
// start reload activity when "Reload" button is pressed down
if (vp_Input.GetButtonDown("Reload"))
Player.Reload.TryStart();
// if user releases 'ENTER', toggle mouse cursor on / off
if (vp_Input.GetButtonUp("Accept1") || vp_Input.GetButtonUp("Accept2"))
Screen.lockCursor = !Screen.lockCursor;
The vp_Input system can be used to rebind controls at runtime (which is not supported by the standard Unity Input Manager). This is done using the method vp_Input.ChangeButtonKey. If its "save" parameter is true, the key for that button will be saved for next runtime. Example usage:
vp_Input.ChangeButtonKey("Jump", KeyCode.G);
|
|
|
|
For a brand new Unity project, the input axes required for gamepads in UFPS will not work by default.
|
|
|
These two new axes are currently hardcored in vp_FPInput.cs. The LeftTrigger will enable the player "Run" state when pressed more than 50%. The RightTrigger will fire the weapon. |
|
|
|
IMPORTANT: Make sure to not do delete "vp_Input" in the Project view, or you will destroy the UFPS Input manager script. |
|
|
|
In the default UFPS project the Unity Input Manager has modified duplicates of the MouseX, MouseY, Horizontal and Vertical axes to provide mouselook functionality via gamepad. It also has two new custom axes: LeftTrigger and RightTrigger, for gamepad use. |
The vp_LocalPlayer class is a wrapper to greatly simplify scripting with UFPS. It provides global quick-access to the local player and its most common UFPS components. Also, it exposes a number of local player + input properties and methods for quick and straightforward access in a single place.
Just make sure the scene has a proper UFPS local player setup, and you should be able to access the components, methods and properties of vp_LocalPlayer from within any script in the code base. Some examples:
vp_LocalPlayer.MaxHealth = 5; // set the local player's max health to 5
vp_BodyAnimator a = vp_LocalPlayer.BodyAnimator; // retrieve its bodyanimator
vp_LocalPlayer.Stop(); // stop the local player in its tracks
|
|
|
TIPS:
|
The following properties are usually not needed, but may prove useful if vp_LocalPlayer should ever throw nullreference exception:
Returns true if UFPS has been able to cache a vp_FPPlayerEventHandler in the current scene, false if not.
If this returns false (perhaps due to loading, or the local player not having spawned yet in multiplayer), then it is not a good idea to use vp_LocalPlayer calls. If this is the case, try running 'vp_LocalPlayer' Refresh and check 'Exists' again before using vp_LocalPlayer.calls.
Caches the local player event handler in the current scene (as opposed to a potentially null player from the previous scene) along with all of its most common UFPS components.
Gets or sets the world position of the player.
Does not stop the player if moving.
Gets or sets the world rotation of the player. The controller will rotate around the world Y axis. The camera will rotate around its X and Y axes, subject to pitch and yaw limits. Any body animator will follow suit: the head will rotate along with the camera. The body and feet will only rotate and move if the new direction diverts from the previous controller forward direction by more than 90 degrees. Basically, if you stand still and try to look over your shoulder, your feet and lower body wil readjust to face that direction. If not, your feet will always stay still no matter how much you look around.
Returns the direction between the player model's head and the look point. Note: Not necessarily the direction between the camera and the look point (it might be a 3rd person camera)
Returns the direction between the weapon model and the look point. In 1st person, this is identical to 'BodyHeadLookDirection'. In 3rd person it is not.
Gets or sets the current player world velocity. The velocity returned is calculated in the same way as that of Unity's CharacterController. Note that setting this value won't have any effect on player position, it will only affect internal states such as animation speeds (!). To add physics velocity to the player, use 'AddForce'. To forcibly move the player to a position,
use the 'Position' property. To stop the player, use the 'Stop' method. To relocate, rotate and stop the player, use one of the 'Teleport' methods
Returns the overall world velocity of the player controller
Adds one frame of external force to the player controller, pushing it in the 'force' direction
Forces the player controller to move according to the provided 'inputVector' in joystick format: a Vector2 where X represents sideways and Y represents forward / backward motion with values ranging from -1.0 to 1.0. This needs to be called every frame in 'LateUpdate()'
Stops the controller in one frame, killing all forces acting upon it, and snaps all camera motion and zoom to a halt. Note that if you are calling 'Move' every frame, this will not have effect
In UFPS, "teleportation" means moving the player to a new location and look angle, halting all controller forces and camera motions (as opposed to simply repositioning or rotating the player object).
Moves the controller to the world 'position' and 'rotation' and stops it.
'rotation.x' is camera pitch, and 'rotation.y' is camera yaw
Moves the controller to the world position (x, y, z), sets the camera angle according to 'pitch' and 'yaw' and stops all controller and camera motion
Moves the controller to the world 'position' and stops it, without affecting rotation
Moves the controller to the world position (x, y, z) and stops it. Does not affect rotation
Snaps the player to a placement decided by the specified spawnpoint, taking into account the spawnpoint's radius, ground snap and random rotation settings. If the player has a vp_Respawner component, its 'ObstructionRadius' setting will be used for obstruction checking. Otherwise the obstruction radius will be 1 meter.
Returns the world transform that the player is looking at, within a max range of 2 meters. Returns null if looking into empty space, or if the object has no collider.
|
|
|
TIPS:
|
Returns the world transform that the player is looking at, or null if looking into empty space, or if the object has no collider. This will not return transforms positioned inbetween the camera and the local player (if in third person mode). If 'layerMask' is not provided, then 'vp_Layer.Mask.ExternalBlockers' will be used.
|
|
|
TIP: This can be used to highlight objects that the player is looking at |
Gets the transform of the solid object that the player is currently standing on (if any). Might be the same as 'Platform'. Returns null if the player is jumping or falling.
|
|
|
TIP: Use 'IsGrounded' to simply check for ground contact |
Gets the transform of the platform that the player is currently standing on (if any). Might be the same as 'Ground'. Returns null if the player is not standing on a platform.
|
|
|
TIP: In UFPS, a platform is defined as a solid object that has the 'MovingPlatform' (28) layer (and usually also a vp_MovingPlatform script) |
Disconnects the player controller from the moving platform it's currently riding on (if any). If the platform is moving, this will make the player slide off of it.
|
|
|
TIP: Use 'AddForce' right afterwards to fling the player off the platform in a particluar direction |
Returns true if the local player controller is standing on a solid object, false if not
Applies damage to the player in simple float format, sends a damage flash message to the HUD and twists the camera briefly
Assembles damage in UFPS format from individual parameters and sends it to the player, resulting in damage, a HUD damage flash and brief camera twist. The local player can not damage itself with 'vp_DamageInfo.DamageType.Bullet'
Applies damage to the player in UFPS 'vp_DamageInfo' format, sends a damage flash message to the HUD and twists the camera briefly. The local player can not damage itself with 'vp_DamageInfo.DamageType.Bullet'
Immediately kills the player and schedules a respawn. If 'painHUDIntensity' is positive, uses it to send a HUD damage flash. The required components are:
vp_FPPlayerDamageHandler (for kill), vp_Respawner (for respawn) and vp_PainHUD (for HUD damage flash)
Gets or sets player health. The health is not allowed to go above MaxHealth, but negative health is allowed (for things like gibbing)
Gets or sets the player's max health. If the value is lower than CurrentHealth, then that will be capped to the new MaxHealth
Toggles to the next weapon if currently allowed (present in inventory) otherwise attempts to skip past it (wield the weapon after it)
Toggles to the previous weapon if currently allowed (present in inventory) otherwise attempts to skip past it (wield the weapon before it)
Attempts to wield a weapon by the name of its 1st person weapon gameobject as childed under the main FPSCamera gameobject. Will fail if no such gameobject exists, or if there is an inventory script preventing it
Attempts to wield a weapon by the chronological index of its 1st person weapon gameobject as ordered under the main FPSCamera gameobject. Will fail if no such gameobject exists, or if there is an inventory script preventing it
Unwields the current weapon, leaving the player unarmed
Returns the gameobject name of the currently wielded 1st person weapon gameobject as childed under the main FPSCamera gameobject
Returns the chronological index of the currently wielded 1st person weapon gameobject as ordered under the main FPSCamera gameobject
Returns amount of ammo left in the currently wielded weapon (intended for HUD scripts).
Returns max ammo of the currently wielded weapon (intended for HUD scripts)
Returns extra 'backpack' ammo for the currently wielded weapon (intended for HUD scripts). This method will only work with the UFPS inventory system
Returns the Texture2D icon of the ItemType of the currently wielded weapon (intended for HUD scripts). If using the UFPS inventory system, this texture is set on its ItemType scriptable object
Switches to the 1st person view
Switches to the 3rd person view
Toggles between the 1st and 3rd person views
Always returns true if the player is in 1st person mode, and false in 3rd person
Returns the player collider, most likely a Unity CharacterController
If the local player has an animated body hierarchy, returns the transform of the head bone set on the vp_FPBodyAnimator component. Otherwise returns the transform of the main 1st person camera
If the player has a foot fx handler, returns the transform of the gameobject set in its 'Footsteps -> LeftFoot' slot. Otherwise returns the transform of the player controller
If the player has a foot fx handler, returns the transform of the gameobject set in its 'Footsteps -> LeftFoot' slot. Otherwise returns the transform of the player controller
This property allows you to change the death sound of the player at runtime
This property allows you to change the type of ImpactEvent that the player sends when making footsteps. This makes it easy to change the footstep effects at runtime for different situations or states, such as 'Sneaking', 'Sprinting', 'Wet', 'Wounded' etc. For info on how the surface effect system in UFPS works, please see the manual.
This property allows you to change the type of ImpactEvent that the player sends when falling hard to the ground. This makes it easy to support different types of fall effects for different situations or states. For info on how the surface effect system in UFPS works, please see the Surface System chapter
This property allows you to change the type of ImpactEvent that the player sends when jumping. This makes it easy to support different types of jump effects for different situations or states. For info on how the surface effect system in UFPS works, please see the manual
Makes the camera shake momentarily as if a bomb has gone off nearby. The default force will be 0.5f unless a 'force' value is provided. You may provide an AudioClip and AudioSource to also play a sound. If 'audioSource' is empty, the main camera's audio source will be used
Makes the camera shake momentarily as if a large dinosaur or mech is approaching. Great for bosses! the default force will be 0.5f unless a 'force' value is provided. You may provide an AudioClip and AudioSource to also play a sound. If 'audioSource' is empty, the main camera's audio source will be used
Re-enables gameplay input (moving, firing, jumping, reloading, crouching etc.)
Blocks the player from moving and sending gameplay input (moving, firing, jumping, reloading, crouching etc.). This does not affect freelook, mouse cursor or GUI input. To disallow these, please see the various 'Mouse' and 'FreeLook' methods
Toggles 1st person gameplay input on and off (moving, firing, jumping, reloading, crouching etc.). This does not affect freelook, mouse cursor or GUI input. To toggle these, instead use 'ToggleMouseCursor' and 'ToggleFreeLook'
Re-enables camera freelook
Disables camera freelook
ToggleFreeLook()
Toggles camera freelook on and off
Restores the crosshair texture in case it has been previously hidden
Backs up the current crosshair texture and replaces it with an invisible one
Toggles crosshair visibility on / off
This property allows you to change the crosshair texture at runtime. Here's a very simple script to change the crosshair when it's over an enemy object (remember to set your chosen enemy layer on the target objects)
public int EnemyLayer;
public float Range = 50;
public Texture HaveNoTargetTexture;
public Texture NoTargetTexture;
void Update()
{
if ((vp_LocalPlayer.GetLookTransform(Range) != null) && vp_LocalPlayer.GetLookTransform(Range).gameObject.layer == EnemyLayer)
vp_LocalPlayer.CrosshairTexture = HaveTargetTexture;
else
vp_LocalPlayer.CrosshairTexture = HaveNoTargetTexture;
}
Disables freelook and firing, and enables the mouse cursor all over the screen, allowing GUI mouse input such as clicking buttons
Enables the mouse cursor all over the screen and disables firing, while still allowing freelook and body rotation
Hides the mouse cursor, disabling GUI mouse input.
Toggles mouse cursor and freelook on and off. Please note that hiding the mouse cursor cleanly will only work in fullscreen mode. In the editor, and in windowed mode, the game window must receive a click to hide the mouse cursor
Returns true if the local player is the master of an ongoing multiplayer session. Always returns true in singleplayer. This is a functionality of the 'UFPS Photon Multiplayer Starter Kit'. Manipulate the value using the 'vp_Gameplay' class in case you wish to hook it into another network layer. To check whether the game session is currently in multiplayer or singleplayer mode, you can check 'vp_Gameplay.isMultiplayer'
Retrieves the UFPS player event handler of the local player in the current level, or null if non-existant.
Retrieves the UFPS camera of the player in the current level, or null if non-existant.
Retrieves the UFPS controller of the player in the current level, or null if non-existant.
Retrieves the UFPS input manager of the player in the current level, or null if non-existant.
Retrieves the UFPS damage handler of the player in the current level, or null if non-existant.
Retrieves the UFPS weapon handler of the player in the current level, or null if non-existant.
Retrieves the UFPS inventory of the player in the current level, or null if non-existant.
Retrieves the UFPS respawner of the player in the current level, or null if non-existant.
Retrieves the UFPS body animator of the player in the current level, or null if non-existant.
Retrieves the UFPS ragdoll handler of the player in the current level, or null if non-existant.
Retrieves the UFPS foot fx handler of the player in the current level, or null if non-existant.
Many UFPS components communicate via a script called the PlayerEventHandler, which is a hub for all local player scripts. This object can be thought of as the nervous system of the player. The event handler decides which activities the player can engage in, and updates all the player's components when activities are being started and stopped.
All scripts that make up the player hierarchy can talk to the event handler - and it can talk to them - but the event handler knows absolutely nothing about what's going on in the connected scripts, and the scripts know little or nothing about each other.
But what's the point of all this secrecy?
Objects being unknown to eachother makes for a modular design which is more resistant to brutal changes and is easier to maintain long term. In early versions of UFPS, taking out the weapon switching logic or the camera system would be an arduous process, requiring many surgical procedures before the game would even compile.
In v1.4 a big step was taken towards complete future modularity (although some work remains). In this first version of the event system, difficulty has increased a little for some scripting tasks, while many tasks have gotten easier.
As an example, DemoScene3 uses the vp_PlayerInventory script. This means the player has limited ammo and weapons. Now, if you disable or even delete the PlayerInventory component at runtime, the game will keep running - the player will just suddenly have unlimited ammo and weapons because it no longer understands the concept of "items being limited". The hooks for the inventory system still exist in the player event handler - but no inventory is plugged in anymore.
This makes it easy for you to write your own custom inventory system. As long as it talks properly to the event handler you can code it pretty much how you like, ideally without changing a single line of code in any other FP component (such as the weapon or shooter).
The event system is designed, above all, for speed. It utilizes core C# engine features for very fast runtime execution, and typically does most of its work on startup, caching information about classes once for fast lookup should it ever need the info again.
|
|
|
Using a fast event system can be crucial on mobile platforms where the regular Unity event system is sometimes too slow. |
An event is usually fired as a result of the player pressing or releasing a button. This will activate one of the events declared in vp_FPPlayerEventHandler.cs.
All the methods that are registered as listening to that particular event will then execute. This might be methods all around the code base. It might be zero methods, or an unlimited amount of methods.
Methods that listen to an event always have a listener prefix, such as "OnStart_". For example:
void OnStart_Attack()
This method name tells you the method will automatically be registered as listening to the Attack event when the application starts up, and will execute every time a line of code (anywhere) succeds in calling:
Player.Attack.TryStart();
|
|
|
TIP: To learn more about the various event types, open the vp_FPPlayerEventHandler script and mouse-over on the event types (e.g. vp_Message) for usage info. |
|
|
|
TIP: For an example of input related gameflow using events, see Activity example flows. |
To find all the places where an event is sent you can do Find All References on the event in your IDE. If this is not available, you can search the project for the event name preceded by a dot ( . ) For example:
.Reload
To find all the methods that listen to an event, search the project for its name preceded by an underscore ( _ ). For example:
_Reload
Let's say we want to create an event that prints a string to the Unity console. We don't want the string to be printed by the calling object - instead it should be sent to a target "printer object" - via the event handler.
Now, to work with the event system you will typically engage in five different kinds of tasks:
Open the vp_FPPlayerEventHandler.cs script and add a new event declaration:
public vp_Message<string> PrintSomething;
Since our scripts are MonoBehaviours, we need to give them access to the event handler. This is done by adding the below code to both scripts. This will fetch the player event handler object located on the root transform on startup.
vp_FPPlayerEventHandler m_Player;
void Awake()
{
m_Player = transform.GetComponent<vp_FPPlayerEventHandler>();
}
Our "Target" script will have some code to be run, and will need to register properly with the event handler (this is not needed for the sender).
The following code will register and unregister the MonoBehaviour with the event handler whenever the component is enabled or disabled, whenever its gameobject is activated or deactivated, and whenever the gameobject is destroyed. Paste the below code into the "Target" script.
protected virtual void OnEnable()
{
if (m_Player != null)
m_Player.Register(this);
}
protected virtual void OnDisable()
{
if (m_Player != null)
m_Player.Unregister(this);
}
Now it's time to add the actual implementation of the printing method. Add the following code to the "Target" script. This is what will be executed when the event is sent.
void OnMessage_PrintSomething(string s)
{
Print(s);
}
In the "Update" method of the "Source" script, add the following code:
if (Input.GetKeyUp(KeyCode.Return))
{
m_Player.PrintSomething.Send("Hello World!");
}
Now, start the game and press Enter. This should result in the string "Hello World" being printed to the console.
|
|
|
IMPORTANT: Notice that the above code doesn't do just "PrintSomething("Hello World")". Instead it uses the ".Send" before the parenthesis. This is because "PrintSomething" is not a method but an event of type "vp_Message", which is always invoked by its "Send" method. Remember this because it can be confusing at times, especially since different types of events have different invocation syntax. |
There are four general types of event with very varying scripting difficulty level. All types support a single generic parameter (or none). Some event types support generic return values. Some support an unlimited amount of registered methods. Others don't.
Listener prefix: OnMessage_
Invoker: Send
Multiple listeners per event: Yes
Return value: any type (optional)
The standard event type. Takes 0-1 generic arguments and optionally a generic return value. Messages are used for exposing script methods, allowing all scripts that are registered to the event handler to call them. The method name in the target script must have the prefix 'OnMessage_'. Call 'Send' on the event to invoke the method.
An unlimited number of callback methods with the 'OnMessage_' prefix can be added to the same event. For example: there might be 100 methods in 100 different scripts all added to the 'BombShake' event. Now, if a single script calls 'Player.BombShake.Send(1.0f)' every one of those methods will trigger with the argument '1.0f'. A method in a registered script will automatically be added to an event if its name has the prefix 'OnMessage_', followed by the event name. For example, search the project source code for 'OnMessage_BombShake'.
Listener prefix: OnAttempt_
Invoker: Try
Multiple listeners per event: No
Return value: bool
An attempt is a simpler form of a message, which supports 0-1 arguments of any type and always returns a bool. It is called using the word 'Try' instead of 'Send'. Its intended usage is for situations when gameplay code needs to ask permission, typically for player actions that may succeed or fail. This event type only supports a single listener (only one method in one script can be hooked up to an attempt).
For example: 'Player.SetWeaponByName.Try("Axe")' can be called to try and switch weapons. If the registered method doesn't think the player has an axe, it should return false. Otherwise, it should switch to the axe and return true. A method in a registered script will automatically be added to an event if its name has the prefix 'OnAttempt_', followed by the event name.
Listener prefix: OnValue_
Invokers: Get, Set
Multiple listeners per event: No
Return value: any type (for 'Get')
This event type exposes a C# property of a single registered script. The generic invocation fields, 'Get' and 'Set', expose their property counterparts. The property name in the target script must have the prefix 'OnValue_'. Use 'Get' and 'Set' to retrieve or assign the property via the event.
Values work basically just like the C# properties they expose. Either the "get" or the "set" accessor can be left out. A property without a set accessor is considered read-only. A property without a get accessor is considered write-only. A property with both accessors is read-write. A listener for a vp_Value looks a little bit different from a vp_Message or a vp_Attempt:
Vector2 InputMoveVector;
Vector2 OnValue_InputMoveVector
{
get
{
return m_MoveVector;
}
set
{
m_MoveVector = value;
}
}
Listener prefixes: CanStart_, CanStop_, OnStart_, OnStop_, OnFailStart_, OnFailStop
Invokers: TryStart, TryStop, Active, Start, Stop
Multiple listeners per event: Yes
Return value: bool (for 'TryStart' & 'TryStop')
|
|
|
TIP: For a quick intro on activities, you may first want to check out Activity example flows. |
vp_Activity is a very powerful event type encapsulating a set of common activity related game logics. It might look a little daunting at first glance, but it's well worth knowing inside out since it is the main workhorse in UFPS input logic.
vp_Activity was designed with the goal of drastically reducing the amount of scripting needed for dealing with complex FPS input scenarios. Using vp_Activity will remove the need for many special cases in the central input script. It handles things like event duration, trigger intervals, scheduled disabling, and most importantly keeping track of what the player can and can't do.
An activity may be active or inactive, and may trigger callbacks when it starts or stops. The activity is typically started or stopped by calling its 'TryStart' and 'TryStop' methods, in which case a list of conditions will determine whether the call succeeds. The activity may also be forced on or off using the 'Active' property or by calling the 'Start' and 'Stop' methods. An unlimited number of conditions and callback methods can be added to the start and stop delegates.
The method names in the target script are categorized into 'conditions' and 'callbacks'. When a 'TryStart' method is called, an unlimited amount of registered conditions for the event may trigger. All scripts that have registered a condition for the activity now have a say in whether the activity should be able to start. If a single script returns false, the activity will fail to start and return false, otherwise true. The same goes for the TryStop command.
New in v1.4.4: By adding an OnFailStart or OnFailStop callback to a script, you can automatically execute code when an activity fails to start or stop. This is useful in cases where you want to react to the result of TryStart or TryStop, but you don't want to modify the core script (for example vp_FPInput) by adding an if-statement to the function call.
New in v1.4.4: TryStart and TryStop each have an optional boolean argument: "startIfAllowed" and "stopIfAllowed". Setting this to false can be used to check whether an activity would start or stop without actually doing anything.
|
|
|
IMPORTANT: Keep in mind that the CanStart_ or CanStop_ callbacks will fire anyway, so to be certain of not executing anything, these should only contain conditionals and no other custom code. |
The vp_Activity event optionally supports a single generic argument which can be accessed over the event duration via the 'Argument' property. To learn more about activities in action, it is a good idea to study the various events declared in the vp_FPPlayerEventHandler.cs script.
Prevents player from restarting an activity too soon after stopping
Prevents player from aborting an activity too soon after starting
Automatically stops an activity after a set timespan
Returns the user-passed argument of this activity,
When set, starts or stops an activity and fires its start or stop callbacks (if any).
Starts an activity and fires its start callbacks (if any).
Stops an activity and fires its stop callbacks (if any).
Disallows an activity for 'duration' seconds.
The player event handler also has a feature which can bind activities to states. This is done using the method "BindStateToActivity", which can activate or deactivate a state when an activity with the same name is toggled. This is used quite heavily for the example "AdvancedPlayer" prefab, in conjunction with several component state blocking rules.
vp_Timer is a system for delaying (scheduling) methods with a time delay. Its design draws on experiences from several animation-, gui- and cinematic heavy game projects. The system supports arguments, delegates, repetition with intervals, infinite repetition and timer canceling. Timers are mostly created using the static method In.
|
|
|
vp_Timer takes a programmatic approach to timing as opposed to content based (as in using animation curves etc). Though you can animate things using vp_Timer, it is primarily a tool for timing things rather than an tool for animating them. |
vp_Timer.In executes a method after a certain delay in seconds. In its simplest form, it's called with a delay as the first argument and a target method as the second.
// --- EXAMPLE: execute 'SomeMethod' in one second
vp_Timer.In(1.0f, SomeMethod);
void SomeMethod()
{
// do something
}
|
|
|
You can start a timer that runs forever without executing anything by calling the vp_Timer.Start method. |
To repeat a timer, simply specify a number of iterations after your method name. This will repeat the method a number of times, separated by a timespan equal to the initial delay.
// --- EXAMPLE: execute 'SomeMethod' in one second,
// then repeat it
four times with one second inbetween
vp_Timer.In(1.0f, SomeMethod, 5);
vp_Timer.In(0, SomeMethod, 3, 1);
If you need the delay between iterations to be different from the initial delay, add the desired interval at the end.
// --- EXAMPLE: execute 'SomeMethod' in one second,
// then repeat it
four times with 0.2 seconds inbetween
vp_Timer.In(1.0f, SomeMethod, 5, 0.2f);
|
|
|
If you use iterations with a zero delay and do not specify an interval, the interval will also become zero and all iterations will happen simultaneously (this can actually be used as a short-hand alternative to a for-loop if you want to call a method many times in the same frame). |
To call a method with a single argument, first create a method of type void with a single parameter of type object. Then you may call the method with an argument of any type right after the method name. In the target method you must cast the object back into the destination type.
// --- EXAMPLE: call a method with a single argument
vp_Timer.In(1.0f, MethodWithSingleArgument, "Hello World!");
void MethodWithSingleArgument(object o)
{
// use the object directly by type casting it like this ...
MethodThatTakesAString((string)o);
// ... or store it as the target type before use like this
string s = (string)o;
print(s);
}
|
|
|
If you pass an integer as the third parameter, it will be interpreted as an argument only if there is a corresponding method that takes an object argument. If not, it will be interpreted as an interval. |
Multiple arguments can be sent to a method by passing them in the form of an object array. In this way you can transfer an unlimited amount of arguments of varying types.
--- EXAMPLE: call a method with multiple arguments
vp_Timer.In(1.0f, MethodWithMultipleArguments,
new object[] {"December", 31, 2012});
void MethodWithMultipleArguments(object o)
{
object[] arg = (object[])o; // 'unpack' object back into an array
print( "Month: " + (string)arg[0]
+ ", Day:" + (int)arg[1]
+ ", Year:" + (int)arg[2]);
}
A delegate is basically a pointer to a method. vp_Timer uses delegates to reference the methods you specify via the In method. But nothing prevents you from declaring a delegate right inside the In method. This is where delegates become very interesting. They provide the powerful option of wrapping blocks of code inside a timer without having to create a new method every time.
// --- EXAMPLE: print a console message in one second using a delegate
vp_Timer.In(1.0f, delegate() { print("Hello World!"); });
Delegates, too, can be passed arguments in exactly the same way as methods.
// --- EXAMPLE: inflict 'incomingDamage' points of damage after a delay
float incomingDamage = 242.0f;
// add a single object parameter inside the delegate's parenthesis
vp_Timer.In(1.0f, delegate(object o) // <--
{
InflictDamage((float)o);
}, incomingDamage); // <--
// pass the argument right after the delegate's closing bracket
Delegates can take multiple arguments in much the same way as methods.
// --- EXAMPLE: print the month, day and year variables after a delay
string month = "December";
int day = 31;
int year = 2012;
vp_Timer.In(1.0f, delegate(object o)
{
object[] arg = (object[])o; // 'unpack' object into an array
print( "Month: " + (string)arg[0]
+ ", Day:" + (int)arg[1]
+ ", Year:" + (int)arg[2]);
}, new object[] { month, day, year }); // <--
// pass the month, day and year variables as an object array right after the delegate's closing bracket
You can use the CancelAll method either to cancel all currently running timers, or only the ones scheduling a specific method. You can also cancel specific active timers using the vp_Timer.Handle.Cancel method (see the next chapter).
// --- EXAMPLE 1: cancel every running timer
vp_Timer.CancelAll();
// --- EXAMPLE 2: cancel every running timer that schedules 'SomeMethod'
vp_Timer.CancelAll("SomeMethod");
The vp_Timer.Start method can be used to run a timer for the sole purpose of measuring time (useful for e.g. stopwatches). It takes a mandatory vp_Timer.Handle (see the next chapter) as only input argument, has no callback method and will run practically forever. The timer handle can then be used to pause, resume and poll all sorts of info from the timer event
// --- EXAMPLE: start a timer that runs forever
private vp_Timer.Handle m_RaceTimer = new vp_Timer.Handle();
..
void BeginRace()
{
vp_Timer.Start(m_RaceTimer);
}
Timers are typically "fire-and-forget". They are very lightweight and can not be manipulated directly. The upside of this is that for most timers you don't have to do a lot of object creation (the downside, of course, being that you can't really access the timer tself).
vp_Timer.Handle objects are used to keep track of timers post-initiation. Timer handles expose a wide range of useful properties and methods. They are most commonly used to cancel a timer or to see if it's still active, but they also have many properties to analyze the state of a timer (for example, the editor uses them to display debug info).
Timer handles need to be created separately, then initialized by passing a vp_Timer.Handle object as the final argument to vp_Timer.In.
// --- EXAMPLE 1: execute 'SomeMethod' in 20 seconds,
// but cancel if user presses space
private vp_Timer.Handle Timer = new vp_Timer.Handle();
..
vp_Timer.In(20.0f, SomeMethod, Timer);
..
if(Input.GetKeyUp(KeyCode.Space))
Timer.Cancel();
// --- EXAMPLE 2: execute 5 iterations of 'SomeMethod',
// but cancel after 3 seconds
private vp_Timer.Handle Timer = new vp_Timer.Handle();
..
vp_Timer.In(0.0f, SomeMethod, 5, 1, Timer);
vp_Timer.In(3, delegate() { Timer.Cancel(); });
|
|
|
TIP: Placing the handle name on the next line of code can sometimes be good way of highlighting the fact that a timer has a handle associated with it. |
Timer handles allow you to cancel specific timers whenever you like. They can also be used to prevent scheduling a method multiple times simultaneously, or to cancel a running timer and restart it.
|
|
|
TIP: This is all great for GUI and input cases where users may be "spam-clicking" buttons or toggling quickly between screens, player states or weapons. Without this capability, any "toggling system" using timers may fall into very strange patterns of states flipping on and off. |
// --- EXAMPLE 1: cancel and restart a timer on each subsequent call
private vp_Timer.Handle Timer = new vp_Timer.Handle();
..
vp_Timer.In(0.4f, SomeMethod, Timer); // <--
// if 'Timer' is already active, it will be canceled and restarted
// --- EXAMPLE 2: prevent scheduling a timer until the
// timer handle we want to use is free (inactive)
private vp_Timer.Handle Timer = new vp_Timer.Handle();
..
if(!Timer.Active) // prevents restarting 'Timer' until it's done
vp_Timer.In(1.5f, SomeMethod, Timer);
Cancels the timer associated with this handle, if active. After a timer has been canceled, the timer handle still exists. You can poll it for (by now historical) data on the timer (for example its scheduled total duration) but some properties will be null and you can't make it execute again. You will sometimes want to check to see if the associated timer is still running using the Active property.
Executes the timer associated with this handle early, if active. This is useful if you have a scheduled an action that the player should be able to trigger early without canceling it (let's say the player shoots at a time bomb instead of disarming it).
A multitude of properties can also be accessed from a timer handle. See the comments in vp_Timer.cs for more info.
Compiling vp_Timer.cs with the DEBUG define will allow you to display debug info on all created timers in the Unity Inspector. This is very useful when debugging complex gameplay. Open the file 'vp_Timer.cs' and at the top of the file uncomment this line:
// --- EXAMPLE: run vp_Timer in debug mode
#define DEBUG // uncomment to display timers in the hierarchy
Press play in Unity and you should notice a new gameobject "Timers" in the Hierarchy upon the first timer initiated. Select this object and a "Timer" component will become available in the Inspector. Every active timer will be represented in this view as a box with the name of the method being called, its arguments, and optionally the id and callstack info of the function call. When a timer triggers, it will return to the object pool and disappear from view.
|
|
|
IMPORTANT: When done debugging, remember to comment out the DEBUG define again! vp_Timer feeds a lot more junk to the garbage collector in this mode. |
Shows the total amount of timer objects created during this session. This will be the same as the maximum number of timers ever having been active simultaneously.
This number represents the amount of timers that have been recycled and may be used for subsequent scheduling.
This number represents the amount of currently active timers.
Displays the Id of the call to vp_Timer.In or vp_Timer.Start that (re)activated this timer. This is an ever growing number, i.e. each Id of such call is unique.
Displays a stack trace (a list of the function calls that led up to the timer being initiated). This is very useful for debugging, especially if you are using lots of delegates and have no method name to go by.
|
|
|
TIP: If you really need to name delegates for debug purposes, schedule them using a string with a name of your choice as the argument. The nametag will be visible in the list between the parentheses of the delegate. |
Anti-Cheat Toolkit is a very powerful third-party product designed to detect the most commonly attempted cheats, and trigger code in response to cheating. UFPS has a light ACTk integration, adding basic support for Anti-Cheat Toolkit's ObscuredTypes to the UFPS remote player wizard, state and preset systems.
While no system can make a game 100% cheat resistant, Anti-Cheat Toolkit can aid you in making life a little bit more frustrating for typical cheaters, making it harder to hack your game with off-the shelf cheating programs.
|
|
|
TIP: Reading the ACTk readme is highly recommended to get a basic understanding of what the system does and doesn't do. |
While using most of ACTk's detectors is trivial, when implementing ObscuredTypes into an existing project full of prefabs, you should tread lightly to avoid loss of prefab data. The following is a guide on how things can be simplified within the UFPS framework.
|
|
|
KEEP IN MIND:
|
Implementing them has no gameplay functional consequences per se. They pretty much work like regular variables of the corresponding type (with a couple of minor exceptions).
The best stages of a project to switch to ObscuredTypes might be when you are just starting out, and / or when you don't expect to be updating UFPS again for the remainder of the project (likely best). If you however do need to make an UFPS update, see this tutorial for info on how to retain serialized ObscuredType values in prefabs.
All that said, when you have ObscuredTypes up and running it is very powerful and a surefire way to frustrate your cheaters!
|
|
|
PLEASE NOTE: This will revert the value to default in all prefabs using the particular script. This can not be avoided unless the script inherits from vp_Component (see the next tutorial for a list of such scripts). |
using CodeStage.AntiCheat.ObscuredTypes;
ObscuredFloat
ObscuredVector3
ObscuredVector2
ObscuredInt
ObscuredBool
ObscuredString
For example:
public float MaxHealth;
... becomes ...
public ObscuredFloat MaxHealth;
|
|
|
The following approach is only possible for UFPS scripts that are descendants of vp_Component AND that have a custom editor. This is true for:
vp_FPController vp_FPWeapon vp_FPWeaponShooter vp_FPWeaponMeleeAttack vp_FPCamera vp_FPInput vp_FPInputMobile vp_Weapon vp_WeaponShooter vp_Shooter vp_PlayerFootFXHandler |
using CodeStage.AntiCheat.ObscuredTypes;
|
|
|
TIP: For the UFPS multiplayer add-on, you don't need to use this approach for remote player prefabs, instead just do it for the local player prefab, and regenerate the remote player afterwards. |
This is to some extent dependent on your game design, but of course there are some no-brainers for most (especially multiplayer) game designs. Keep in mind that ObscuredTypes incur a performance hit, so don't necessarily go crazy with every variable in the game. The following scripts hold variables that you may want to harden for a typical (especially multiplayer) game.
|
vp_DamageHandler |
Health of players and breakable objects |
|
vp_Regenerator |
Regenerating player and object health |
|
vp_PlayerDamageHandler |
Falling damage |
|
vp_Shooter |
Most aspects of weapon firing |
|
vp_WeaponShooter |
Tap-firing rate |
|
vp_UnitBankInstance |
In-weapon ammo |
|
vp_FPController |
Lots of things governing general player motion |
|
vp_Controller |
Flying, jumping and gravity |
For more info on UFPS-ACTk integration for multiplayer, see the UFPS Photon Multiplayer Starter Kit manual.
|
|
|
This tutorial assumes you have made no other direct changes to the UFPS source code except changing variables to use ObscuredTypes, and that the UFPS Script directory folder structure has not changed in the new update. It doesn't cover all cases - it's just to show an overall approach. |
This can happen when a the Unity custom editor (likely of a script prefixed 'vp_FP') becomes confused that a type has changed. It might especially be spammed to the console when dragging a slider. It's not serious but of course very annoying. To remove the error:
(The ternary operator is the question mark '?' sometimes used in C# to shorten simple if-statements.)
For example, the following code:
float damage = (float)Mathf.Abs((float)(DeathOnFallImpactThreshold ? MaxHealth : MaxHealth * impact));
... must be unrolled into this:
float damage;
if (DeathOnFallImpactThreshold)
damage = MaxHealth;
else
damage = (MaxHealth * impact);
At time of writing, Vector4 is not supported by ACTk, and therefore the vp_FPCamera bob values can not be protected using ObscuredTypes.
In the UFPS multiplayer add-on (which uses Photon PUN), if you want to send an RPC with - or serialize - obscured values, you must first cast them to their regular type, like so:
(float)d.CurrentHealth
That's about it! The file Readme PDF in the root folder of the asset has detailed info on UFPS on the web and how to get in touch with us. Again, big thanks for buying this asset and good luck with your game! =)
|
© Opsive, All rights reserved. |
|


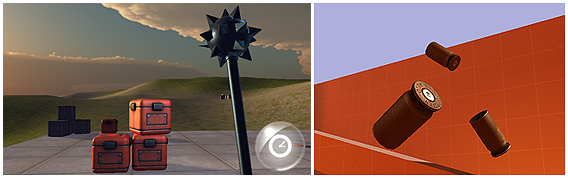
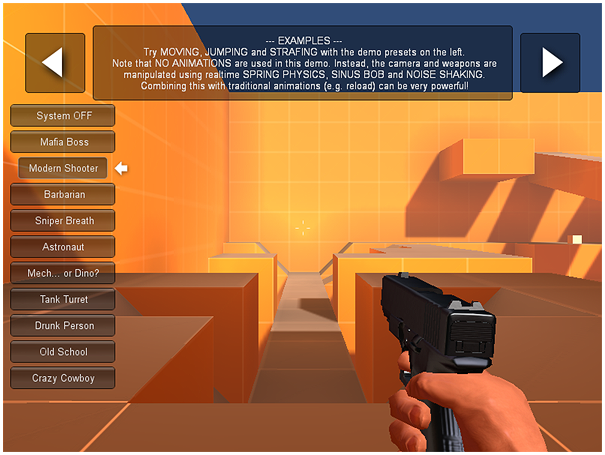
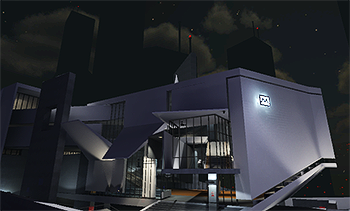
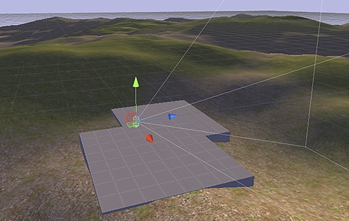
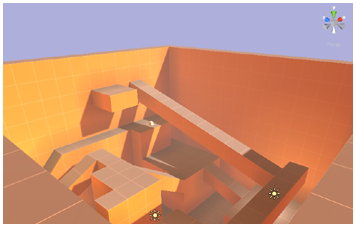
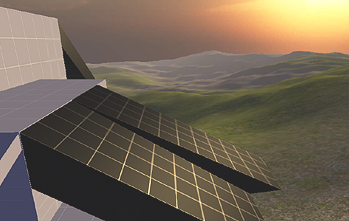
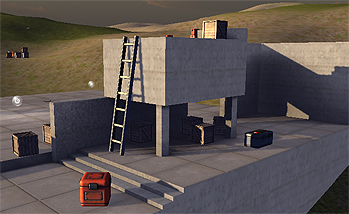
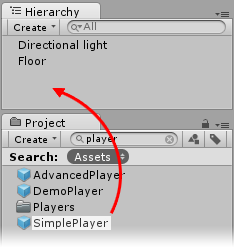


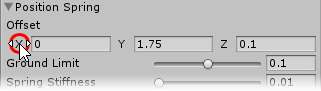
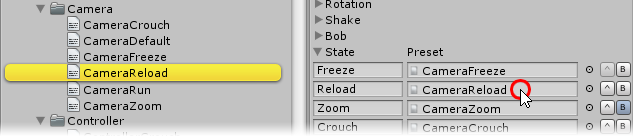


.png)
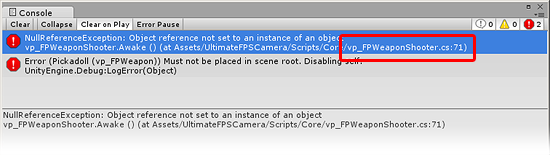
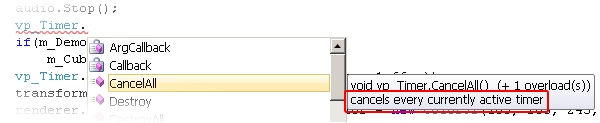
.png)
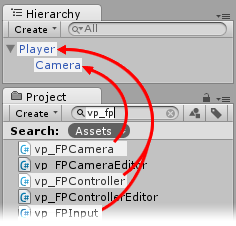

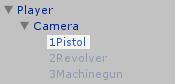


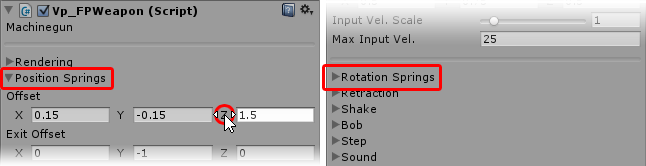
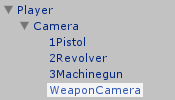
.png)
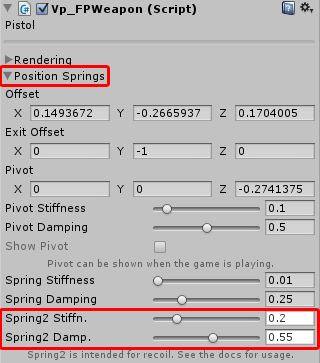
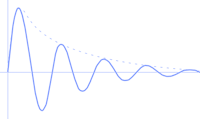
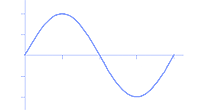
.png)
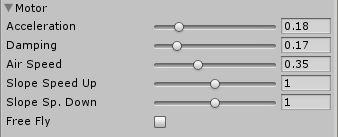
.png)
.png)
.png)
.png)
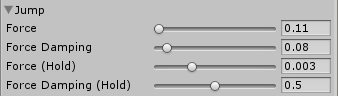
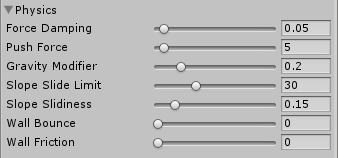
.png)
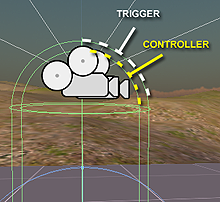
.png)
.png)
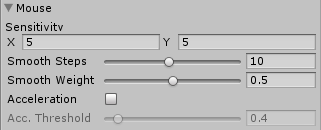

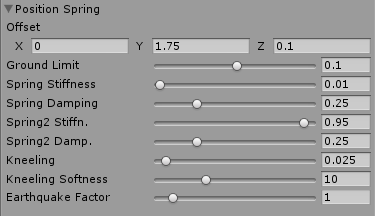
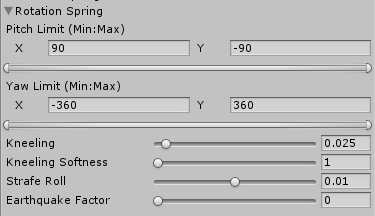
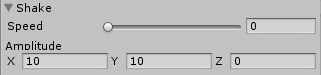
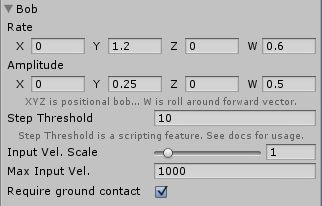
.png)
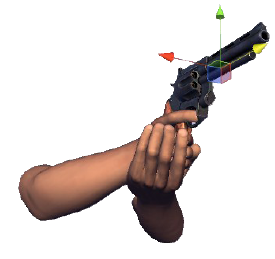
.png)
.png)
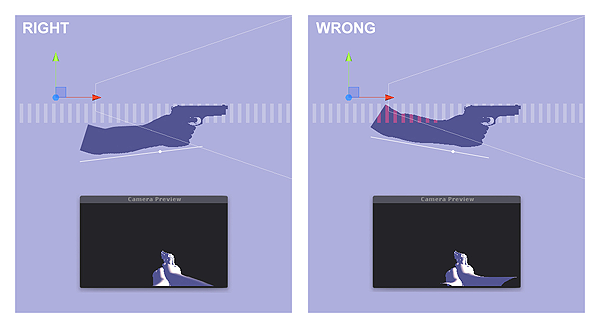
.png)
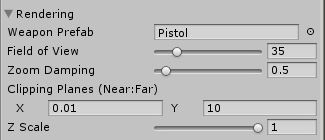
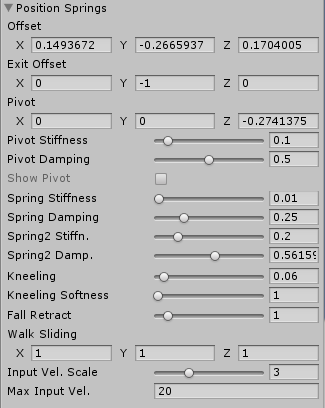
.png)
.png)
.png)
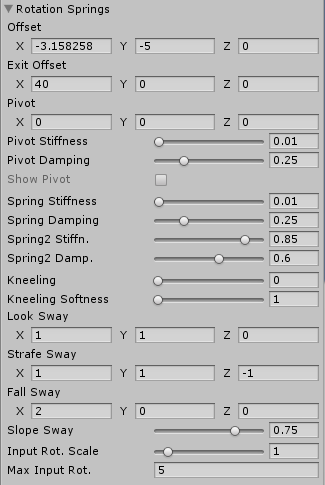
.png)
.png)
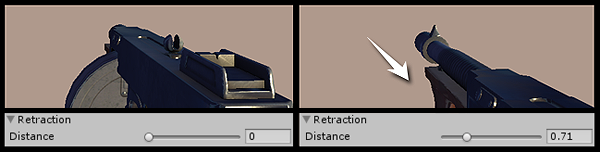
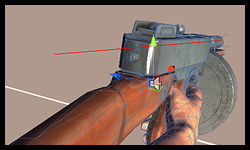
.png)
.png)
.png)


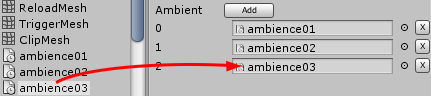
.png)
.png)
.png)
.png)
.png)
.png)
.png)
.png)
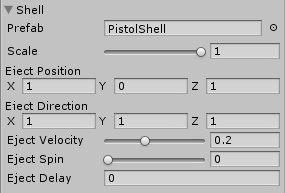
.png)
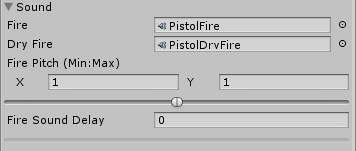

.png)
.png)
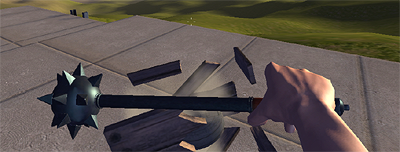

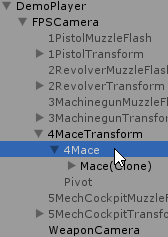
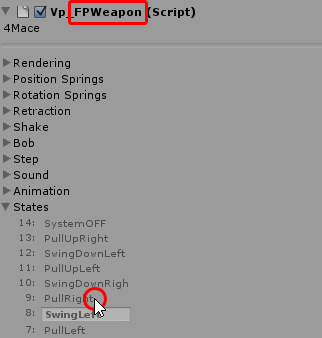
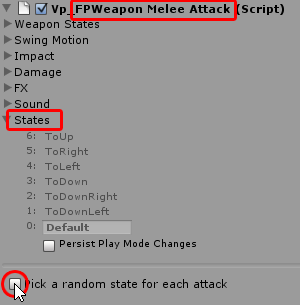
.png)
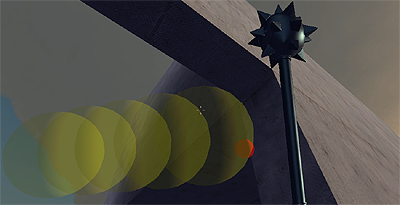
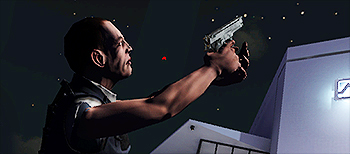

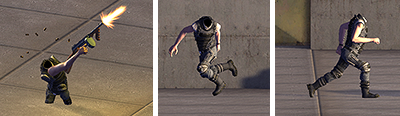

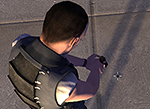
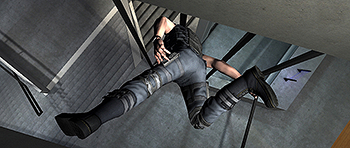
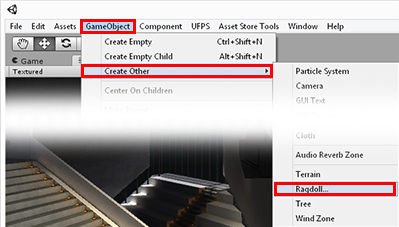
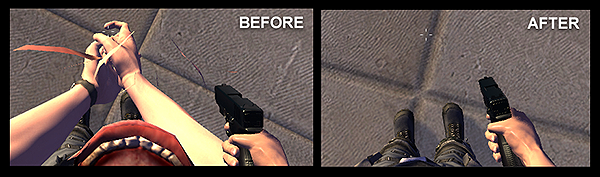
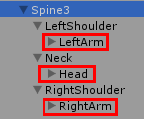
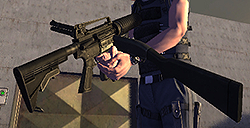
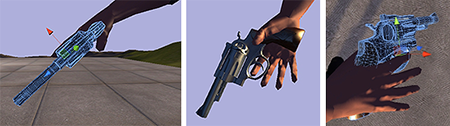

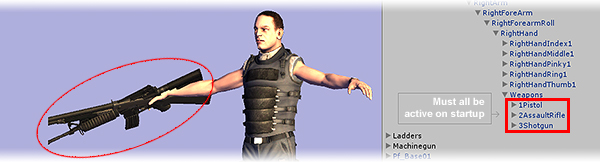
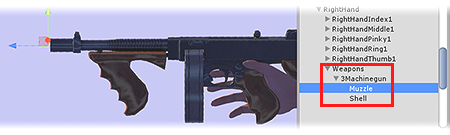
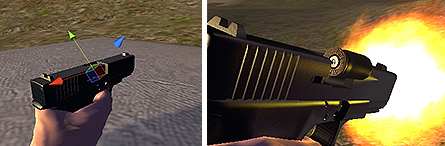
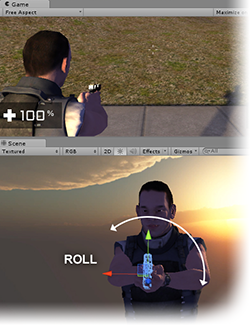
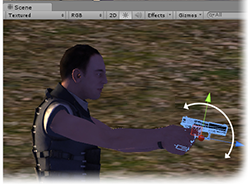
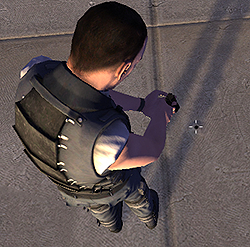
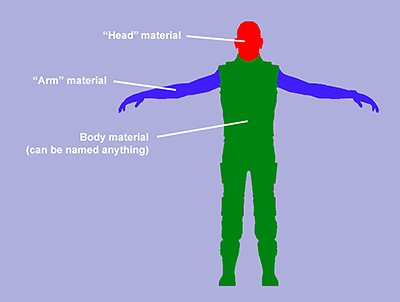
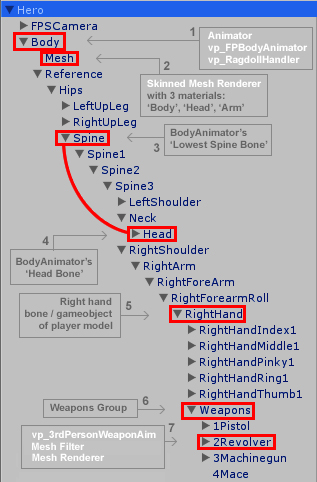
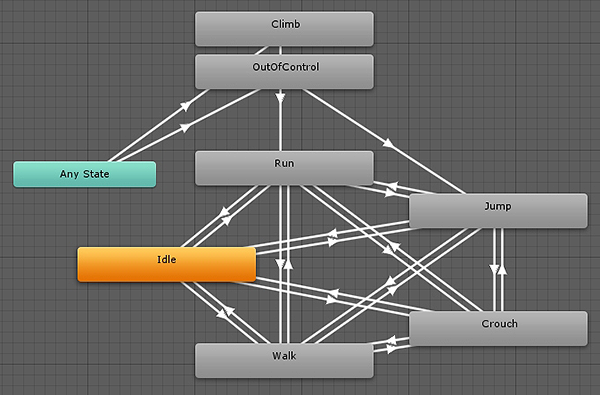
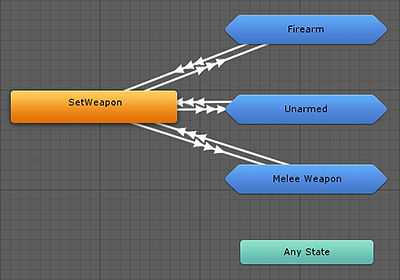
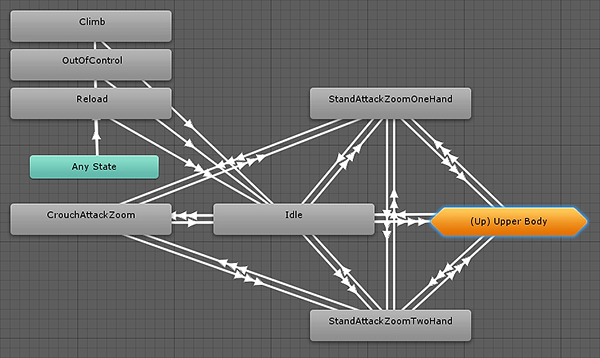
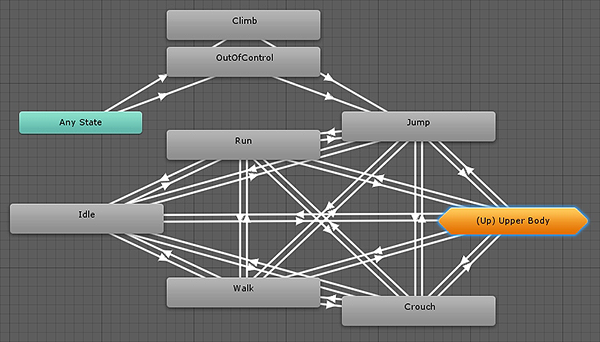
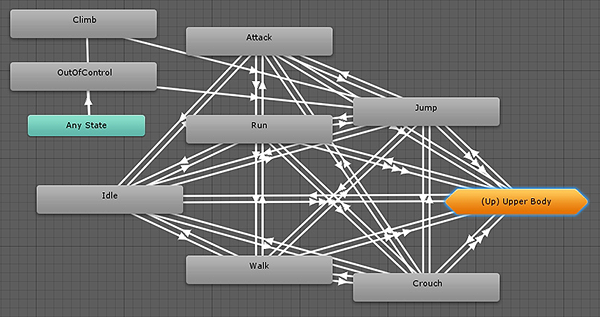

.png)
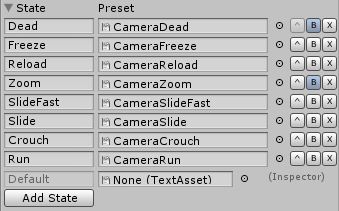
.png)

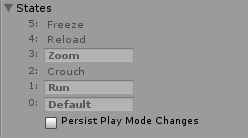
.png)


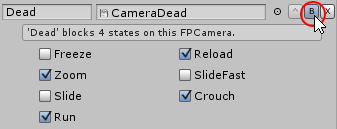


.png)


.png)
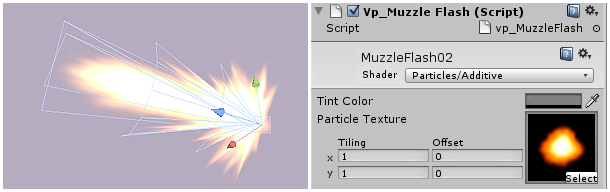
.png)
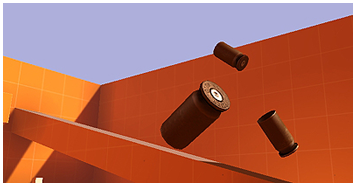
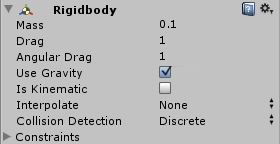

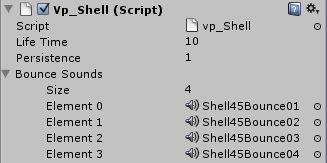
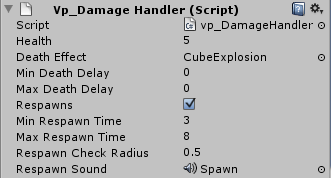
.png)
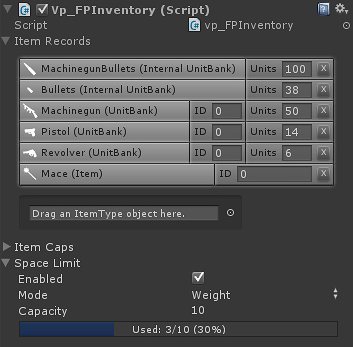
.png)
.png)
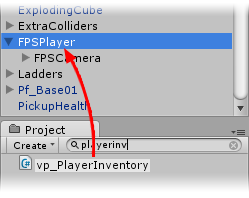
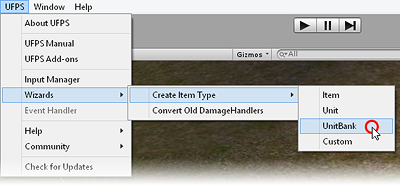
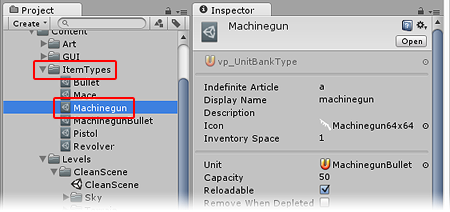
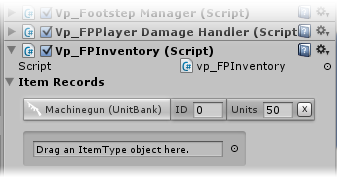
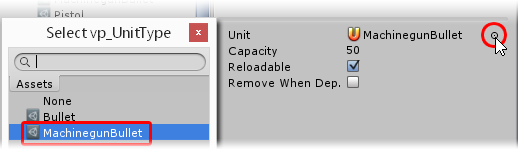
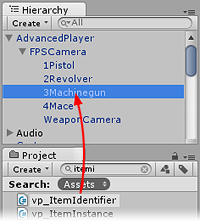
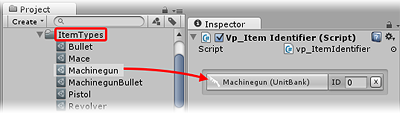
.png)

.png)
.png)
.png)
.png)
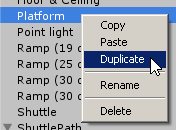
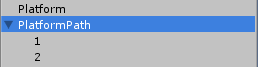
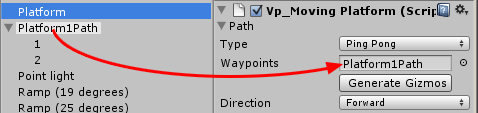
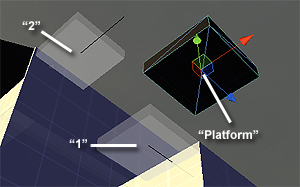
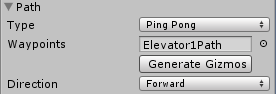
.png)


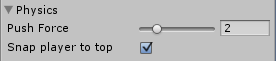
.png)
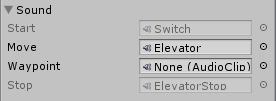
.png)
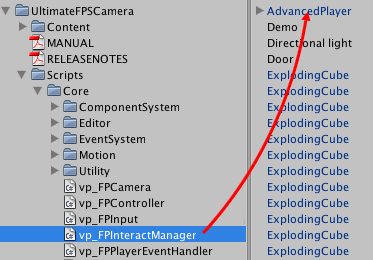

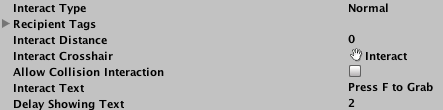
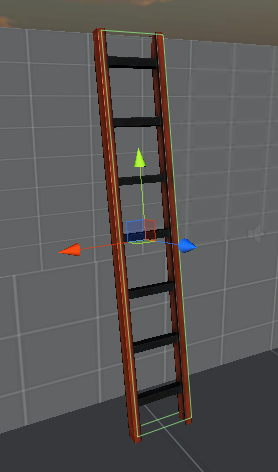
.png)
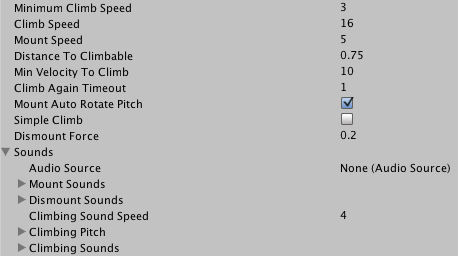
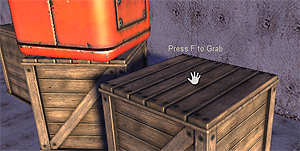
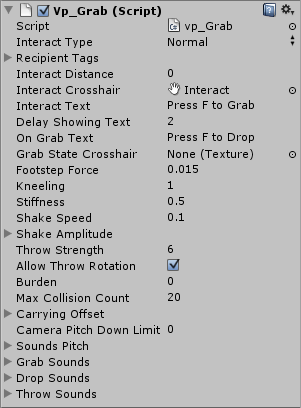
.png)
.png)
.png)


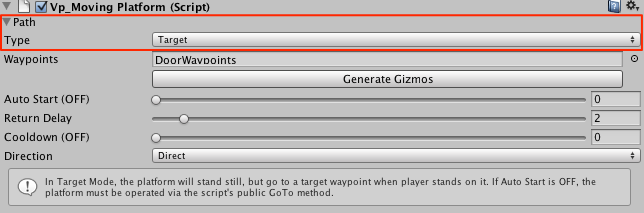
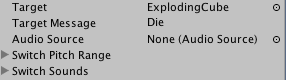
.png)
.png)
.png)
.png)
.png)
.png)
.png)
.png)
.png)
.png)
.png)
.png)
.png)
.png)
.png)
.png)
.png)
.png)
.png)
.png)
.png)
.png)
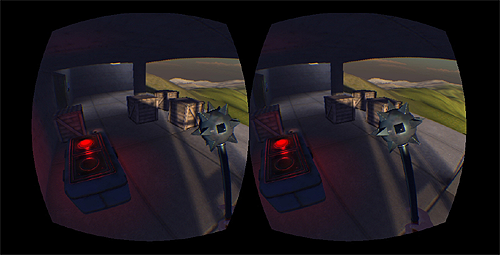
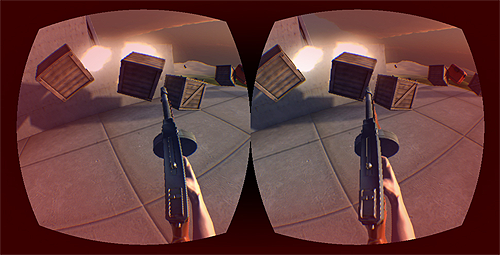
.png)
.png)
.png)
.png)
.png)
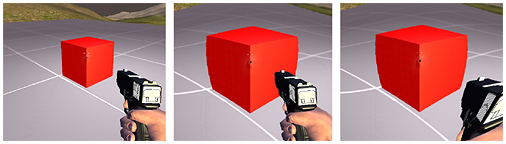
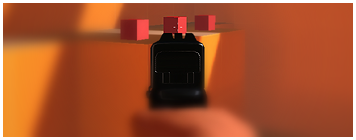
.png)
.png)
.png)
.png)
.png)
.png)
.png)
.png)
.png)
.png)
.png)
.png)
.png)
.png)
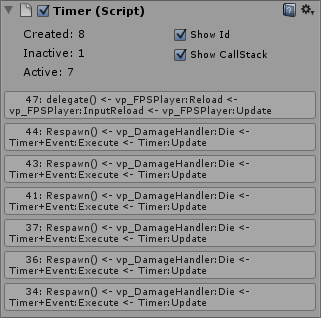
.png)